Landscaping
Learn essential techniques to create thriving urban landscapes that add beauty and value to your city.
This publication addresses the planting and establishment of urban trees. It is designed to help the urban forester, city horticulturist, city official, tree commission, and other concerned citizens invest money wisely when trying to improve their cities through environmental beautification.
The Problem
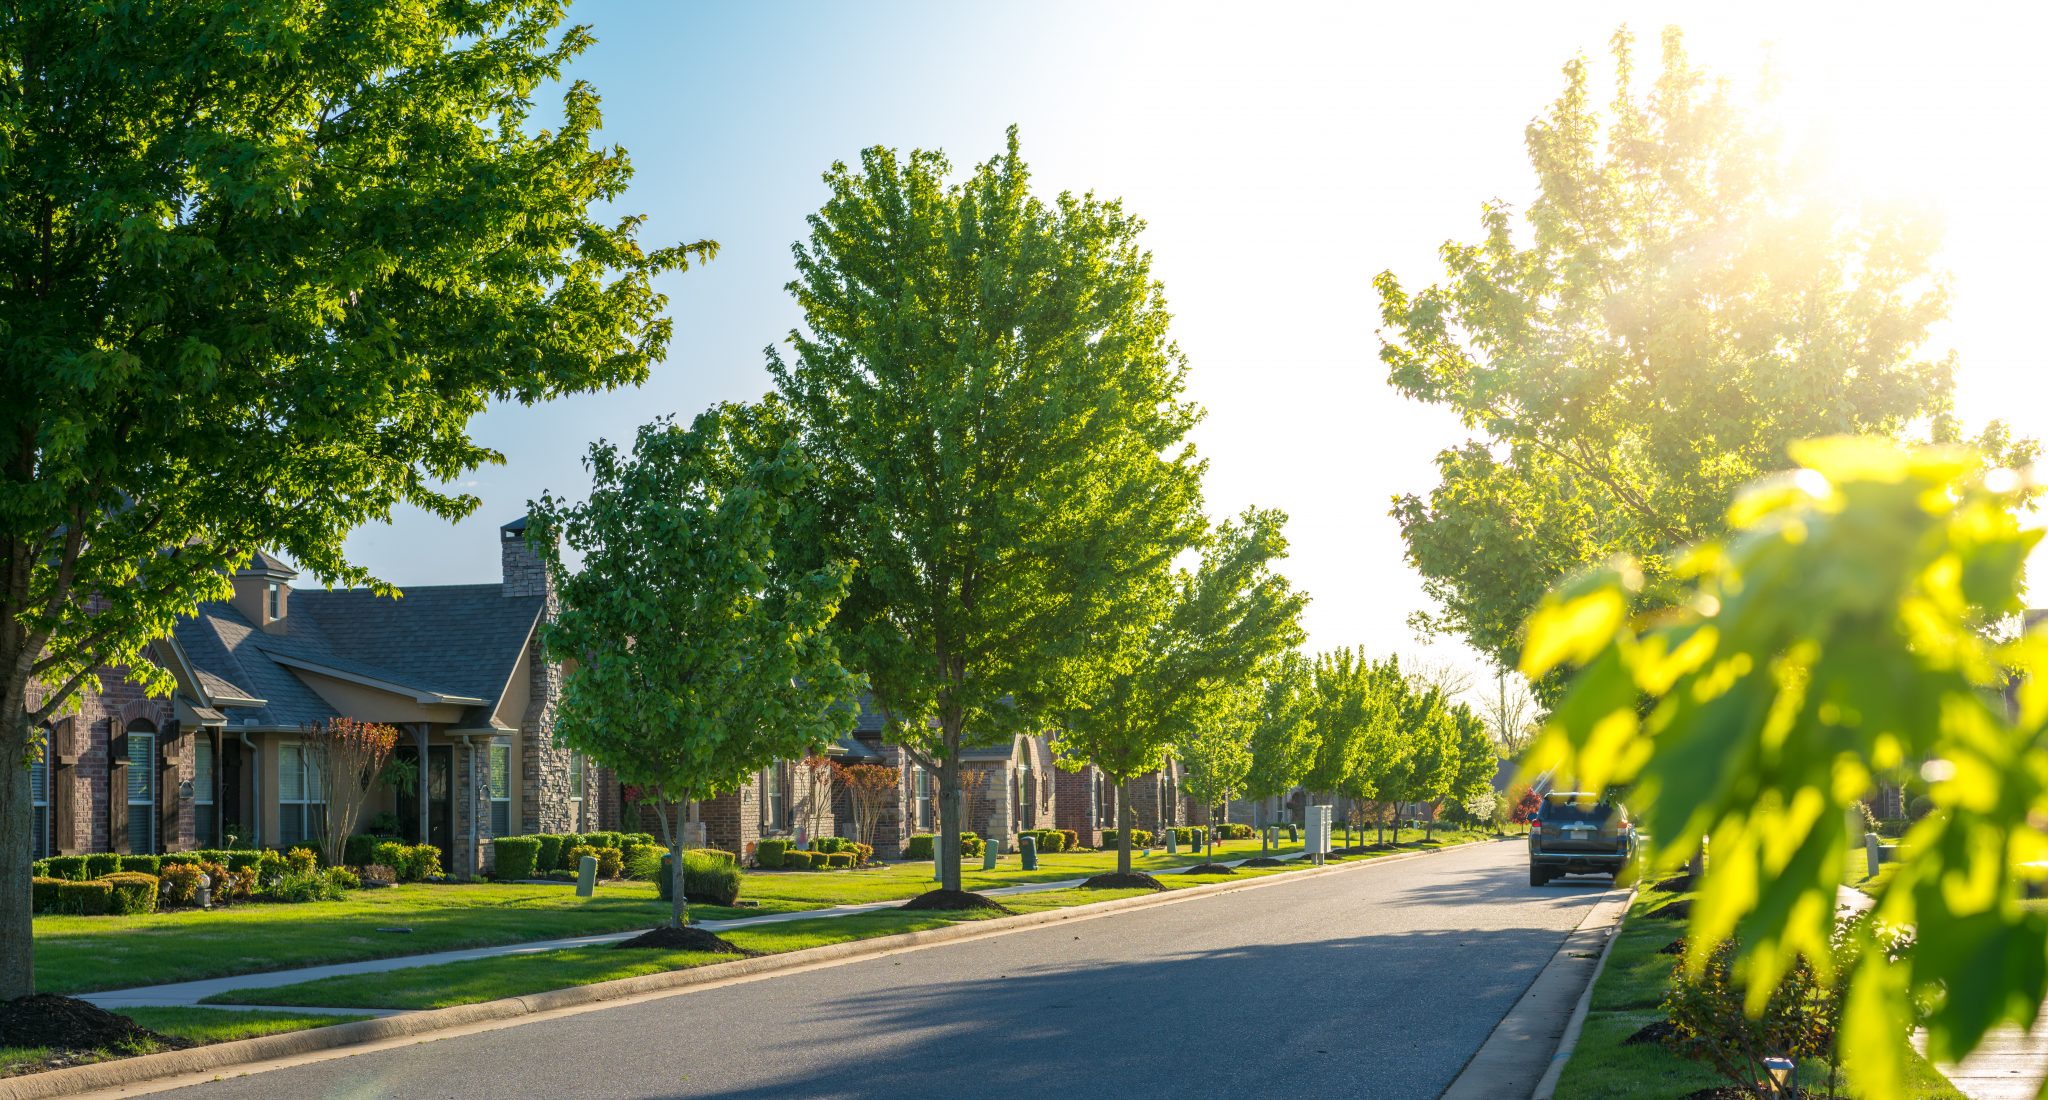
 When most of us envision the ideal city street, we dream of towering oaks and elms with massive outstretched branches providing dappled shade. We imagine sidewalks lined with flowering dogwoods, cherries, and crabapples. We think of people out walking, jogging, playing, relaxing, and enjoying the outdoors. Birds, squirrels, and other animals will also grace the natural scene. Unfortunately, for streets of most of our larger cities, reality is asphalt and concrete, pollution-stained buildings, smog, assorted trash, graffiti, and pigeon-stained benches and statues.
It is not often that you hear someone describe a wonderful experience of going to a downtown hotel and throwing open a window to let in the fresh air and spring fragrances. Usually, the curtains stay closed to block a less than desirable view. Surely we can improve these circumstances.
A few bright spots exist, but, regrettably, the best place to see our vision of beautiful city streets is on film. We can have those dreams, however. Our communities can be revitalized. But it takes planning and cooperation to create and maintain a livable environment as our cities expand. If planning is not done before the expansion, it is much harder and more expensive to go back and correct our mistakes.
When architects began contributing their twentieth-century artistry to our cities, they often did not have the knowledge, sensitivity, or budget to offer a comfortable, livable environment. Research was not available at the time to show the economic, psychological, and environmental advantages of blending nature with synthetic constructs. Proper landscape design and establishment techniques were unknown for providing the necessary environment for plant growth and development. The attitude at the time was that landscaping was nice, if funds were available for beautification. Public officials did not realize that landscaping and planting trees create an environment that is not only pleasing to inhabitants but is a necessity for creating and maintaining economic vitality and survival of the city’s economy.
City officials and budget watchers did not believe that psychological benefits were worthy of the necessary funding. When cities began to decline and urban research revealed the value of trees, city officials acted in good faith. With limited budgets and little knowledge of plant- growth requirements, communities tried to repair the problems. They chiseled out 4-foot squares of concrete and soil and planted trees. With good intentions, they planted dogwoods, oaks, ashes, and many other prized trees into the holes and stepped back and waited for their investments to mature. As we know, the vision became a nightmare as stunted, chlorotic, diseased trees struggled for survival in intolerable conditions.
The Solution
Properly planted and well-maintained trees are an investment in the future of our cities. If you provide people with a comfortable and safe place to live, eat, and shop, they will come and spend their money. This publication outlines the proper techniques for planting and establishing trees in an urban environment. It will help you and your community invest your time and money wisely in properly selected and planted trees.
The concept of Plant Health Care was introduced by the USDA Forest Service, National Arborist Association, and the International Society of Arboriculture. This concept approaches tree care from seed to old age decline. It encourages initial design considerations, preventive care, frequent monitoring, early detection of problems, and use of integrated treatments to provide long-term, stable solutions to urban tree health problems. We share our urban forests with plants and animals, and this program recommends management methods that are environmentally safe, cost-effective, and conscious of human needs. Although this publication focuses on planting and establishment, all aspects of plant health-care management should be achieved together.
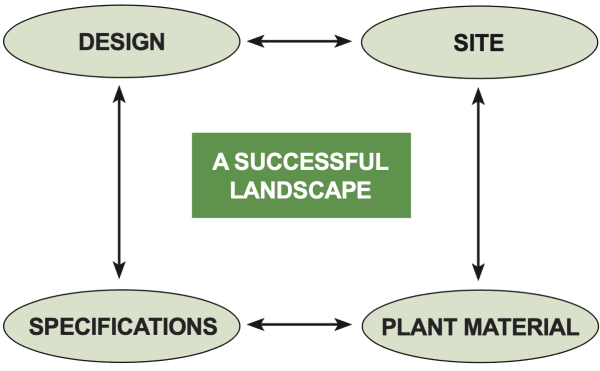 A successful tree-planting and establishment program must have the following:
- A good design
- Proper site evaluation and preparation
- Proper plant selection
- Proper installation and maintenance techniques
These requirements are all interrelated. If one step is not done right, it jeopardizes the whole project: The plant must be suited to the light exposure, drainage, soil chemistry, and other factors of the site; the design must consider the characteristics of the site and allow enough room for good root-system development; the preparation, installation, and maintenance must suit the needs of the plants, the design, and the site.
No planting situation is going to be perfect. Evaluate each factor and make few concessions to the “Optimum Planting Conditions.” Each compromise creates potential stresses on the plant. Individually, these stresses usually do not hinder growth and establishment, but successive compromises accumulate until plant establishment and growth are jeopardized.
The Design
Roots! Roots! Roots!
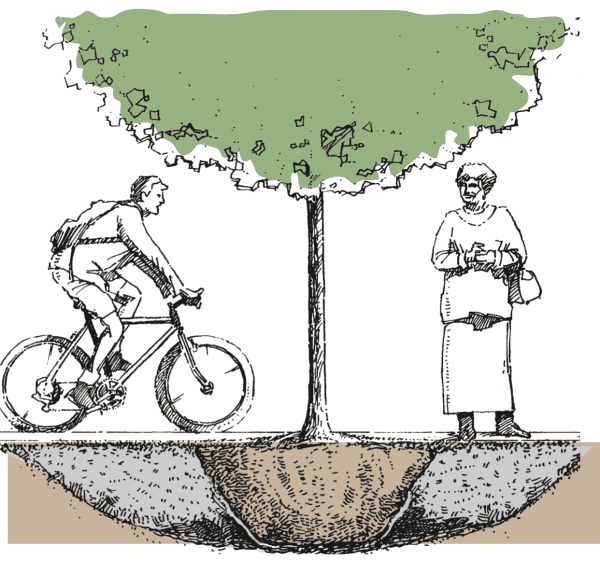
One of the biggest concerns for the design process is the provision of enough space for the roots of the tree to grow. The amount of space required depends primarily upon the tree’s size at maturity and its expected lifespan given the amount of stress to be endured by the tree. An old horticulture maxim is, “If you create a root zone environment in which the roots can thrive, the top of the plant will take care of itself.”
For each inch of diameter of a mature tree, allow 2 feet along the side of a square planting hole.
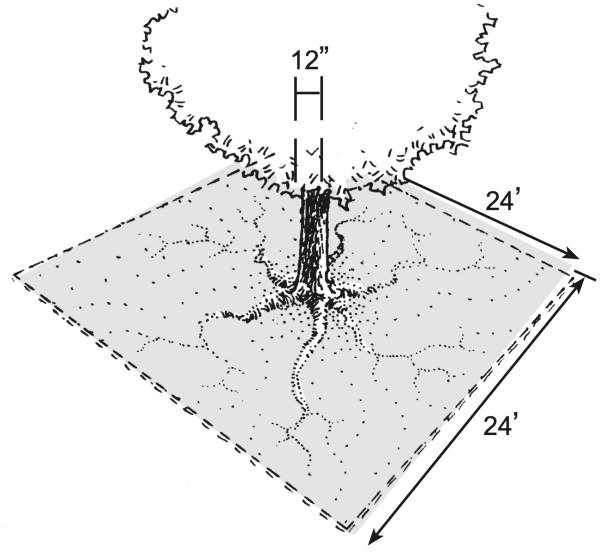
You want to create a design that will minimize root stresses. Some of these stresses may include soil compaction by pedestrians or cars, excessive heat reflecting off sidewalks or buildings, or an imbalance of water and air in the root zone. A good, quick rule of thumb for deciding the size of the planting area is to estimate the diameter of the tree at maturity. For each inch of diameter, allow 2 feet along the side of a square planting hole. For example, an oak that is 12 inches in diameter will need a protected root area of 24 feet on one side of the planting hole, or 576 square feet of rooting space.
What age should you use to determine the maturity of a tree? The greater the site stress levels, the shorter the life span of a tree. For city streets and downtown parking areas, estimate maturity at 7 years. Moderate-stress sites in residential street plantings or low-stress sites in residential yards or parks have more generous maturity estimates of 15 and 25 years, respectively. If a circular planting area is specified, determine the diameter of the planting area by estimating the tree diameter at maturity and multiplying this number by 2.25. (Example: If you estimate the ultimate desired diameter for a tree you have selected to be 12 inches, multiply 12 × 2.25 = 27 feet diameter required for a circular planting area, or 572 square feet root zone area.)
Porous pavers can be used to give the desired root zone area if space is limited.
Rejuvenation projects present special problems when finding proper space. Physical constraints in the area may limit options. Therefore, species selection is important, and you must take into consideration that the tree may have a shortened expected life span. However, new development projects call for cooperative planning and allocation of the proper amount of space needed by a tree.
A design feature that can provide an optimal growing environment for trees is the creation of continuous planting beds rather than individual planting holes for each tree. Join concrete spaces and provide walkways between the trees. Mulch the area with compost from the city’s maintenance and compost program. The result is an inexpensive and aesthetically pleasing way to provide some relief for restricted planting sites.
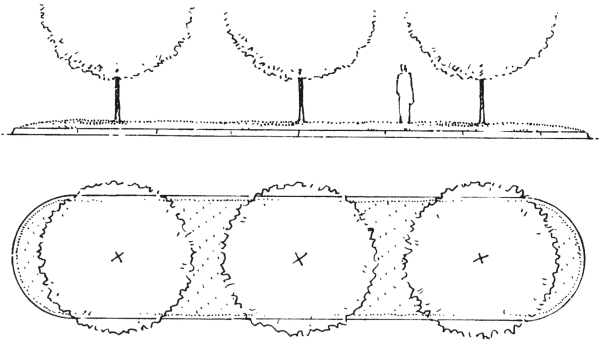
Continuous planting beds allow more root zone area and are aesthetically pleasing.
A good design considers possible drainage problems. If you pour water into a planting hole and it does not drain within 5 to 8 hours, corrective actions are required. Before taking any expensive corrective measures, dig the hole a few feet deeper to see if there is an impermeable pan restricting drainage. You cannot change the soil, but you can alter the site to minimize the impact of the soil’s poor physical characteristics. Drainage tile can be installed, subsoiling can be used to break up pans, or raised planters can be built. A combination of these measures, along with selection of a tree that tolerates a low oxygen root environment, will enhance establishment success.
Tree Selection
Tree selection for the site is very important to the success of the project. Consider each of the following factors:
- Soil type, pH, drainage, and volume
- Available light and canopy area
- Environmental extremes of temperature, pollution, and salt
- Potential aesthetic impact
Our best barometer for the success of a tree in a particular area is experience. Rejuvenation plantings are often very restrictive, and tree selection is crucial. Check with a local certified retail nursery dealer, your county Extension office, or state Urban Forestry office to get a list of trees that would be suitable for your area and planting conditions. A common mistake is to find one tree that has proven successful and to plant only that tree, creating a monoculture within our cities. This lack of diversity can be disastrous. A recent review of several of our cities’ street-tree inventories reveals that sometimes as much as 85 percent of a city’s street-tree canopy is composed of one species. The decline of the American elm is an example of what the cost of a monoculture can be to our cities. Encourage diversity and continuous experimentation so that we can expand the list of available trees for our cities. Experiment not only with new species but with tree cultivars within these species identified as having greater tolerance of particular urban soils. With proper design and space allocation, your menu of trees from which to select increases.
Tree Size
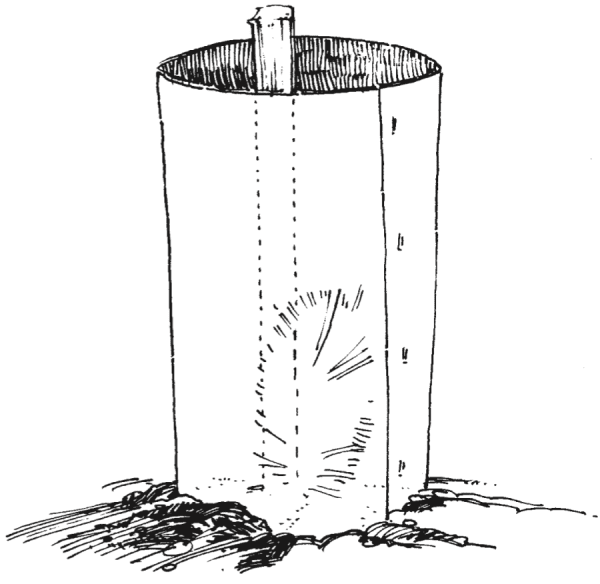
Seedlings in a tree shelter
It is better to invest in smaller trees and plant them properly than to spend your limited funds on large trees and not install and maintain them properly. Smaller trees are preferable for more reasons than money. Smaller trees are easier to transplant and establish and often outgrow larger transplanted trees within the first 2 to 3 years. Be careful not to select trees that are small enough to be subject to vandalism or mechanical injury. Trees with a trunk diameter of 1 1⁄2 to 3 inches are usually large enough to discourage vandalism and large enough to be easily seen by machinery operators. Smaller balled and burlapped trees establish more quickly than larger trees due to less root loss and subsequent stress experienced by larger trees. For mass plantings, research that is promising and ongoing is using seed or small seedlings with the protection of tree shelters for site plantings. Look for new research releases from the Horticulture Department and School of Forestry and Wildlife Sciences at Auburn University.
NOTE: If you are planting in the Black Belt region of Alabama, contact your county Extension office for suggestions for trees for this area. Your area presents special problems for urban trees and proper tree selection is imperative.
Be sure the trees you purchase are from a reputable nursery and consult the American Association of Nurserymen’s American Standard for Nursery Stock. Go to www.anla.org and click on “publications” to find the standards printed online. This publication outlines the minimum guidelines for acceptable root balls or container sizes for various classifications and sizes of trees, shrubs, bulbs, corms, tubers, and Christmas trees. Extremely valuable for any group involved in the purchase and installation of nursery stock, this publication can be purchased through the American Association of Nurserymen, 1250 I St., N.W., Suite 500, Washington DC 20005.
Trees are grown, harvested, and marketed in three forms: balled and burlapped (B&B), in containers, or bare root. There are new variations to these methods, such as bagged plants or plants grown in foam containers, but these three production and marketing methods comprise the majority of plants grown and sold in the United States. Each of these methods requires different handling for proper establishment.
Selecting and Inspecting B&B Plants
B&B trees are grown in a field and dug up during their dormant season (fall and winter). A portion of the roots and soil are packaged in burlap or synthetic material to hold the ball together and protect the roots until planting. When planting B&B trees, choose trees grown locally. Having the same soil type and climatic conditions provides roots with a familiar environment and lessens transplant shock. They are also more likely to thrive in local climatic conditions. Locally grown trees are not always available and are not crucial to successful establishment, but their use is a consideration. Balled and burlapped trees have a greater chance of establishment if they are dug 30 days before shipping, put back in the hole, and allowed to put out new roots and acclimatize. Request root-pruned plants. Before planting B&B trees, inspect the root ball to be sure that it
is firm. A broken ball means broken roots. Move the trunk of the tree to be sure it is stable and securely anchored by the roots. Also, inspect the trunk to see if ties have rubbed or girdled the bark. Wet, mushy root balls may indicate compaction and loss of soil structure and air space.
Planting and Inspecting Container Trees
Container plants are trees grown in a container with coarse organic soil or medium. Container trees are rapidly gaining popularity because you transplant 100 percent of the roots. B&B plants, when dug from the field, lose 85 to 95 percent of their roots in the digging process. Root loss creates some obvious stress on the tree. Because of their intact root balls, container trees can be planted year-round when provided with proper care.
Plants are grown in a container in pine bark or some other coarse organic medium. This allows for rapid, healthy growth in a container but can be a limiting factor to establishment in the landscape. The coarse texture of the container medium is very different from landscape soils. The surrounding soil’s attraction for the water is often far greater than the bark’s attraction for the water. If the surrounding soil is dry, water is drawn away from the container root ball. Therefore, it is very important that these plants, as well as the surrounding soil, be watered every 2 to 3 days, depending upon local climate and soil conditions, for the first 6 months. Once the roots have begun to grow into the surrounding soil, reduce watering to one or two times per week for the first year.
Inspect container plants by removing them from the container and inspecting the roots. Make sure roots look healthy and extend to the bottom of the container or fully use the available growing space. Be sure that the roots are not root bound or so matted that establishment will be a problem. If plants are root bound, do not score or cut down the side of the roots, as is often recommended. Because roots circle inside the container, scoring the sides of roots disconnects them from the plant. Physically rub the ball to expose the roots to the surrounding soil or pull out the lowest kinked root and try to straighten it or cut a portion of it off. Of course, the best idea is to avoid these types of plants. Containers that use air or copper to prune roots have been designed to help eliminate this problem.
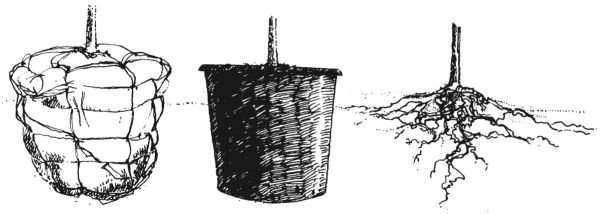
Purchase trees in balled and burlapped, containerized, or bare-root forms.
Selection and Handling Bare-Root Plants
Bare-root plants are dug from the field during dormant season with the soil removed from the roots. This offers an advantage of reduced cost in shipping and can be an acceptable planting method if precautions are taken. Roots are exposed and can easily dry out and die. When these plants are received they should be immediately unpacked and watered. Cover the roots with moist sawdust, compost, soil, or some other media (heeled-in) and place the plant in a shaded area or store it in a cooler until planting. These plants should be received and planted while still dormant or shifted to a container to allow for root growth.
Preparing the Site Fertilizer and Soil Amendments
When evaluating the site for the selection of trees and the design, it is important to take a soil test. Soil pH or essential element content can be a limiting factor to many trees. Since some of the required elements for plant growth such as calcium, phosphorus, and potassium move very slowly in the soil, it is much easier and more efficient to amend these soils prior to planting. Your county Extension agent can help you interpret your soil test results.
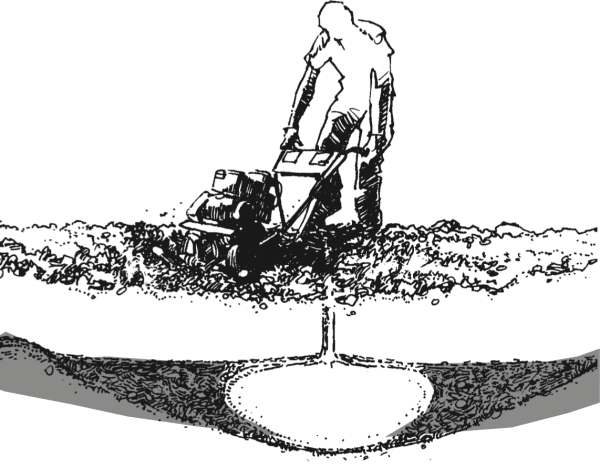
It is also good to provide organic matter to many of our urban soils. Till 4 to 6 inches of pine bark, or some other available organic compost, into the entire planting area to a depth of 6 to 12 inches (not to backfill). There is no benefit to just adding this material to the backfill in the planting hole, and this practice can be detrimental to establishment. A uniform planting area is needed for good root growth.
The Hole
The minimum-sized planting hole should be 2 1⁄2 times the diameter of the tree root ball and no deeper than the height of the root ball. The old recommendation of digging a deep hole and loosening soil beneath the root ball was made with good intentions. However, heavy root balls settle in the loose soil, resulting in a planting that is too deep. A tree that is planted too deep will have limited oxygen for root respiration and will develop stress. Research shows that most of a tree’s roots are in the upper 12 to 18 inches of soil and extend out two to three times the width of the canopy. So, provide a root environment that is wide and shallow. It is better to plant too high than too deep. If you want to loosen the soil to a greater depth, leave a firm pedestal for the root ball to rest on to prevent future settling.
Dig the edges of the hole at a 45-degree angle. After digging the planting hole, it is a good idea to make grooves in the sides and bottom of the hole. Many Alabama soils are high in clay and have a glazed appearance after digging, especially when using large mechanical tree spades. Glazed sides restrict the penetration of roots into the surrounding soil. These roots may never get out of the original hole to establish themselves in the native soil. This limits their nutrient and water resources and could lead to roots that circle the hole and eventually girdle the trunk. When planting trees dug by a mechanical tree spade, it is better to dig the planting hole with a backhoe and dig the desired wide, shallow hole rather than “plugging in” the tree to the same-size planting hole.
Planting the Trees
Proper tree planting and area preparation. The ball sits on undisturbed soil, planted no deeper than it was grown.
After the tree species and size have been selected, the site properly prepared, and the planting hole dug, you are ready to plant the tree. All plants brought to the site should be stored in a shady area, watered daily, and protected from drying winds and temperature extremes. Fine root hairs are very sensitive to physical and environmental damage. Damage to the roots cannot be seen immediately but will show up later in reduced growth and disease and insect problems.
B&B, as well as container-grown trees, should be carried by the root ball. Carrying trees by the trunk or rough handling of the root ball can damage the roots. Containers and synthetic burlap and all ties or tags should be removed or dropped into the bottom of the hole. Regular, untreated burlap (treated burlap is green) may be left on the root ball if none shows above the soil line. Burlap above the soil line will have a “wick effect,” drying the root ball.
Be sure that the tree is straight in the planting hole and the top of the root ball is even with or slightly above ground level. For bare root plants, spread roots out evenly in the hole. Do not wad or jam roots into the hole! Begin backfilling up to two-thirds the height of the root ball using the same soil that came out of the hole. Fill the remainder of the hole with water and allow the tree to settle. Add the rest of the soil. If you are planting in sandy soils or on slopes where infiltration is a problem, use remaining soil to make a 3- to 4-inch berm or raised area surrounding the root ball. Be sure the berm is well beyond the edge of the root ball so water will be directed to the right place. Do not pile soil around the base of the tree. If drainage is poor, a berm is not recommended as you would not want to direct any additional water to the hole.
Mulching
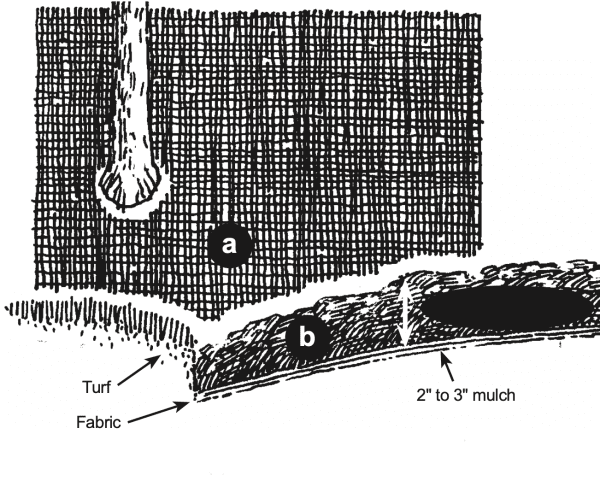
Proper use of (a) mulching cloth and (b) interface of turf and mulch
Mulching is essential to the successful growth of young trees. Mulch helps conserve and extend available water to the tree, reduces competition by suppressing weeds, moderates temperature extremes, and acts as a barrier or visible marker for damaging landscape maintenance equipment. Organic mulches support microbial activity important for tree establishment and growth.
Too much mulch can be harmful. Only 2 to 3 inches of pine straw or bark will be sufficient to provide weed control and moisture retention for the tree. Coarser mulches such as pine bark nuggets and pine straw do not support the growth of weeds as much as the finer compost materials. Herbicides can be used for additional weed control. Advances have been made in this area, and products are available that are safe for the plants and are nontoxic to our environment. Contact your county Extension agent for help in selecting the right herbicide for your planting needs.
A commonly used mulch is black plastic. Black plastic suppresses weeds, but it also limits water infiltration and gas exchange. Roots under this material are usually concentrated at the surface where oxygen is available. Additional mulch is required for aesthetics. This mulch is usually washed away or decays to expose ugly, weathered black plastic. Black plastic is not a good choice for mulch.
Fabric mulches are more effective than black plastic, but additional organic mulch is still required for aesthetics. This material can also be exposed and become an eyesore. Another drawback is that weed seeds can blow into the mulch, germinate, and grow through the fabric. Despite its limitations, fabric mulches are alternatives and provide initially better weed control than organic mulches by themselves. Each situation will need to be evaluated on the basis of economics and available labor. Extend the mulched area 2 to 3 times the diameter of the planting hole to encourage root growth into the surrounding soils.
Staking and Guying

Proper guying
Staking and guying of trees is only necessary in windy locations, in areas of heavy traffic, or in situations where the tree will not stand up by itself (this should not happen if proper tree selection is made). Be sure to use a nonabrasive material such as flexible hose or nylon stockings to prevent rubbing and girdling of the tree. Never use wire even if protective foam or other guards are used. Staking is designed to prevent the tree from blowing over in high winds—not to restrict movement of the trunk. Any staking should allow flexing of the trunk. This flexing contributes to proper taper development and strength of the trunk. Any stakes that are close to the root-ball area should be driven through the root ball and into the native soil for good support. One or two growing seasons should be sufficient for getting the tree established so that the ties can be removed, with the possible exception of extremely large trees (greater than 8-inch diameter). Be sure that these ties are removed!
Tree Wraps
Tree wraps, used for protection against sunscald on thin- barked trees, are rarely needed in Alabama. Wraps are sometimes used on fruit trees or pecan trees but rarely on ornamental shade trees. Some of the materials can cause more damage than help. Moisture accumulates behind the wraps and often creates optimum conditions for insects and diseases. New products are becoming available that are treated with pesticides to prevent this problem should wraps ever be required.
Root-Zone Protection
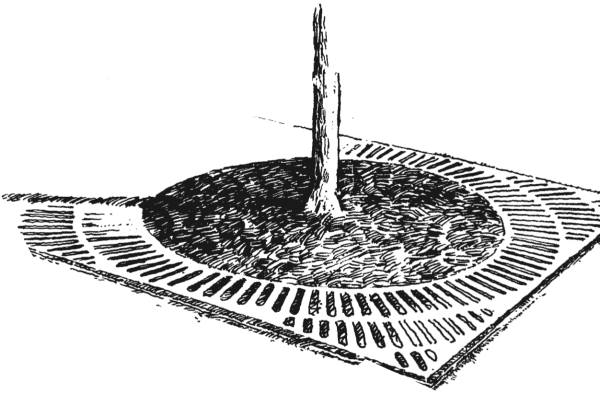
One method of root-zone protection
If possible, develop a 6-foot-diameter sod-free buffer zone around the tree to protect the tree’s root zone from foot traffic and competition and to protect the tree’s trunk from injury. Use open paving stones instead of solid concrete or asphalt to allow water penetration and gas exchange. If traffic and compaction are going to be a problem, divert traffic through the use of landscape plantings or barriers, or use raised planters or elevated grating to protect the root zone.
Maintenance
Once the tree is planted, a maintenance program should be implemented to monitor water, insects, and disease. Water is crucial during the first and second growing seasons. Irrigation should be part of the initial planning. Drip irrigation is the preferred system. Neither water trucks nor dragging hoses provide the regular watering that trees require. The expense is partially offset with reduced labor, increased survival, growth, and establishment.
Fertilizer
Fertilizer is not required for the first year if the soil has been properly prepared and fertilized as indicated by the soil test. The normal recommendation for fertilizing shade trees for maximum growth in an unrestricted area is 2 to 4 pounds of nitrogen per 1,000 square feet.
This is usually applied in a split application in January and again in mid- to late June. However, in a street-tree environment, with a tree under stress and with a limited exposed root zone, dumping this amount of nitrogen in a 4 × 4 foot area could be disastrous. Fertilizer rates must be reduced to fit the size of the exposed area. Make more frequent applications or use slow-release fertilizers. This is also true for sandy soils where nitrogen leaches readily from the soil.
A method that is not recommended here is to apply 1⁄4 to 1⁄2 pound of nitrogen per inch diameter at breast height. This method is rarely applicable for the urban setting with restricted, exposed root zone areas. Do not use this method for fertilization. If slow-release forms of nitrogen are used, up to 6 pounds of nitrogen could be applied per 1,000 square feet. To prevent damage to turf areas, never apply more than 3 pounds of actual soluble nitrogen per 1,000 square feet.
Proper Pruning
Proper pruning will be an integral part of any successful urban forestry program. Without some form of help, trees seldom develop growth patterns that complement urban forest uses. Wide crotch angles, which provide strength, and strong central leaders are not normally the result of nature. For pruning to be beneficial, it must be done at the proper time of year and with a specific purpose in mind. For initial planting and establishment, all pruning and shaping should have been done at the nursery. But if pruning is required, wait until after the first season. Research indicates that pruning inhibits root growth. The first season’s priority is establishment. Maintenance pruning will be required on a regular 3- to 5-year cycle and should be planned for from the beginning.
Major pruning cuts should be performed from December to March in Alabama. Earlier pruning may initiate undesirable growth and later pruning may cause the tree to bleed severely (this is not necessarily detrimental to the tree). Injury to the tree, safety reasons, or pruning schedules may force you to prune at other times of the year. The risks and benefits of pruning out of season must be weighed and compared before a decision is made. Small pruning cuts (1- to 1 1⁄2-inch diameter) can be made during any time of the year. Crossover branches, dead or dying limbs, water sprouts, and double leaders should be removed immediately to reduce possible injury to the tree. This is the only kind of pruning that should be performed at the time of establishment.
Excessive pruning stimulates suckers and water sprouts, which cause more pruning the following year. After the first year’s growth, further training cuts can be made. Ideally, trees should be trained with strong central leaders and wide crotch angles in the 10 o’clock or 2 o’clock position. The importance of establishing a strong growth habit cannot be overemphasized. Untrained trees may seem beautiful and full when young but may develop severe hazards and be predisposed to injury as they mature.
When pruning, the position and sequence of cuts are extremely important for larger limbs. Before making any removal cut, you should locate the branch bark ridge and branch collar. This will be the position of the final cut. Move up the limb approximately 6 inches and make a cut upwards one-fourth the diameter of the limb. Move an inch or so beyond this cut and cut down through the limb. This should leave a 7-inch stub. The final cut should be from the outer edge of the branch bark ridge through to the outer edge of the branch collar. Make the cut as smooth as possible. Pruning paint or sealer is not beneficial or recommended.
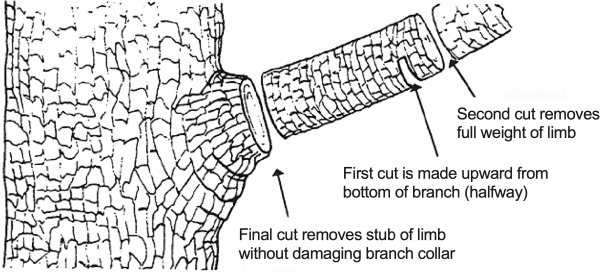
First cut is made upward from bottom of branch (halfway)
Second cut removes full weight of limb
Final cut removes stub of limb without damaging branch collar
Remember the importance of pruning in your urban forestry program and be sure to practice it correctly. In review, the steps to successfully establishing street trees are as follows:
1. Evaluate the site, including consultation with the city engineer, create a design, select the species for the site, and plan the follow-up care.
2. Create the proper environment for the plantings, select high-quality plants, implement the design, and plant no more than can be maintained properly. The guidance of an experienced professional may be needed and may prove cost-effective.
3. If restoring or creating a pleasant, thriving, economically sound urban environment is one of your city’s goals, planting of trees and proper planting and maintenance of the urban landscape is not a frivolous beautification project. It is a necessity, and it requires the same planning and budgeting as sidewalks, lighting, buildings, and other city structures. Trees are a high-priority investment. Plan wisely, select carefully, and maintain your trees. The value will increase.
 David H. West, County Extension Coordinator and Adjunct Assistant Professor, School of Forestry and Wildlife Sciences. Originally written by Ken Tilt, former Extension Horticulturist and Professor Emeritus; Dave Williams, former Extension Horticulturist and Professor Emeritus; and Harry Ponder, Professor Emeritus, Horticulture, all with Auburn University.
Revised January 2022, Street Trees: Site Selection, Planting, and Maintenance, ANR–0814