Landscaping

Learn eight steps to ensure healthy and thriving plants—from analyzing the site and choosing the right plants to mulching and watering. Included are
an irrigation schedule geared to the size of tree trunks and tips for pruning and staking.
Successful establishment of woody landscape plants involves a balance of soil, air, and soil moisture.
- Take advantage of dormancy and the rainy season. Plant in fall or winter.
- Analyze the site. Place plants based on mature size.
- Match the right plant to its best-suited environment.
- Prepare the site. Healthy soil grows healthy plants.
- Plant correctly. Consider the type of stock, planting hole depth and width, and mulch.
- Water properly and every day for several weeks.
- Stake and prune if needed.
Success from the Start
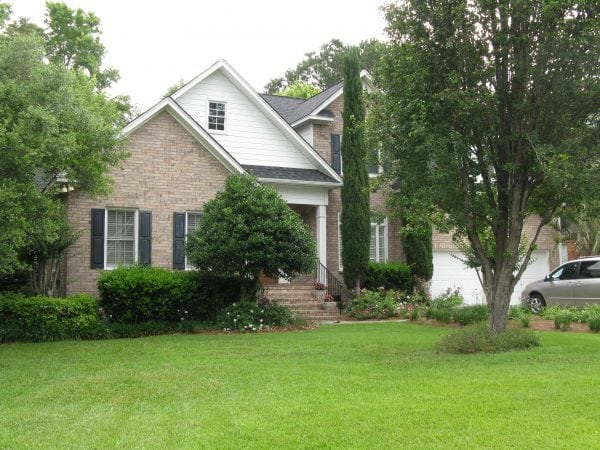
Several plants are too big for the area where planted.
Several preliminary steps can help ensure healthy, thriving plants, but the most important step involves the soil—healthy roots need a mix of soil, air, moisture, and nutrients. If this part is done right, other mistakes may still allow for a healthy plant. But if you neglect the soil, other steps done correctly cannot remedy a weak root system. Unhealthy roots lead to unhealthy plants.
Fall and winter planting is a simple, yet often ignored, technique to increase successful establishment. Water is critical for any new planting and is easier to manage in the cool fall and rainy winter seasons. Because trees and shrubs are dormant in this season, they need less water than they need in the growing seasons.
To grow plants that thrive instead of just survive, follow these eight steps to success.
Step 1. Analyze the Site
Site analysis matches the plants suited for the light, wind exposure, available growing space, and soil conditions that exist on site. A good rule to follow is Don’t fight the site. In other words, choose the right plant for the site you have.
If you choose an azalea, but the site has poorly drained soil, the azalea will likely die unless you improve the drainage. Build a berm or raised bed to position the plant above the poorly drained soil.
Plant location is also defined by the space available for plant growth. Avoid planting a large growing tree directly under a utility line. Do not plant large growing shrubs 3 feet apart or 2 feet from your home’s foundation. Plants with plenty of space grow better and have fewer pest problems.
A soil test and report complete the site analysis and guide you to make needed adjustments in soil pH and fertility. Soil pH is important to growing healthy plants and plant roots. The Auburn University Soil, Forage & Water Testing Laboratory offers an inexpensive soil test. See www.aces.edu/soiltest.
The AU Soil, Forage & Water Testing Laboratory has online calculators to help you determine the right amount of fertilizer based on your soil test results. See www.aces.edu/soiltest. Choose Calculators.
Step 2. Choose the Right Plant
Closely related to site analysis is plant choice. Plant requirements can differ widely among species, and it is wise to spend time researching the needs of the plants. Choosing the right plant minimizes future problems and maintenance requirements. Once well-chosen plants are established, most require little supplemental water, fertilizer, or pesticide.
If you choose high-maintenance plants that require regular, supplemental watering, pest management, and other maintenance considerations, at least you know their needs ahead of time. It’s wise to limit these finicky plants to select areas you are willing and able to maintain.
If you want to grow hybrid tea roses, you should know in advance that they require specially prepared, deep, well-drained soil. Hybrid tea roses also need supplemental irrigation, regular pest management, and frequent pruning. Know your plants and match them to your expected gardening activities.
Seek additional information beyond what is provided on the plant tag. A plant tag may indicate full sun, but that plant may perform quite well, and possibly better, with partial shade when grown in a hot Alabama summer. Another tag may indicate that the plant needs moist soils, but your soil may have periods of excessive moisture. You need to know if the plant can withstand only occasional or frequently flooded soils.
Step 3. Prepare the Site
Soil preparation may involve adding additional topsoil if the existing topsoil is poor or nonexistent. When mixing organic matter into a planting, imagine the full area that the plant’s roots will eventually occupy. If altering the upper soil layer, add the soil test recommended nutrients (fertilizers) or pH adjustment (dolomitic lime) or if both, add at the same time.
It is never a good idea to dig individual holes and backfill with organic matter or with another soil having a contrasting texture or water-holding capacity compared to the native soil. Either way, it is difficult to regulate and maintain the correct mix of air and water when one isolated area (the planting hole) has sharply different soil from the surrounding native soil type.
If the soil you have is poorly drained, adding organic matter to an individual planting hole causes water to move in easily, but it then drains out of the planting hole very slowly. On the other hand, if the soil has good clay content and drains well, the isolated organic material dries out faster than the surrounding native soil.
Adding organic matter increases the water- and nutrient- holding capacity if your soil is very sandy or sandy loam. Always use well-composted organic matter and add to a broad area. It is not necessary to be exact. Adding organic amendments to any expanse of poor soil is better than none. Using 2 to 4 inches of compost tilled into the upper 6 to 8 inches of soil is ideal.
Step 4. Plant Properly
Trees and shrubs can be bought as container grown, field dug, or bare root. Each type of plant stock is handled and planted differently. Regardless of the plant type, it is always best to dig shallow and wide planting holes and to plant at the proper depth.
Horticulturists agree that it is better to plant too high than too deep. As a guide, the topmost lateral root should be slightly above or level with the original soil grade. Pulling loose soil above the exposed lateral roots prevents drying out but allows for sufficient moisture and oxygen. See “A well-made planting hole” illustration.
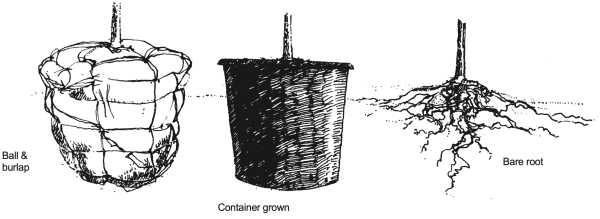
Bare-root plants should be carefully handled, keeping the roots moist before planting. Dig the planting hole just deep enough to accommodate the roots. Create a mound in the middle, set the plant at the top, and spread out the roots. Gradually backfill with loosened native soil. Water the soil as you add the backfill to get good soil-to-root contact. Firm up, but do not pack, the soil around the root system. Bare-root transplants require close attention to water needs because the root system is often very small; many roots are potentially lost in the digging and shipping process. Because the plants are normally small, however, they often establish quickly and perform well with fall planting.
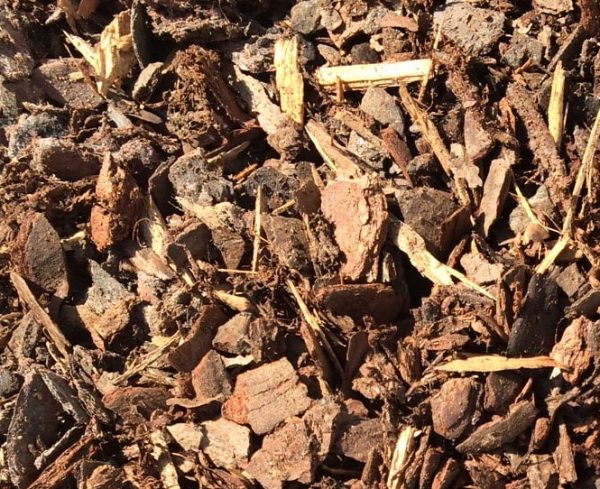
Pine bark soil conditioner
Container-grown plants have the advantage of larger, intact root systems but present other concerns. Most container-plant nurseries use a soilless media comprised mostly of pine bark or similar organic matter. This provides a good environment for root growth while in the containers, but it is not a good environment when isolated in the new planting hole. Before removing plants from the container, water them thoroughly. After allowing time for water absorption, remove plants from the container and spread out the root system in one of two methods.
(1) Use a sharp knife and make 3 or 4 scoring cuts lengthwise and about 1⁄2 inch deep into the root ball. This type of root pruning cuts circling roots, stimulates root branching, and allows you to untangle and spread out thick root systems laterally.
(2) If the plant is not pot bound (excessive circling roots), simply wash the soilless media away from the root ball and plant the nearly bare-root plant as described above. Removing as much of the loose media as possible allows for better root to-soil contact and makes water management easier.
Field-dug plants are often referred to as B&B or balled-and-burlapped plants. The plants are much heavier than container-grown plants and may require specialized equipment for handling. Avoid damaging the trunk or limbs and never lift one by its trunk. If plants are not planted immediately after delivery, store them in a shady location where the root ball can be watered as needed. If it is winter and extreme cold is predicted, insulate the roots with a thick mound of mulch or a blanket to avoid freezing. Avoid storing B&B stock for more than a week.
Step 5. Size the Planting Hole (B&B Stock)
Locate the topmost lateral root by washing away just enough soil to expose it. Measure the root ball depth from the top lateral root. Prepare the planting site by digging a hole at least twice the width of the root ball to allow for rapid lateral root growth. Allow room for removing the wrapping or wire. The depth of the planting hole should be no deeper than the height of the root ball. If concerned about settling, dig the hole 2 to 4 inches less than the root ball height.
Once the root ball is in place, remove any rope, string, and wrapping. B&B plants are usually wrapped in burlap or maybe a synthetic burlap-like material. Remove as much of the material as possible after the plant is in the planting hole and before adding the backfill. Cut away the wrapping near the bottom of the root ball or peel it away from the root ball and leave it in the planting hole bottom.
Preparing the root ball for planting is an opportune time to remove circling roots that can girdle the plant trunk in the future. If such roots exist, cut them back near the trunk.
Larger B&B plants may have a wire basket to provide easier handling and security for the root ball. Leave the wire intact until the plant is placed in the planting hole. Once in place, either bend the top row of wires down into the hole or remove this top row entirely with bolt cutters. Although the wire basket weave has large spaces, the wire can interfere with the expansion of larger tree roots in later years.
When the plant is in the final position, backfill with the loosened native soil to half the planting depth and water thoroughly. Finish backfilling and water again. Firm up, but do not pack, the soil to remove air pockets and to help keep the loose soil from easily washing away. Avoid excess soil over the root ball at planting and only cover exposed roots. Deep planting kills trees.
Planting on sloping land may require you to build a small dike around the rooting area on the down slope side to slow the water flow and reduce runoff and soil erosion. This is less critical if you are using drip irrigation or some slow method of water delivery.
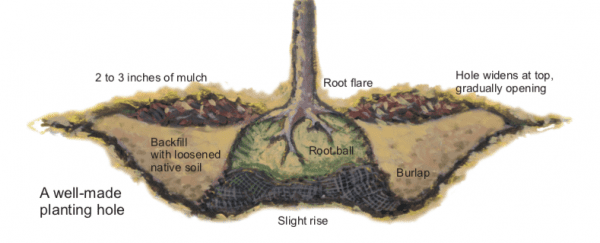
A well-made planting hole
Step 6. Create Mulch and Water Zone
Build a low (2 to 3 inches tall) circular berm of soil to hold water where it is needed and mulch the berm for stability. Just to the outside of the berm, add a 3-inch- deep surface layer of mulch in a circular size roughly 2 to 3 feet in diameter per each inch of trunk diameter (measure diameter at ground level). You can add a very thin layer of mulch over the root ball itself but do so for aesthetic purposes only. Deep mulch layers in this zone interfere with water moving to the vulnerable re-establishing root system. Remove the circular berm after 3 or 4 months.
Mulch rings are important for both the establishment period and long-term health of the tree or shrub. They provide a barrier between turf and trunk, reducing the chance of injury from a mower or string trimmer and an area of reduced plant competition (weeds and turf) for water and nutrients. The ideal mulched area should enlarge as the plant continues to spread and extend past the limb spread.
The shadiness underneath a tree is a poor environment for turf to grow, so a large, mulched area solves two problems.
Step 7. Water Properly
Current research shows that new transplants establish quickest with light and frequent irrigation.
Irrigate every day if transplanting in the warmer seasons and every other day if planting in the cooler seasons. Use 2 gallons of water per inch of trunk diameter. This regular schedule is important and should continue for several months. Avoid supplemental watering when the soil is saturated and use a watering method that allows all the water to soak into the newly planted root ball. Use a spade or trowel to investigate soil moisture.
If planted in a spring followed by a droughty summer, the water regime should start again the following spring as leaves appear. Continue this regime through the second summer.
If a tree trunk is 2 inches in diameter, water with 4 to 6 gallons each time you water. Two buckets punched with a few holes and placed on opposite sides work well, or find commercially available water bags. Irrigate daily for 1 month, then every other day for 3 months, and then weekly until established. Shift the watering zone away from the original root ball by 6 inches every 2 to 4 weeks.
When a plant survives having little or no supplemental irrigation, it is considered to be well established. The time for this to occur depends on several factors already discussed. In general, larger plants require more time—up to 16 months for a 2-inch diameter tree.
Table 1. Irrigation Schedule for Vigor or Survival
Chart used with permission from Edward F. Gilman, Professor, and Laura Sadowski, Information Specialist, Department of Environmental Horticulture, University of Florida, Institute of Food and Agricultural Sciences, Gainesville, FL 32611. IFAS publication ENG 1061, one of the Urban Forest Hurricane Recovery Program series of the School of Forest Resources and Conservation and the Environmental Horticulture Department, UF/IFAS Extension. Original publication date September 2007. Reviewed April 2014.
| Size of Nursery Stock | For Vigor | For Survival |
|---|---|---|
| Less than 2-inch caliper | Daily for 2 weeks; every other day for 2 months; weekly until established. | Twice weekly for 2 to 3 months |
| 2- to 4-inch caliper | Daily for 1 month; every other day for 3 months; weekly until established. | Twice weekly for 3 to 4 months |
| Greater than 4-inch caliper | Daily for 6 weeks; every other day for 5 months; weekly until established. | Twice weekly for 4 to 5 months |
Step 8. Stake and Prune if Needed
Stake a tree or larger shrub if necessary to keep the plant from toppling in the wind or to prevent excessive movement that can break newly forming roots. Small B&B plants (less than 1 1⁄2-inch trunk diameter near the base), trees, and shrubs don’t usually require staking. Deciduous plants started in the fall also need less support due to lower wind resistance. Fall transplants often root sufficiently and better withstand winds by the time new leaves are produced the following spring.
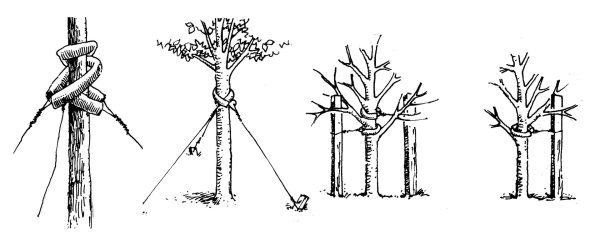
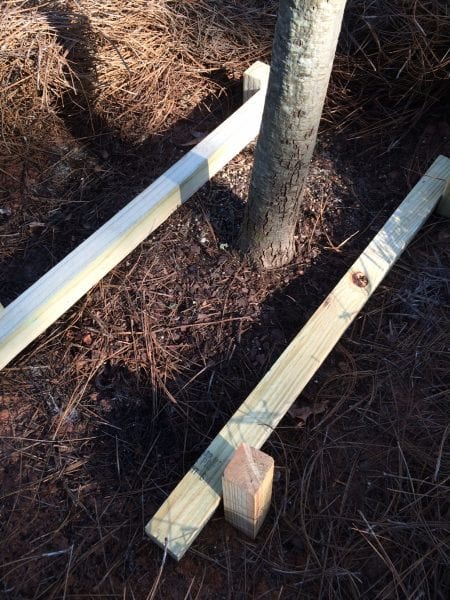 If a tree or shrub needs support, use flexible straps that allow slight movement of the trunk base. Small movements in the aboveground plant are beneficial, signaling plant development in the trunk, base, and roots. Attach the straps between one-third and halfway up the height of the plant. Various staking methods are pictured in this document. When only a little extra support is needed around B&B or container-grown plants, drive stakes into the ground at the edges of the root ball. Drive 2′′ × 2′′ stakes 12 to 24 inches below the root ball almost flush to the ground. Then connect the two stakes on each side with a 2′′ × 2′′ horizontal board, using wood screws to secure. Research has shown that this method works well for fall-planted deciduous B&B plants that are around 2 inches in trunk diameter. You might not need to remove the underground stakes; normal decay often eliminates them. Simply remove the horizontal aboveground supports after a year or so.
Pruning in the first year should be limited to removing broken or severely damaged branches. After establishment, you may follow up in the second year with corrective pruning of forked trunks, crossing branches, or thinning excess branches. For flowering or fruiting plants, specialized training and pruning are often required even earlier. Generally speaking, less pruning is better for the first year of establishment. Less branch pruning leads to faster establishment.
Large-growing woody plants, especially trees, are an investment. According to the American Forestry Association, trees have significant monetary benefits. Each year, a single tree provides $73 worth of air conditioning savings, $75 worth of erosion control, $75 worth of wildlife shelter, and $50 worth of air pollution reduction. Make smart choices with these investments for your home and property.
This publication is part of the Woody Landscape Plant series available on the Alabama Extension website at www.aces.edu.

 Revised by Kerry Smith, Outreach Programs Administrator, Home Grounds, Gardens, and Home Pests, Horticulture, Auburn University. Originally written by Tony Glover, former County Extension Coordinator; and Jennifer Derrow, former Undergraduate Student, Horticulture, both with Auburn University.
Reviewed April 2023, Planting & Establishing Woody Landscape Plants, ANR-0410