Fish & Water
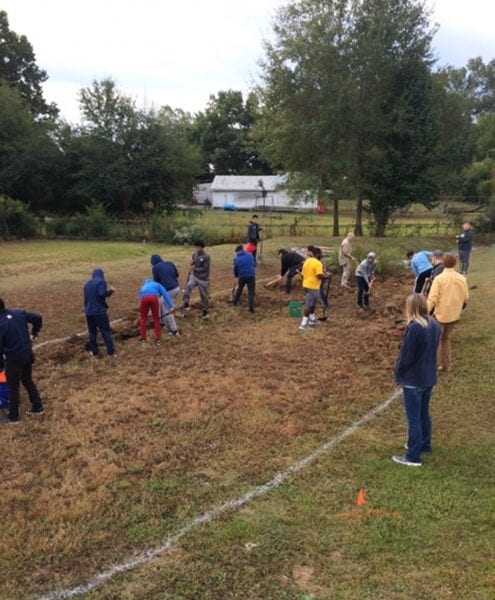
Figure 25. A clear visual outline helps volunteers identify where to dig. Note that utilities are also marked and flagged ahead of time.
Defining Rain Garden Boundaries
The first step is to outline (with string or spray paint) the parameter of your rain garden. This is also a good time to make sure that any utilities outlined from your 811 call are visibly marked.
Getting Water to the Rain Garden
Although your rain garden may be in a location near a downspout or downhill from a downspout, you may still need to do some work to make sure the water will be routed into your rain garden. Digging slight trenches or building artificial rock-lined swales can work.
Managing Water Overflow
Your rain garden should be able to manage the majority of the water falling on your impervious surface area, but it also needs an overflow plan for Alabama’s extreme rain events. This may include a notch or a pipe in the berm at least 2 inches lower than the berm. Berms should be built to have at least 2 inches of height above the elevation of the outlet.
Consider directing your overflow into the following:
- A flat area in your home landscape where water can be safely absorbed or directed to another rain garden
- A french drain or rock-filled soakage trench, a swale or drainage ditch, a storm drain, a street gutter, or pipes and catch basin that return stormwater to its original destination before the rain garden was built
Note: If you live in an urban area, first check with your local planning department to see if a permit is required for draining the overflow off-site.
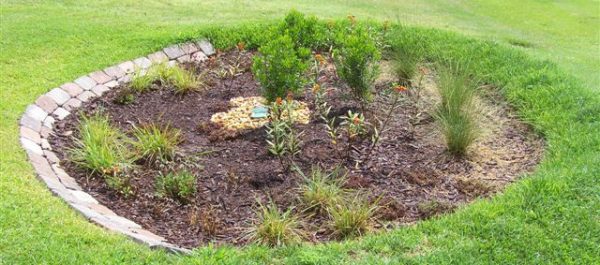
Figure 26. Can water get in and out without problems? Notice the berm on the right side.
Excavating, Grading, and Berms
Before excavating, create a level depressional area in your rain garden. Ideally, the rain garden will be level from side to side and end to end so the water infiltrates uniformly across the bottom of the rain garden. But if you have a slight center depression, that is okay too.
When excavating, set aside the topsoil (or top 4 to 6 inches of soil) for incorporation with other soils and soil-quality amendments. Excess soil excavated from deeper areas can be used to create a berm around the final receiving end of the rain garden. Try to minimize compaction of soils in the rain garden during the digging process.
Once the rain garden is excavated to the desired depth, work the sides of the bowl to create a gentle slope that connects the rain garden to the existing grade or ground level of the landscape.
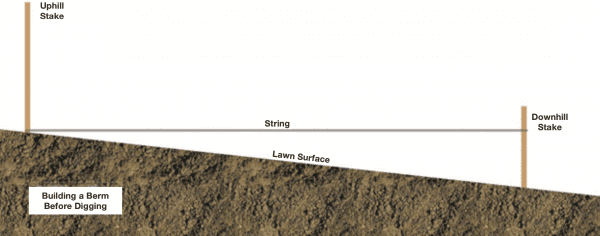
Figure 27. Before digging, tie a level rope to two stakes at the upper and lower ends of your rain garden.

Figure 28. After digging, use a measuring stick to measure how far down you have dug and try to keep your ground level. Use additional soil for berm construction.
Soil Preparation
Soil-quality amendments. Soil amendments may be necessary to improve the soil’s infiltration and plant nutrient supply. Lime or fertilizer may be recommended in soil test results. Finished compost (compost that has completely transformed into a dark-colored and earthy-smelling material) can enrich the soil, increase water retention, suppress plant diseases, and reduce the need for chemical fertilizer. Avoid using unfinished compost or chicken litter.
For every 100 square feet of a rain garden, a cubic yard or a 3-inch layer of soil texture amendments is recommended. Infiltration rates of 1.5 inches per hour or greater do not require any soil amendments to improve infiltration.
Compost can be spread before planting time in the spring or under mulch in the fall. You can buy bagged compost or make your own in your backyard. For more information on how to compost, read the “Alabama Smart Yards Handbook” or articles on composting from Alabama Extension.
Backfill. Use a rake, shovel, or rototiller to break up the topsoil that was set aside. This topsoil is mixed with soil amendments (if necessary) and placed back in the rain garden. Begin by mixing in 1 inch of soil amendments with topsoil to create a mix that is about 50/50 topsoil and amendments.
If topsoil is of poor quality on-site, reduce the amount of topsoil added to the amendments for rain garden backfill. Work this soil mixture back into the existing soil in the rain garden until approximately 2 to 3 inches have been added. At this point, the empty space should be equal to the desired ponding depth plus a mulch depth of 3 inches.
Mulch. A general rule is to add 0.5 cubic yards of mulch for every 50 square feet of rain garden. Small, tender perennial plants can be protected during mulch placement by placing containers over plants to ensure that the mulch layer does not unintentionally cover plants. Mulches will wash and float, but standard single- or double-shredded hardwood mulch that is well-aged is less likely to wash out easily.
Inlet. To prevent erosion at the inlet, a 1-foot-wide strip of gravel, rock, or concrete splash pad can be added to slow down and evenly disperse the flow of water into the rain garden. This is especially helpful when there are no gutters or a gutter extension cannot be incorporated. More rocks can always be added later if erosion occurs.
Berm. The berm is placed on the downhill side of the rain garden where the overflow exits. It should be mounded as high as the uphill grade of the rain garden. Native grasses or turfgrass sod can be grown (or repurposed) on the berm to provide cover and stabilize berm soil. A berm is not usually necessary when a rain garden is installed on a level landscape.
Overflow. A low spot or notch (weir) about a foot wide can be created on the berm to minimize erosion. The weir should be filled with 3 to 6 inches of stone, and landscape fabric can be used to deter weed growth in the overflow. Be sure that the weir directs water leaving the rain garden to a vegetated overflow area away from any structures.
 This is an excerpt from How to Install a Rain Garden, ANR-2768.
Laura Bell, Project Coordinator; Eve Brantley, Water Resources Specialist and Professor; Caitlin Sweeney, Assistant Coordinator; and Naomi Pitts, Assistant Coordinator, all with Alabama Extension Water Program at Auburn University