Farming
Poultry red mites are a type of external parasite that infests chickens. They conceal themselves within the chicken coop surroundings and reproduce quickly. These mites survive by feeding on the blood of chickens and can even cause their death. Learn how to prevent and treat poultry red mite infestations.
Multiple species of mites exist globally, but only a limited number of them are relevant to poultry as external parasites. Specifically, this document addresses the poultry red mite, scientifically known as Dermanyssus gallinae, and also referred to as chicken mite or roost mite. This particular mite is an ectoparasite that feeds on the blood of chickens and various other avian species.
Poultry red mites are not always bright red; rather, they are red after a blood meal. They also look similar to northern fowl mites. The main difference between these two mites is that you will not find red mites on chickens during the day, whereas the northern fowl mite spends its entire life cycle— day and night—on the chicken.
Red Mite Identification
The poultry red mite is a hematophagous, or blood- sucking, ectoparasite. This particular mite stays on the chickens only at night and then hides in the coop environment during the day. To see if your flock is being affected by this particular external parasite, examine your flock at night with a flashlight. These parasites are most active 5 to 11 hours after darkness.
When your chickens go to roost at night, poultry red mites crawl along the roost to find the host. They crawl along the chicken’s leg to where the scales on the legs end and the feathers begin. This is right above the hock joint. Skin not protected by scales is subject to being bitten by the poultry red mites. You may just see redness from bite marks, or you may see the mites themselves, just above the hock. This does not mean that they will not travel up to the breast or thigh areas and bite the skin there. Sometimes you will see bite marks or lesions on other areas of the body when you lift the feathers to see the skin.
Poultry red mites are tiny, so you must look closely at what looks like dirt on the birds. Since chickens engage in dust bathing, observing their skin at night may require patience as you wait to see any potential movement. You may be able to disturb what looks like a mite by using a tiny paintbrush, such as ones used in watercolor paints, and see if it responds by moving. Be aware that they move slowly.
When you are moving equipment around or cleaning in the chicken coop, you may see small groups of poultry red mites. They congregate in cracks and crevices. Taking apart a wooden coop for spring cleaning, or perhaps during regular monthly cleaning, will likely reveal mites as they slowly run for cover once a hiding spot has been exposed. They will even inhabit spaces around nest boxes or in the litter. You must carefully check broody hens for signs of infestation from sitting in a nest box with red mites.
The Life Cycle
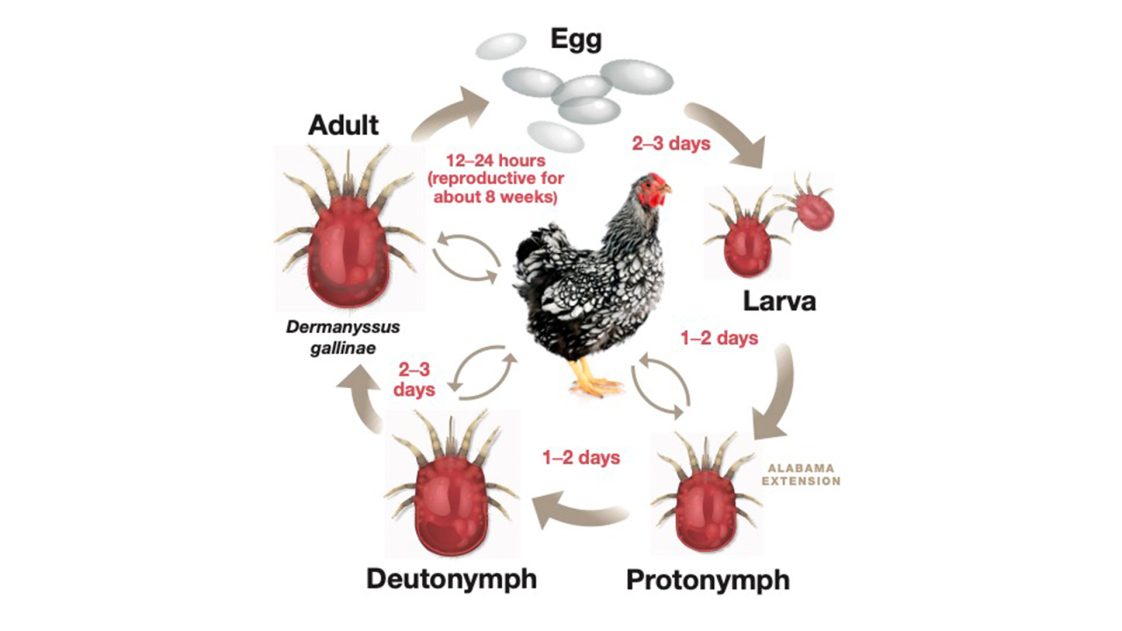
The life cycle of the poultry red mite starts as an egg that hatches in 2 to 3 days. At this stage, it is called a larva, and it is in its smallest size. In 1 to 2 days, the larva molts and is called a protonymph. In another 1 to 2 days, the protonymph molts and is called a deutonymph. After 2 to 3 days, the deutonymph molts one last time and is then an adult poultry red mite. The protonymph, deutonymph, and adult take blood meals on the host chicken. Within 12 to 24 hours after becoming an adult, a female poultry red mite can produce eggs that are laid in clutches of 4 to 8. Generally speaking, a female red mite will lay around 30 eggs in her lifetime, and she is capable of being reproductively active for about 8 weeks. In optimal conditions, the time between an egg being laid, molting several times, and becoming an egg-producing adult can be as short as a week. Poultry red mites are good survivors and can live in the environment for up to 9 months without feeding.
Symptoms of an Infestation
Chickens that are enduring an infestation of poultry red mites will be affected in two ways. First, birds will express stress-related behaviors. These behaviors will include increased levels of preening, head scratching, and some gentle feather pecking due to skin irritation from bites. Plumage damage can be seen as the feather quality of chickens will be reduced due to self-grooming. Increased self-grooming is a characteristic symptom of anxiety. This can be identified by feathers losing their shine or iridescent sheen. Feathers will begin to look tattered at the ends from frequent preening by the beak. A small portion of the feather may be missing from the rachis out to the end of the barb.
Stressed hens may begin to act aggressively toward one another. The aggression can begin with feather pecking and progress to cannibalism. There may be increased levels of light feather-pecking at night due to the irritation from the mites. In severe infestations, chickens may spend more than half of the night in feather-pecking behavior, which disrupts their sleep patterns. Hens may no longer sleep on perches where they have been repeatedly bitten.
Red mites may also be seen crawling on eggs if they inhabit crevices in the next box. This infestation can be especially problematic for hens that choose to sleep in the nest box or have begun to brood eggs in the nest box. Severe infestations of red mites can result in blood spots appearing on eggs. These red spots occur when eggs roll around in the nest and crush the red mites, marking the eggs with their color. When nest boxes are infested, hens may choose to avoid using the nest boxes when laying eggs. Instead, hens may begin to lay eggs on the coop floor or find an alternative location for egg laying. This can lead to dirtier eggs from the floor and hidden nests that are not discovered for longer periods.
Another symptom of a red mite infestation is in the chicken’s body weight. Chickens will begin to weigh less. This is possibly due to the disturbance of normal behavior during both the day and night. Although not complete, information on the effects of the mite on chicken behavior as noted by industry personnel and researchers, indicates that water intake will increase, egg production will decrease, and feed intake will increase. The increased feed intake and lowered egg production and body weight lead to a lower feed conversion ratio.
Birds will experience anemia that can range from mild to severe, even leading to death. Anemia is when the body does not have enough healthy red blood cells, which leads to reduced oxygen flow to the body’s organs. This can result in fatigue, changes in skin color, or a fast heartbeat. With this condition, your hens will have pale combs and faces. In a particularly bad infestation of poultry red mites, hens may lose more than 3 percent of their blood by volume every night. They may also isolate themselves and appear huddled or sleepy.
Disease Transmission Potential
The poultry red mite has also spread diseases, including numerous poultry pathogens and zoonotic organisms. The most recognizable organism to small flock owners is Salmonella enteritidis. If a poultry red mite takes a blood meal from a chicken that has Salmonella, then the Salmonella can live in the mite’s gut for up to 4 months. In that time, it can transfer the bacteria to another chicken. Also, the poultry red mite can carry the causative agent of Lyme disease, Borrelia burgdorferi, and avian influenza A virus.
Humans may be bitten by mites while caring for their flock. If you are bitten, your skin may become red and irritated, possibly followed by itching. This condition is called gamasoidosis. Humans can also be infected by organisms carried by the poultry red mite when bitten. These organisms include Borrelia burgdorferi, and Bartonella.
Monitoring Your Flock
Monitor your coop environment to see if poultry red mites are present, so you can decide if there are enough red mites to take action by treating the chickens or doing a coop cleanout. Any of the monitoring methods mentioned below can also be done in conjunction
with examining known gathering spots for the mites in the coop.
Blue Painter’s Tape
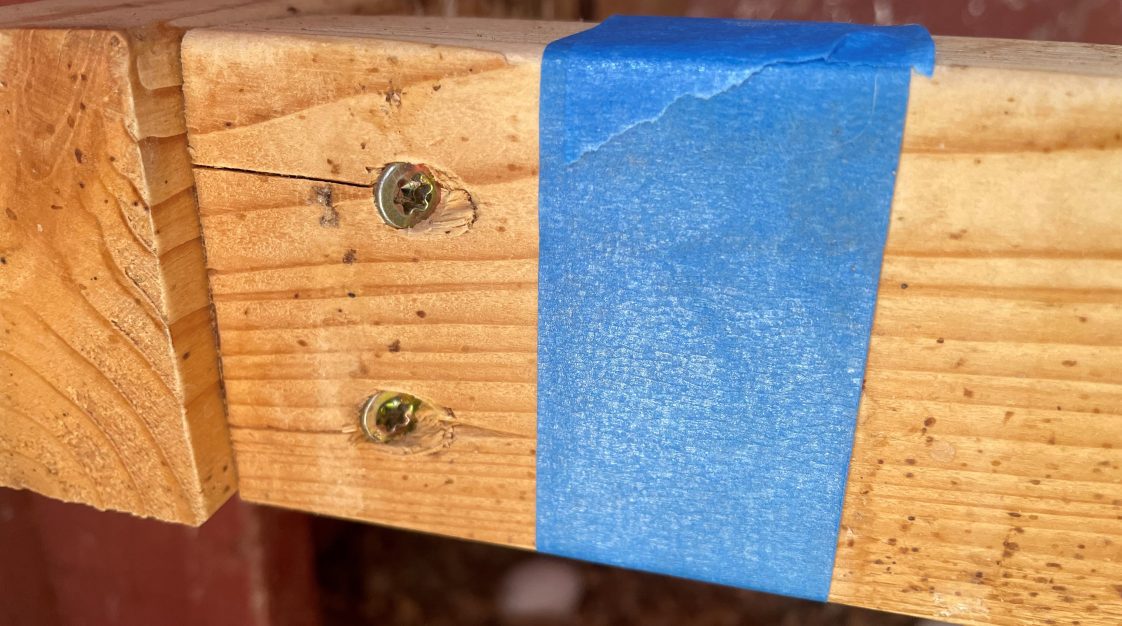 The first method uses blue painter’s tape. Purchase 1.88- or 1.44-inch wide tape and wrap it around the roost near where the walls meet the roost. Wrap the tape so the sticky side faces outward and away from the roosting pole. Any poultry red mite that crawls along the roost will need to walk across the painter’s tape and will become stuck. Take this step in the evening, preferably after the chickens have selected their spot on the roosting pole. Examine the tape the following day and count the number of mites stuck to the surface. This is an easy and affordable monitoring method for any small flock owner. If you put out several tape traps, then you may find some have more mites than others, indicating that a desirable hiding spot is nearby and should be the focus of your treatments of the coop and birds.
Rickstick
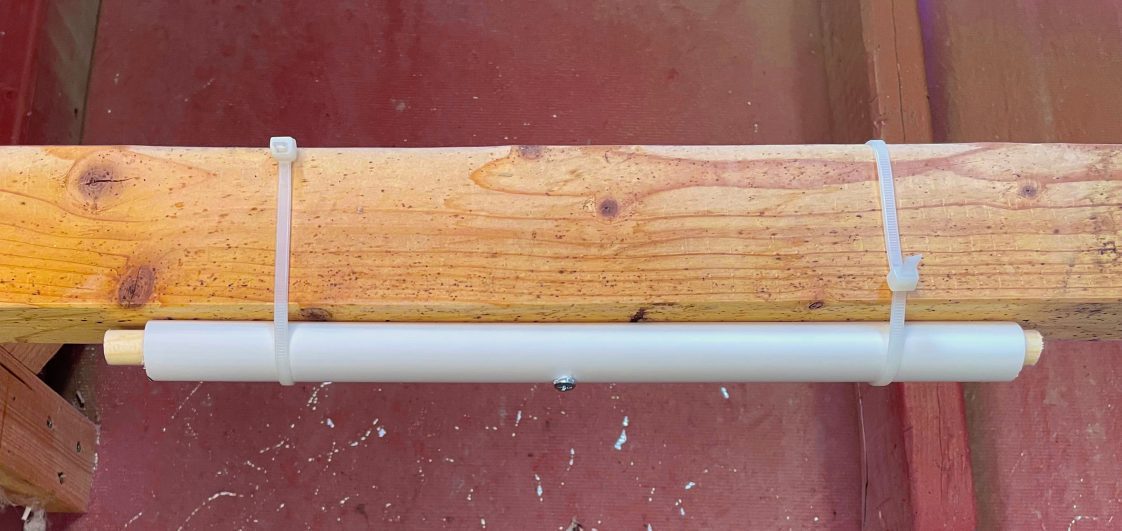 The second method is a Rickstick, a 1-inch PVC tube with a stick, such as a wooden dowel, inside of it. The stick should be slightly smaller in diameter than the PVC tube and extend slightly beyond the PVC pipe. Chickens are curious and may want to play with anything new in the coop, so place the stick inside the PVC tube with a single screw halfway down the wooden stick. This will keep chickens from pulling the stick out of the tube.
Mount this tube on the underside of roosts using cable ties. Regularly examine the wooden dowel in the Rickstick to see if any poultry red mites are present. Count the mites, clean off the stick, and return it to the PVC pipe. If you find just one or two mites on the RickStick, you are at a low or medium level of infestation. If there are more, treat all the birds and the coop.
PVC Tube + Cardboard
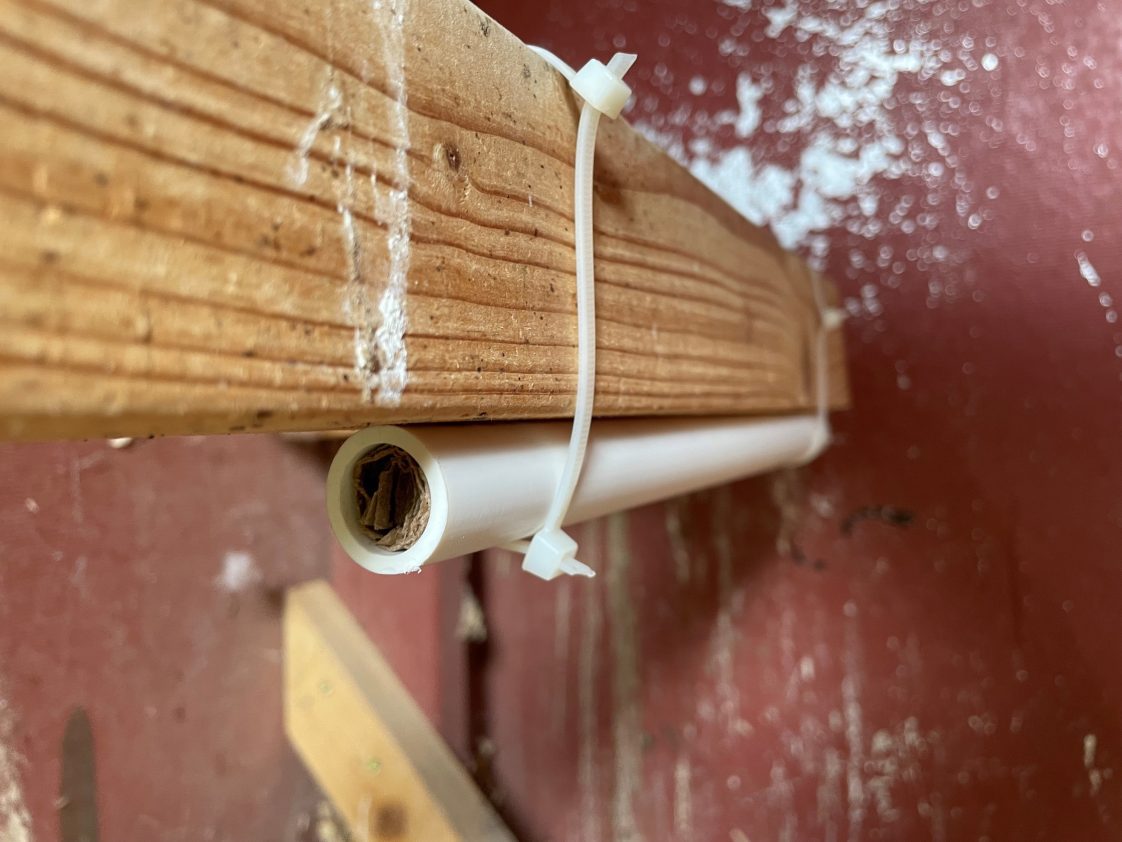 The third method uses PVC pipe mounted in similar locations to the Rickstick. Instead of a stick inside the PVC pipe, place a rolled-up piece of corrugated paper or corrugated cardboard. The length of the cardboard should not stick out of the sides of the PVC pipe, or the chickens may pull it free. The cardboard should be rolled up tight and placed in the tube. Pull out the cardboard after 1 or 2 days and search for mites, keeping in mind that you may have to pull the cardboard apart to see if they are inside the ridges between the inner and outer layers of cardboard. Replace the corrugated paper and check the trap regularly. The corrugated paper PVC tube should give you countable numbers of mites. Fewer than 250 mites is a low number, 251 to 500 is medium, and more than 500 is high. Examine your birds to see if they are losing weight when medium numbers are present, and then treat birds and the coop as numbers approach or exceed 500 mites.
Prevention
Regular cleaning disturbs the cracks and crevices where red mites hide. Painting the inside of the coop is another way to cover up many of the cracks and crevices where mites like to hide during the day. If you choose a light paint color, mites are also easier to see. Having a painted coop interior will result in an interior that is much easier to clean and disinfect. An alternative to painting the interior is to use a silicone gel to seal larger cracks and crevices. Exclude wild birds and rodents from your flock, as they can be a source of red mites.
Treatment Options
Treat birds and the coop for poultry red mites only if they become a problem. Spraying birds and the chicken coop environment with unproven products can potentially create more problems. Not only can this be environmentally irresponsible, but resistance may also occur due to incomplete kills or poor residual activity. By monitoring birds and the chicken coop environment, you can verify that the problem exists and at a level that warrants action.
Use temperature to your advantage. Chicken red mite populations grow faster when temperatures are between 77 and 95 degrees F. They also prefer a humidity level of 70 to 90 percent. You may be able to remove the flock from the coop interior for a day and close up the coop until temperatures reach over 113 degrees F, which is lethal for red mites. In cold climates during cold times of the year, a coop temperature that reaches -4 degrees F is also lethal for red mites.
An integrated pest management (IPM) approach wisely uses time and resources to keep your flock healthy. Many chemical control methods once on the market are no longer available, or mites are resistant to them. A short residual activity with some chemical products means that some mites may not come into contact with the chemical. Mite eggs are resistant to many products. As such, some chemicals may need to be reapplied to allow eggs to hatch, affecting immature stages of poultry red mites.
Your treatment strategy should resemble an integrated pest management plan. Your strategy will change depending on the number of poultry red mites you find, because so many acaricide (mite-killing) products that were once available are no longer on the market. Be strategic and forceful with your treatment strategy. If you find just 1 or 2 mites on the birds, you are at a low or medium level of infestation. You should treat all the birds and the coop if there are more.
Some treatments listed in this document are not to be used in the presence of birds and, therefore, should be used during spring cleaning or after a flock has been moved out. Most treatments warn that the chickens’ feed, water, and related feeding or watering equipment should not become contaminated with the product.
For products designed to be used directly on the chicken, focus on areas around the vent, the upper thighs, and under the wings. Dusts and liquids should be applied directly to the skin. Do not spray the feathers, as that is not where the treatment will be effective. If the product is a dust, ensure that you work in a well-ventilated area and wear a mask. Several products carry warnings on the label that indicate what sort of clothing or personal protective equipment you should use in the presence of the product. Please be sure to read and follow all label instructions. You can also use food grade diatomaceous earth (DE), but don’t breathe the dust. Application rates for DE will need to increase when humidity levels are high.
In all of the coop sprays in table 2, retailers suggest that you spray the product into cracks and crevices in the coop. It may surprise most people that they will go through more than a gallon of liquid spray to force the product down into these gaps effectively. The only exception is in coops where owners have painted the interior to significantly reduce the number of cracks and crevices where red mites may hide. Not only does painting the coop’s interior reduce the number of places where red mites may hide, but it also helps flock owners reduce the amount of material they spray as a treatment.
Table 1. Products for Treatment of Poultry Red Mite–Infested Birds or Coops
| Product Type | Brand Name | Insecticide | Mode of Action Classification | Mixing Instructions | Application Sites | Application Methods and Restrictions |
|---|---|---|---|---|---|---|
| Dust | Yellow Jacket Wettable Dusting Sulfur II | Sulfur | Inorganic | Ready-to-use dust | Directly on the bird | Dust liberally on chickens and rub into plumage, concentrating on area around the vent. |
| Dust | Insectrin, Permectrin 0.25% Dust | Permethrin | Pyrethrin | Ready-to-use dust | Directly on the bird and coop spray | Apply 1 teaspoon to each chicken, focusing under the wings, thighs, around the vent, and the breast. For dusting the coop, apply 1 pound per 40 square feet. Do not apply to the nest boxes, on eggs, or in the feed or water. |
| Dust | Beetle Shield | Tetrachlorvinphos | Organophosphate | Ready-to-use dust | Directly on the bird and coop spray | Apply 1⁄4 teaspoon to each chicken focusing under the wings, thighs, around the vent, and the breast. Wear long sleeves and gloves when handling this product; do not inhale or get in the eyes. For dusting the coop, apply 1⁄2 pound per 100 square feet. Treat cracks and crevices where mites may hide. |
| Spray | Pure Planet Poultry Spray | Clove and cottonseed oils | Herb-based soap solution | Ready-to- use spray | Directly on the bird and coop spray | Spray on the skin and legs, focusing around the vent. Spray in the coop focusing on cracks and crevices. Can be sprayed on the bedding and in nest boxes. |
| Spray | Prozap Insectrin X | Permethrin | Pyrethrin | Dilute 1.28 ounces per gallon of water | Directly on the bird and coop spray | Apply 1 gallon diluted spray to 100 hens using a garden sprayer and focusing on the vent area. Spray roosts, walls, and nest boxes. |
| Spray | Ectiban, Permectrin 5.7% EC | Permethrin | Pyrethrin | Mix 2.5 tablespoons per gallon of water. | Directly on the bird and coop spray | Apply 1 gallon diluted spray to 100 hens using a garden sprayer, focusing on the vent area. Evaluate hens to see if a second application is needed 4 weeks later. |
| Spray | Starbar E-Pro | Permethrin | Pyrethrin | Mix 1 to 4 fluid ounces to 3.75 gallons of water. | Directly on the bird and coop spray | Apply 8 teaspoons per bird, paying particular attention to the vent area. Do not apply to the nest boxes, on eggs, or in the feed or water. |
| Spray | Ravap | 23% stirofos + 5.7% dichlorvos | Organophosphate | Hen spray: Mix 5 ounces in 2 gallons of water. Coop spray: 5 ounces in 1 gallon of water. | Directly on the bird and coop spray | This is a restricted use pesticide. Apply 8 teaspoons per bird directly onto the skin. Soak the feathers around the vent area. Do not spray chickens more than once every 14 days. For spraying the coop, apply 1 gallon of spray per 100 to 150 square feet. Treat cracks and crevices where mites may hide. Wear long sleeves and gloves when handling this product; do not inhale or get in the eyes. |
Table 2. Products for Treatment of Coops with Poultry Red Mites (Not for Use on Live Birds)
| Product Type | Brand Name | Insecticide | Mode of Action Classification | Mixing Instructions | Application Sites | Application Methods and Restrictions |
|---|---|---|---|---|---|---|
| Spray | Yellow Jacket Wettable Dusting Sulfur II | Sulfur | Inorganic | Mix 0.25 to 0.5 pounds in 1 gallon of water. | Coop spray only | For coop spray, mix 0.25 to 0.5 pounds into 1 gallon to cover 25 to 50 square feet. Force the spray into cracks and crevices. |
| Spray | Yellow Jacket Flowable Sulfur | Sulfur | Inorganic | Mix 8 teaspoons in 1 gallon of water | Coop spray only | For coop spray, this dilution treats 100 square feet. Treat cracks and crevices where mites may hide. Wear long sleeves and gloves when handling this product; do not inhale or get in the eyes. Wait a minimum of 48 hours before introducing poultry. |
| Spray | Elector PSP 44.2% spinosad | Spinosad | Spinosyn | Mix 2.5 teaspoons in 1 gallon of water. | Coop spray only | This dilution treats 2,500 square feet. Force the spray into cracks and crevices. |
| Spray | SureKill SK 100 | Pyrethrins 1 to 2% + piperonyl butoxide + 3% bicycloheptene dicarboximide | Pyrethrin | Concentrate diluted for use with sprayers that give large, wetting spray particles (garden sprayer). | Coop spray only | For coop spray, mix 15 ounces per gallon of oil (refined kerosene), which covers 1,000 square feet. Treat cracks and crevices where mites may hide. Wear long sleeves and gloves when handling this product; do not inhale or get in the eyes. Allow the product to thoroughly dry before people re-enter the coop. |
 Brigid McCrea, Extension Specialist, Poultry, Auburn University
New August 2023, Poultry Red Mites: Identification, Prevention, and Treatment, ANR-3014