Commercial Poultry
This is the third installment of a three-part series on improving body uniformity in broiler breeders. You will learn best brooding management practices related to preplacement and placement to minimize mortality and optimize performance.
Broiler breeder pullets and cockerels increase their body weight up to fifteen fold from hatching to 4 weeks of age. Maintaining target body weight (BW) and uniformity are important metrics in obtaining optimum reproductive performance in the subsequent lay cycle. The more uniform the flock, the easier it is to manage with simple feed allocation to obtain target BW and male fleshing.
Managing the house environment during the first few weeks of age is often taken for granted. Poor management when the flock is young can have a pronounced negative impact on target BW, uniformity, and frame development. Poor housing management can also increase mortality and morbidity.
With the cost of parent stock pullets and cockerels at $11 to $14 per chick, providing an optimum brooding environment is of utmost importance. Management of the parent stock during the brooding period can have a pronounced impact on the number of uniform pullets and cockerels that move to the breeder house and in their subsequent performance as breeders.
Litter Preparation between Flocks
House sanitation is key to maintaining pullet and cockerel livability and should not be taken for granted. Houses should be cleaned, washed, and disinfected between flocks. This includes blowing dust from the ceiling, tunnel doors, vent inlets, and light traps. Fans and fan light traps should also be cleaned.
All feed from the previous flock must be removed along with all caked litter. Although this practice may not be possible in certain regions due to reduced supply of bedding materials, it is recommended that litter be completely cleaned out every other flock to minimize disease challenges.
Add new bedding material and/or litter to a depth of approximately 4 inches and uniformly distribute throughout the house. Preheat the house at or close to placement temperature and ventilate to purge ammonia. After that, set up the house on minimum ventilation and let litter rest for at least 3 days to further remove ammonia and moisture before applying amendments. Applying a litter amendment at the recommended application rate can be useful in reducing ammonia concentrations prior to chick placement.
Timing for these house setup steps can vary depending on the type of litter amendment (dry or liquid). Apply liquid amendments 2 to 4 days prior to placement. Make sure equipment is raised. Allow 24 hours for a “crust” to form on the litter before working in the house after application. Apply dry amendments approximately 24 hours before bird placement. Application practices can change depending on the litter amendment. Consult your chosen litter amendment representative for best application practices.
Preplacement
Preplacement involves preparing the house with proper feed, water, temperature, ventilation, and lighting before chicks arrive. An ambient temperature of 90 degrees F and a minimum floor temperature of 86 degrees F must be maintained for 48 hours prior to placement.
It is important to verify that lights, heaters, fans (minimum ventilation and/or circulation fans), and inlet machines are working properly. Minimum ventilation can be set to run 30 seconds out of 5 minutes (30 seconds on and 270 seconds off) during the first 2 weeks of broiler age. At day 15, minimum ventilation can be increased to 45 seconds out of 5 minutes (45 seconds on and 255 seconds off). Minimum ventilation run times may need to be increased depending on ammonia concentration and relative humidity of the house or based on company guidelines.
Water line system cleaning is important to provide chicks with a safe, clean drinking water supply that is low in mineral contaminants and clear of scale and biofilm buildup; these can reduce pipe volume and water flow rates and increase pathogen levels. Components to be cleaned include water lines, standpipes, regulators, and the distribution pipe.
Growers often fail in their efforts to properly clean water lines by not using the proper cleaner concentration or not leaving the product in the water lines long enough for pathogen reduction. Several cleaning products are approved for poultry water line systems, so it is recommended that you check with your integrator and the manufacturer for acceptable products and product inclusion rate, method of application, and proper length of time the solution should remain in the water lines.
Monitoring pathogen load with precleaning and postcleaning checks is a good idea to verify waterquality success. Samples can be collected from the nipples and at the end of the line and sent to a water-quality laboratory for analysis.
Setup can vary by the brood area chosen, either quarter-house or half-house. The best brooding setup depends on the farm and the management/labor. Due to the relative high incidence of mortality with cockerels and dehydration often caused by long transit times from parent stock hatcheries, quarter-house brooding has garnered attention for providing access to feed and water in a smaller area and stimulating cocci cycling.
Inconsistent coccidia cycling can create uniformity issues during rearing. The goal is to provide controlled exposure of coccidia to create long-lasting immunity to protect the birds from a disease outbreak.
There are considerations when choosing quarter-house orand half-house brood areas. For example, a half-house brood setup avoids issues with overcrowding; chicks have more space to find their temperature comfort zone; and there is less labor as turning out occurs only one time. Quarter-house brooding allows chicks closer access to feed and water and higher litter moisture to promote better cycling of coccidia. The disadvantage of quarter-house brooding is that high numbers of coccidia can occur if litter moisture is not managed properly, particularly if the birds are not turned out in a timely manner. This is particularly problematic with quarter-house brooding beyond 9 days.
A half-house area should provide a minimum of 0.75 square feet per bird, both males and females. Birds are typically turned out to a full house on day 21 at 1.5 to 1.6 square feet per bird for females and 2.8 to 3 square feet per bird for males. Chicks reared with a quarter-house brood are held until 7 days and then turned out to a half-house until 21 days. To accommodate quarter-house brood setup, a temporary fence can be placed from the side wall to the other side of the nipple waterers so that chicks have easy access to feed and water (figure 1).
Use supplemental feeders for the first week so that chicks have easy access to feed and water. Place feeders in the brood area at approximately one feeder lid per 75 chicks. The number of chicks per trays/lids can vary if using larger feeder trays. Make sure feed covers the entire tray to approximately two-thirds full. If feeder lids are overfilled, chicks can waste feed (figure 2). Feeder lids can be filled automatically or on a timer with chick mates, or feed can be added by hand if the house is not equipped with chick mates.
Supplemental water can be provided using foam egg toppers, jugs, EZ fills, or mini drinkers. Whatever method is chosen, supplemental water must remain clean. Fill toppers, gallon jugs, or EZ fills with water daily (figure 3). These supplemental drinkers are typically staggered between feeder lids.
Water is supplied to mini drinkers from the water lines; therefore, labor to fill them is not a concern as with EZ fills or foam egg toppers. Still, mini drinkers must be monitored to ensure they are clean and level and will not pose a problem with leaks. It is important to have feed and water away from the sidewall as drafts can impact feed and water consumption.
-
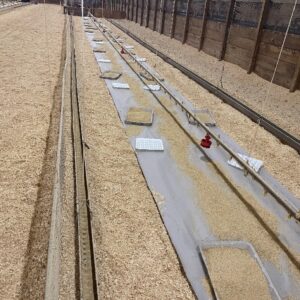
- Figure 1. Example of a brooding setup to promote close and easy access to feed and water, enabling cockerels to get off to a good start.
-
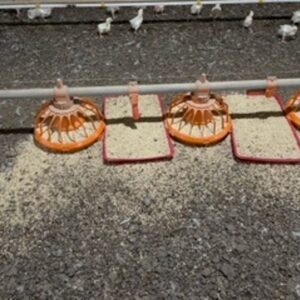
- Figure 2. Feeder lids should not be overfilled as this can lead to feed waste as shown here. Feeder lids should only be filled to about two-thirds full.
-
- Figure 3. Supplemental drinkers such as EZ fills and gallon jugs should be filled daily and regularly cleaned to ensure chicks have access of clean water.
Placement
Feed
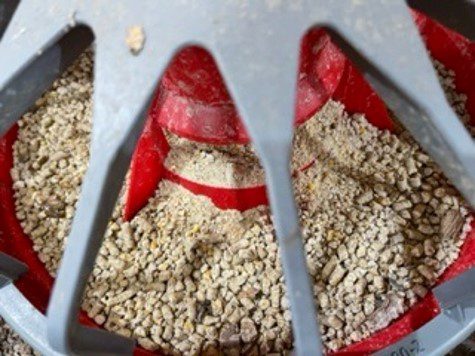
Figure 4. Starter feed containing whole pellets or large corn particles during brooding can adversely affect body weight uniformity.
Approximately 5 pounds of feed per 100 chicks (22.7 grams per chick) should be provided during the first 7 days. As the feeder system is in manual operation, it is a good practice to run feed four times a day during the first week to train the chicks to recognize the sound of equipment delivering feed in the house. This also enables chicks access to fresh feed throughout the day. Make sure chicks in the brood area are within 3 feet of feed and water.
The form and quality of feed provided to chicks can also influence uniformity. High-quality crumbles or mash is needed to obtain adequate target body weight gains. Feed containing large particles of corn or pellets during brooding can negatively impact BW gain and uniformity (figure 4).
Feed Distribution
Chicks need ample access to feed through feeder lids and feed pans during brooding. This is important to achieving target body weights early in rearing.
Feed should be distributed uniformly throughout the house, with feed available at the end of feed lines. Stage feed lines according to age throughout out-rearing to prevent birds from having too much space during rearing. Set feed-line pans to flood stage and fill with feed during preplacement. Run feed lines manually or automatically to maintain fresh feed in the pans without allowing overfilling and wasted feed.
Supplemental feed along sidewalls can be removed by day 3 or 4, and the remaining supplemental feed removed between 7 and 8 days of age. This can best be achieved by removing one-third of the feeders on days 3 and 4 and the remaining in stages. By day 8, feed-line pans should be out of flood stage.
Another important consideration that is often overlooked is raising the height of feeder pans appropriately after flood stage to prevent buildup of litter or shavings in the pans and to minimize mortality of chicks getting into pans. It is good practice to determine the number of days taken to consume starter feed as this will provide an overall indication for feeder management within the brooding program.
Water
Feed consumption and water consumption have a direct relationship. A decrease in water consumption is known to reduce feed consumption, which in turn results in reduced growth. Both the quantity and quality of water are important in obtaining performance objectives.
Parallel to supplemental feed, supplemental water via egg trays or jugs allows chicks to get off to a good start, enhancing growth and reducing the incidence of mortality during the first few days after placement. Using supplemental water until 3 to 4 days of age is extremely important due to the cost of parent stock chicks.
The height of nipple drinker lines can influence growth as well as lead to wet litter if water lines are adjusted too high or low or the pressure on the water line regulators is incorrect. Birds consume water by lowering and then raising their necks to coordinate swallowing water with breathing. Chicks should be able to approach nipple drinker lines with their beaks at a 45-degree angle to the proper height. If nipple drinker lines are too high, water can enter their windpipe, discouraging water consumption. Drinker lines set too low can create water wastage as chicks can’t properly drink, and when they run under the line, wet litter results. Drinker line height should be raised regularly as chicks advance in age.
A sanitation program is an important component of good water-quality management. After the water system has undergone a cleaning process, some contaminants can still be present in the water line. Within a few days, new biofilm can build up in the water system. A sanitation solution can be added to the medicator or a peristaltic pump at a dilution rate of 1:128. If chlorine is used, water lines should be flushed daily for 7 to 10 days to minimize pathogens. Lines flushed with a stabilized hydrogen peroxide product may last up to 5 days. A second sanitation flushing is recommended as is sanitizing the system 24 hours after a water additive, like vitamins, is used to prevent buildup of bacteria, yeast, and molds.
The process of cleaning and sanitation takes effort to complete correctly. It is important to verify that the chlorine and hydrogen peroxide concentrations in the drinking water are sufficient to do the job.
Ventilation
The goal of optimum temperature management is to create an even distribution of chicks throughout the house. This promotes optimum feed and water consumption.
Chicks that are exposed to low brooding temperatures are often found huddling along the wall or along feed and water lines; this results in inadequate consumption of feed and water. On the other hand, when chicks are too hot, they move away from heat sources and often to the sidewalls, away from feed and water. In this way, high temperatures can also limit optimum feed and water consumption by chicks. A reduction of feed and water intake can lead to a spike in mortality, and chicks that survive may experience suppressed immune and/or digestive systems.
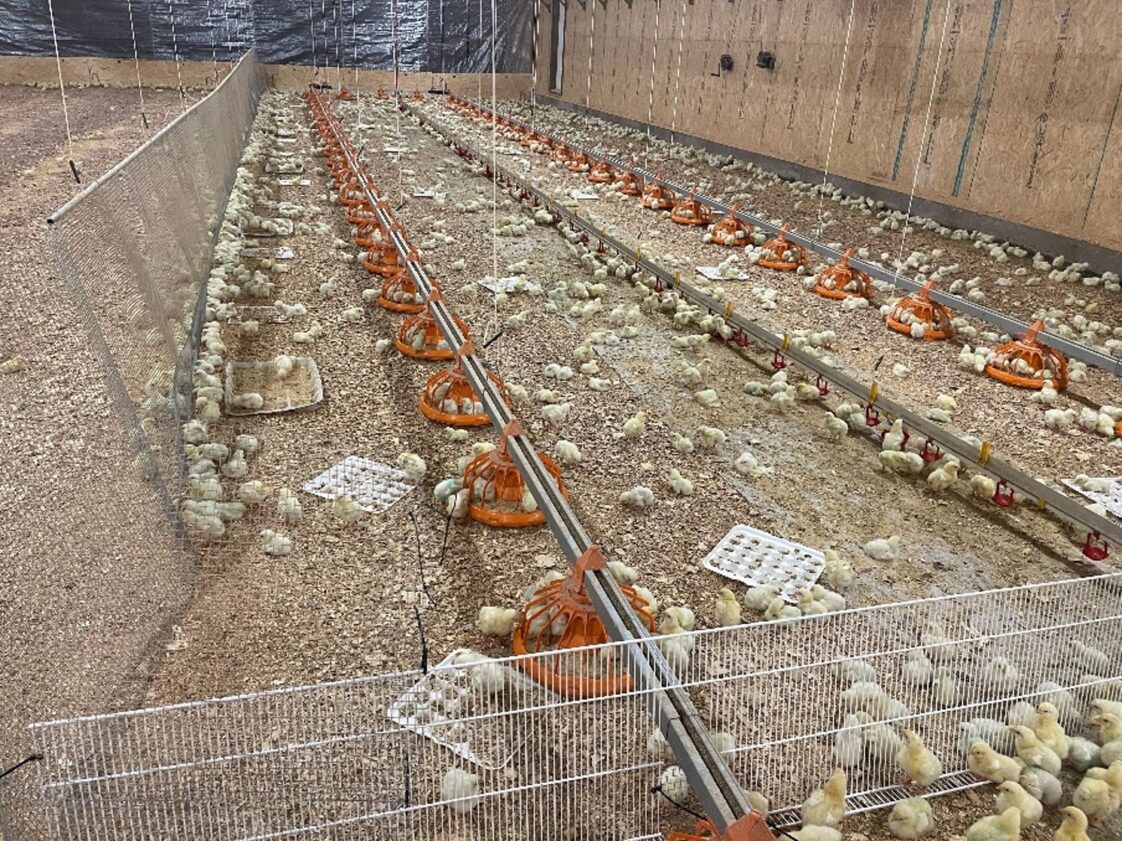
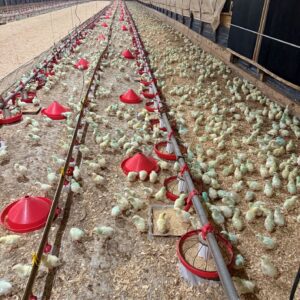
Figure 5. A good temperature and ventilation program enables an even distribution of chicks throughout the house, as shown here.
Intestines are not fully competent until approximately 2 weeks of age, and proper dietary nutrients are required to stimulate the maturation of the gastrointestinal tract. Initially, nutrients from the hen are stored in the yolk sac during development. These nutrients are then absorbed by the chick from the yolk sac for growth during the first few days after hatching. If intestinal growth is impaired through improper temperature management, nutrient and antibody absorption will suffer, ultimately resulting in an increased incidence of morbidity and mortality.
Temperature points for ventilation are set with an electronic controller to regulate heating equipment on/ off cycles to maintain the optimum brooding temperature based on age. For example, the house may have a temperature setpoint of 88 degrees F at placement, with heating coming on at 86 degrees F and a minimum ventilation fan set at 90 degrees F. When chicks reach 8 days of age, temperatures may be set at 85 degrees F, with the heating source at 83 degrees F and the minimum ventilation fan set at 87 degrees F. At placement, temperatures of 86 degrees F at chick height and 90 degrees F near the edge of brooders will allow chicks to find their optimum thermal neutral zone.
Each house can operate differently with respect to maintaining temperature setpoints. Temperatures can be influenced by equipment, house tightness, and other factors, as well as bird variances. It is important that bird activity be observed so that adjustments to temperature setpoints can be implemented to ensure optimum chick comfort (figure 5).
In addition to temperature, elevated relative humidity and ammonia must be monitored. This could indicate house tightness issues leading to vents not opening uniformly. For example, fan shutters that are missing could reduce the amount of air entering through the inlet vents. Tunnel curtains not closing properly can cause vent inlets not to open properly, leading to poor uniform air distribution.
Lights
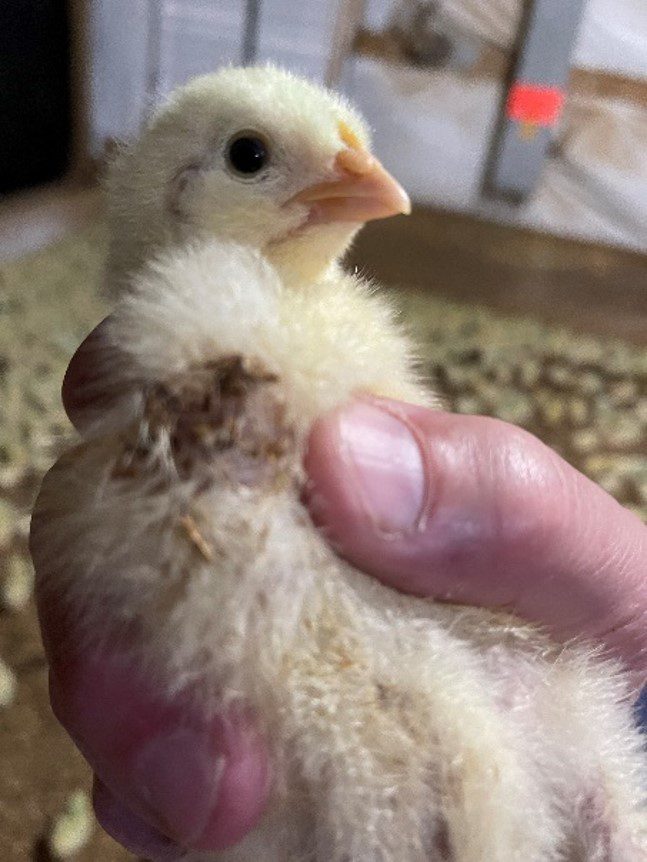
Figure 6. A full, soft, rounded crop is noted as a category 1 crop score.
Chicks are stimulated to access feed and water through relatively high lighting intensity (7-to-9-foot candles if possible) in the brood chamber and a photoperiod of 23 hours of lighting within the first 2 days postplacement.
At placement a measurement of 2.5-to-3-foot candles is typical in most houses. It may be beneficial to add a few light bulbs in the brood chamber, especially in the area designated for quarter-house brooding, to increase light intensity for the first 7 days.
The photoperiod should be decreased incrementally from days 3 to 10 to achieve 8 hours of light (16 hours dark) by 10 days of age. It is recommended that light intensity be decreased to 3-to-6-foot candles (if started with 7-to-9 foot) in the brood area from ages 6 to 10 days and then decreased to 0.5-foot candles after 10 days.
Measure light intensity in approximately eight to ten places in the house to obtain an accurate measurement of light intensity. Use a calibrated light meter held at head height of the chicks. It is important to ensure the lighting is uniform throughout the house. Immediately replace all bulbs not working properly with the same type of bulbs.
Light uniformity is important in brooding to achieve target BW throughout rearing. It is good to check the house for light infiltration when lights are off. Light leaks need to be addressed. Possible leak areas include the bottom of the end wall and around light traps and doors.
Crop Fill Scores
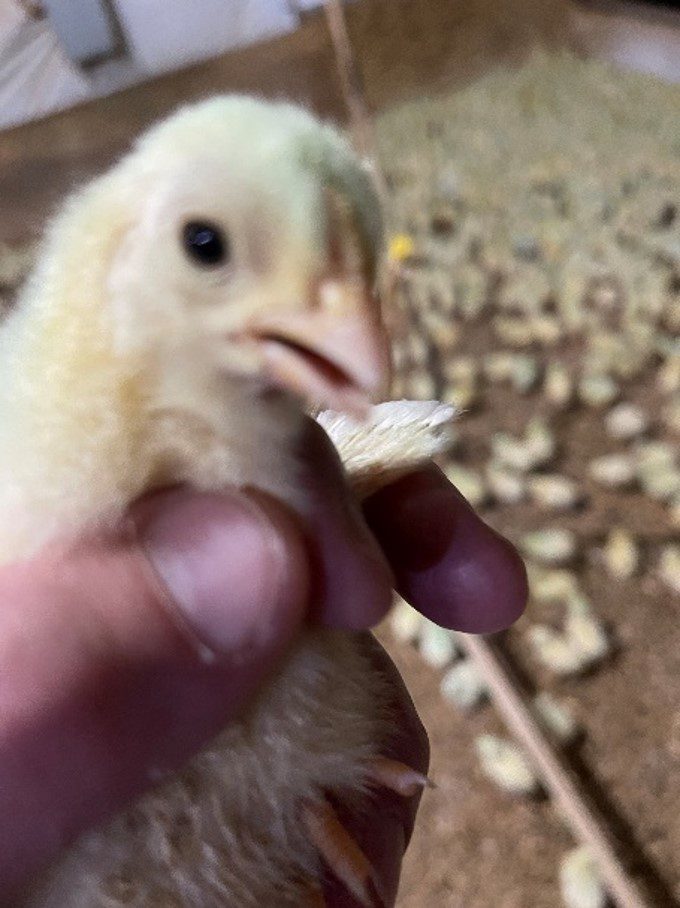
Figure 7. A hard crop with feed residue present but with little or no water indicates a category 2 crop score.
A brooding program should be assessed within 24 to 48 hours after placement to determine how well chicks are consuming feed and water. This can be achieved by subjective scoring of the chicks’ crop fill throughout the house.
Crop fill is categorized using scores of 1, 2, or 3. Category 1 indicates a full, soft, and rounded crop (figure 6). Category 2 is a hard crop with feed residue and little or no water (figure 7). Category 3 is no feed or water in the crop. Scores are based on assessment of a total of forty chicks (ten chicks per location) at four locations throughout the house at 24 and 48 hours after chick placement.
The next step is to calculate the percentage of chicks in each category by the total number of chicks times 100. The goal is to have 95 percent of the chicks as a category 1 by 24 hours and 100 percent of the chicks as category 1 at 48 hours.
If crop fill scores are not meeting target goals, it is important to determine the reasons for the low scores. It could be related to temperature, drafts, air locks in the water lines, poor feed quality, etc.
Summary
- Chicks need a clean environment to reduce the stress of pathogen contamination and get them off to a good start.
- Chicks should be provided fresh feed four to six times per day during the first week of age. In addition, an adequate number of supplemental feeder trays/ lids are needed during the first week of brooding to provide ample access to feed for all chicks.
- Chicks must have clean, fresh water, with no or low pathogen count, and free from mineral contamination and scale buildup. Growers need to implement a consistent water cleaning and sanitation program. Providing chicks with an adequate number of supplemental waterers is key during the first week to get chicks off to a good start.
- Optimum temperature stimulates movement and good distribution of chicks throughout the house. It is important to assess the effectiveness of brooding by conducting crop fill assessments at 24 and 48 hours postplacement.
- Uniform light intensity in the brood chamber can be advantageous in stimulating feed and water consumption.
 William A. Dozier, Extension Specialist, Professor, Poultry Science, Auburn University
New December 2025, Brooding Practices to Optimize Broiler Breeder Development, ANR-3201