Business & Community
This start-up guide is intended to help groups and organizations initiate and sustain an urban community garden.
Why start a community garden?
People living in cities look for ways to grow their own vegetables. Many want to save money on their grocery bills and/or desire the freshness and flavor associated with homegrown produce. Some families choose to grow vegetables that are important cultural and dietary staples and are not easily found in local grocery stores. In addition, gardening is a great way to exercise and enjoy the outdoors.
Community gardens bring neighbors and communities closer together and help to reduce crime, utilize vacant lots, create recreational green spaces, and conserve natural resources.
Steps to Establish a Community Garden
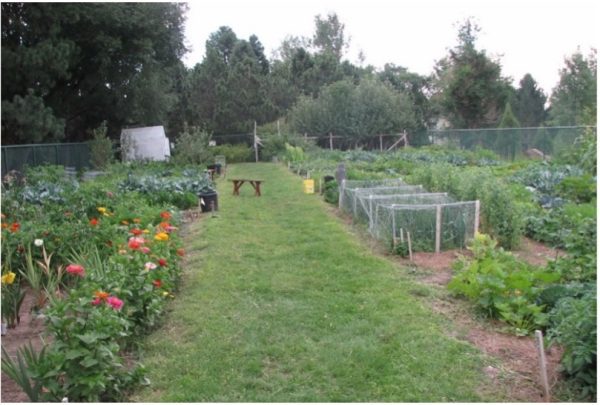
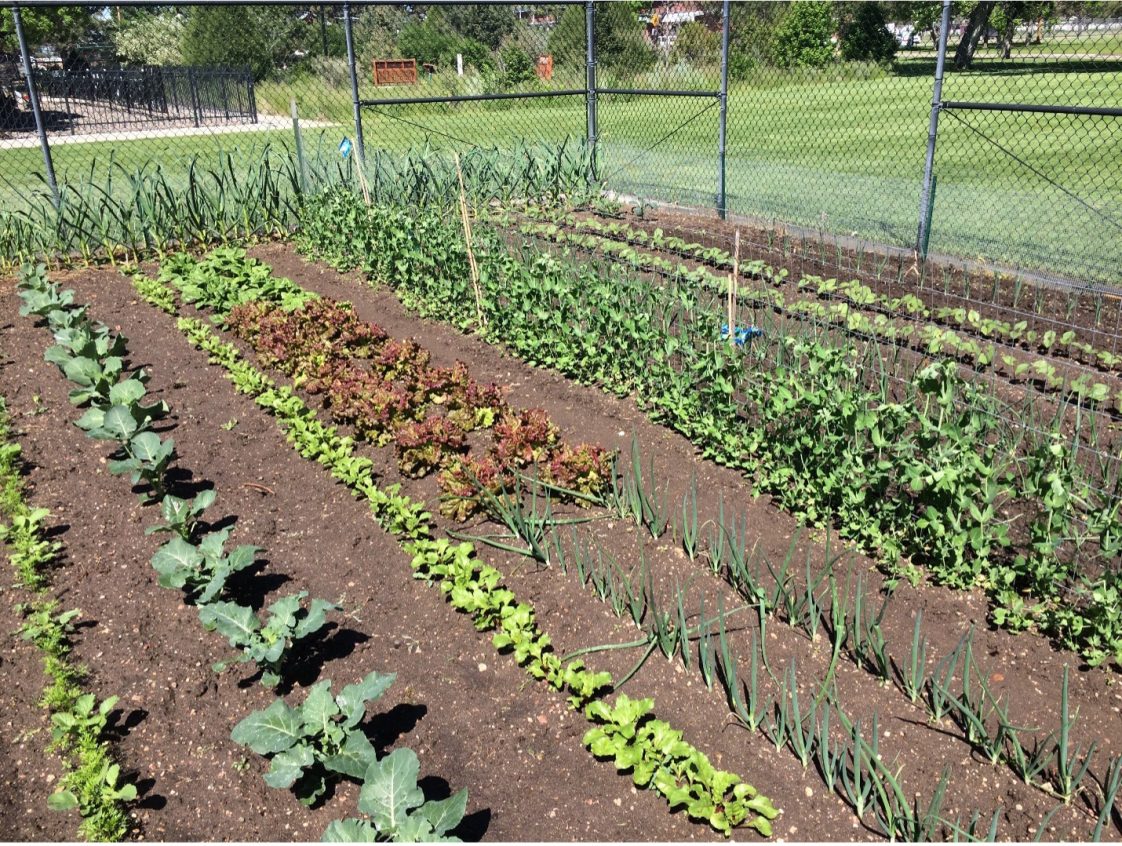
Figure 1. Community gardens can be used to grow edible and ornamental crops. Source: Cheyenne Botanic Gardens 2017.
Step 1. Involve Neighbors & Friends
It takes dedication and hard work to start a new community garden. Begin with a group of dedicated people to make the gardening program successful. Five interested families or a comparable group are a baseline minimum to create and sustain a garden project. Survey the residents of your neighborhood, community, or building to see if others are interested and willing to participate.
Once the group (committee) is formed, hold monthly community meetings, establish a social network on social media with other interested families or individuals to share ideas for your gardening group name and function, and initiate plans and delegate responsibilities. Make sure stakeholders are involved in the planning process and keep everyone updated on the garden’s progress.
Other key stakeholders to be involved are local elected officials that can connect the gardening group to vital city and/or county resources that are available to support public projects.
Step 2. Establish a Gardening Committee
A gardening committee is a way to formally organize your new group. A committee helps to make decisions and to effectively divide the work. It also ensures that everyone has a vested interest in the garden and will contribute to its design, development, and maintenance.
A committee can be formed at any time during the process of starting a community garden; however, it is wise to do so sooner rather than later. Committee members can divide and conquer the many tasks of establishing the community garden; however, a proactive coordinator (community garden group chair) is important. The typical garden committee will engage in the following activities:
- Determine who will lead the entire project, including communicating with participating and potential group members.
- Discuss potential funding options and operating costs
- Establish garden rules (Appendix A)
- Accept and review garden applications
- Establish plot assignments
- Collect garden dues (if applicable)
- Pay water bills
- Resolve conflicts
The typical garden committee has at least three officers: a president/chair (who acts as gardening coordinator), a secretary, and a treasurer, although more officers may be needed. Elections for garden committee officers are usually held annually.
Step 3. Locate Suitable Land for the Garden
Look around your neighborhood for a vacant lot that gets at least 6-8 hours of sun each day. A garden site should be relatively flat, although slight slopes can be terraced. The land should be free of large pieces of concrete left behind from the possible demolition of structures. Any rubble or debris should be manageable enough for volunteers to handle using trash bags, wheelbarrows, pickup trucks, and other supplies or equipment. Ideally, it should have a fence around it with a gate wide enough for a vehicle to enter. It is possible to work with a site that is paved with concrete or asphalt by building raised beds that sit on the surface. The group can also remove the asphalt or concrete to create areas for gardens, but that will make the garden more expensive in time, labor, and other resources to start. A site without paving and with soil that is mostly free of trash or debris is best.
The potential garden site should be within walking distance, or a short drive for everyone that wants to participate. If the lot is not already being used, make sure the community supports establishing a garden there.
It is best to identify three potential sites in your neighborhood and if the landowner is unknown, write down their addresses or the nearest cross streets of the property. The probability that you will be able to start a community garden is higher if you begin with three potential sites in mind. If a site address is unknown, write down the addresses of the properties on both sides of the lot to make an educated guess of the site address.
Step 4. Identify the Landowner
It is illegal to use land without obtaining the owner’s permission. To obtain permission, you must identify the landowner if unknown. Take the information written down about the location of the sites in Step 3 to your county tax assessor’s office. Digital maps may be available (tax mapping department) that will allow you to identify and locate landowners.
If the landowner is known, request a meeting to discuss possible use or donation of the land to establish a community garden. Be sure to invite them to join the gardening group with the understanding that leadership has been identified for the first year.
Step 5. Check Water Source
While you research site ownership, contact the water service provider in your area to find out if the potential gardening site has an existing water meter. Call your water provider’s customer service department and ask them to conduct a site assessment. They will need the site address or the same location information used when contacting the county tax assessor’s office.
Existing access to water makes a critical difference in garden startup costs. Depending on the size of your garden site, you will need a 1/2-inch to 1-inch water meter. If water service was available at the site in the past, expect lower costs to install a new water meter. It may cost more, however, if no water service was available to install a new lateral line and a new water meter. If funding to support the garden is limited, the gardening committee may seek donations or sponsorship to help cover the cost of installing a new water line and meter.
Step 6. Contact the Landowner
Once you have identified a potential site, write a letter to the landowner asking for permission to use the property for a community garden. Be sure to mention to the landowner the value of the garden to the community and the fact that gardeners will keep the site clean and weed-free. This is a good negotiating point because the landowner is free of the responsibility to maintain the site or to possibly pay city weed abatement fees.
Establish a term for the use of the site and prepare to negotiate a lease. Typically, groups lease garden sites from landowners for $1 per year. Attempt to negotiate a lease for at least three years (or longer if the property owner is agreeable). Many landowners worry about their liability for injuries that might occur in the garden. Therefore, include a simple “hold harmless” waiver in the lease and in the gardener agreement forms. For more information on the lease, and the hold harmless waiver, see Step 8 (Sign a Lease).
In addition, be prepared to purchase liability insurance to further protect the property owner (and yourself) should an accident occur in the garden. For more information on the hold harmless waiver, and liability insurance, see Step 8 (Sign a Lease) and Step 9 (Obtain Liability Insurance).
Step 7. Get Soil Tested
Gardening experts recommend testing the soil at the garden site for fertility, pH, and the presence of heavy metals. Soil tests are important to ensure that plants grow well. Be sure to indicate that you want a total elements digest when you submit your soil sample. A soil test kit can be obtained from the local county Extension office. Visit www.aces.edu/counties to find the nearest office.
Step 8. Sign a Lease
Landowners of potential garden sites might be concerned about their liability if someone is injured while working in the garden. The gardening group should be prepared to offer the landowner a lease with a “hold harmless” waiver. This “hold harmless” waiver can simply state that if a gardener is injured because of negligence on the part of another gardener, the landowner is “held harmless” and will not be sued. Each gardener should be aware of this waiver and should be required to sign an agreement to obtain a plot in the community garden. A sample community garden lease is available in Appendix B.
Figure 2. In-ground vegetable production. Source Tyler Mason 2017.
Step 9. Obtain Liability Insurance
Landowners may also require your group to purchase liability insurance. You can find information about liability insurance by searching the Internet for potential resources and businesses in your local area. You will be able to plan your garden after signing a lease and obtaining liability insurance.
Note: Be sure your startup budget includes start-up costs, such as leasing space, liability insurance, etc.
Step 10. Plan the Garden
Community members should be involved in the planning, design, and set-up of the garden. Gardens organized by only 1-2 key members are less likely to be operational if these members get ill or move away.
Before the design process begins, measure your site, and make a simple site map to scale. Hold two to three garden design meetings at times when interested participants can attend. Make sure that group decisions are recorded in official minutes by the committee secretary, or that someone takes accurate notes. This ensures that decisions made can be communicated to others, and progress will not be slowed. A great way to generate ideas and visualize the design is to use simple drawings or photos cut from garden magazines or online publications representing the different garden components—flower beds, compost bins, pathways, arbors, etc.—that can be moved around on the map as the group discusses layout. Garden design templates may also be available online.
Basic Elements of a Community Garden
Here are some recommendations from long-established and successful community gardeners.
- A minimum of 15 plots should be assigned to community members. Without plots for individual participation, it is difficult to achieve long-term community involvement. Raised bed plots, which are more expensive, should be no more than 4 feet wide to facilitate access to plants from the sides without stepping into the bed, and between 8 and 12 feet long. Construct raised beds in sizes from readily available lumber, or from wood that can be cut without much waste. In-ground plots typically range in size between 100- and 400-square feet. Pathways between beds and plots should be at least 3 to 4 feet wide to allow space. The soil in both raised beds and in-ground plots should be amended with compost or aged manure to improve fertility and increase organic matter content. Ideally, soil organic matter is between 4-5 percent.
- A simple irrigation system with one hose bib or faucet for every four plots is standard. Hand watering with a hose is also a practical and affordable method for individual plots (and it is almost a necessity when you start a garden from seed). Drip irrigation can be used in all areas of the garden for transplanted and established plants, but especially for deep-rooted fruit trees and ornamentals. If no one in the group is knowledgeable about irrigation, the committee might need some assistance in designing an irrigation system. Contact a local home grounds agent to help the group develop a basic layout and materials list.
- An 8-foot fence around the perimeter with a drive-through gate. This is a key element of success. Fencing will not eliminate all acts of vandalism or theft, but it will help to deter them.
- A locked tool shed or other structure for storing tools, supplies, and materials. Recycled metal shipping containers make excellent storage sheds and are nearly vandal-proof. Your local home improvement/garden box stores should have a wide selection for community garden needs.
- Add a shaded or covered bench or picnic table where gardeners can sit and take a break. If there are no shade trees on the site, an arbor can be constructed from wood, plastic, or metal pipe. Consider planting fast-growing climbing vines, such as chayote squash, bougainvillea, or muscadine. Alternatively, consider installing a small shade sail.
- Every community garden should have a durable, weatherproof sign with the garden’s name, garden group or committee (if different), sponsors, and a phone number for more information. Be sure to include the appropriate language for bilingual communities.
- If space allows, add a shared composting area for the community Wood pallets are easy to come by and (when stood on end, attached in a U-shape, and the inside covered with galvanized rabbit wire) make excellent compost bins.
Additions to Consider for a Garden Plan
- A small fruit tree orchard, whose care and harvest can be shared by all the members. The orchard can also create shade for people as well as space for shade-loving plants.
- A water fountain such as a hose bib (or faucet) can be purchased at a hardware store.
- Perimeter landscaping that focuses on drought-tolerant flowers and shrubs, plants to attract butterflies and hummingbirds, or roses and other flowers suitable for cutting Herbs are also well-suited to perimeter landscaping and help to create barriers to unwanted pest insects who do not like the smell of their essential oils
- A children’s area that includes special small plots for children, a sandbox, and play equipment.
- A meeting area, which could range from a semi-circle of hay bales or tree stumps to a simple amphitheater built of recycled, broken concrete. Building a shade structure above would be beneficial as well.
- A community bulletin board where rules, meeting notices, and other important information can be posted.
Step 11. Create a Garden Budget
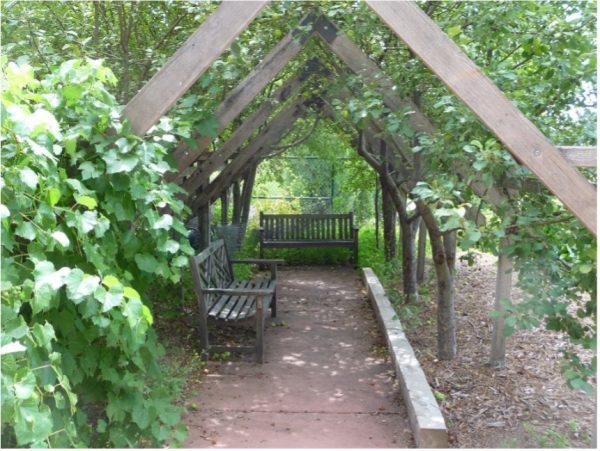
Figure 3. Places to sit in garden facilitate community. Source Cheyenne Botanic Gardens 2017.
Use the group’s design to develop a materials list and cost out the project. The garden coordinator or treasurer will need to call around and compare prices on fencing and other items. You might be surprised at the costs. A community garden with just the basic elements (listed above) typically costs between $2,500 to $5,000. At this point, the group might decide to scale back initial plans and save some design ideas for phase two of the garden.
Step 12. Attain Materials and Money
Some start-up funds will be needed through determination and hard work, but do not forget to seek out material or in-kind donations for the project.
Community businesses might be willing to donate fencing, lumber, seeds, etc. You will never know until you ask. Develop a letter that tells merchants about your project and why it is important to the community. Attach a reasonable wish list. Be sure to personalize the letter for each business you approach. Consider dropping it off personally with the store manager. Then follow up by phone. Be polite, patient, and persistent. The group’s efforts are likely to pay off with some, but not all the businesses approached. Be sure to thank these key supporters and recognize them on the garden sign, at the garden’s grand opening, or in another special way. Keep in mind businesses are more likely to support projects that share the same values and/or are in or near communities they serve.
Money, which will be needed to purchase items not donated, can be obtained through community fund-raisers, such as plant sales, rummage sales, pancake breakfasts, and craft or bake sales. Funds can also be obtained by writing grants but know that they take time and expertise to write. In addition, it may be six months or longer before the group hears back from the funding agency. Many grant applications require that one has a fiscal sponsor or a tax-exempt 501(c)3 status, such as a church or non-profit organization that agrees to administer the garden funds.
Step 13. Ensure the Garden Infrastructure is in Place
If a gardening group has not been formed, this may be the time to do so. Be sure to establish garden rules, fees (if applicable), a garden application form, a garden waitlist, and a bank account.
This is also the time to have monthly or quarterly meetings. Consider asking local or nearby home grounds staff from the Alabama Cooperative Extension System to present on a garden topic that interests the group. Topics such as starting plants from seed, fertilizing the garden, managing weeds, and planting the most delicious cultivars are a few suggested topics. Also, contact the city council person. He or she can be helpful in many ways such as obtaining trash pick-up services. Their staff can also help you with community organizing, so be sure to communicate with them early in the planning process using their preferred method.
Step 14. Begin Growing
Many new garden groups make the mistake of remaining in the planning, design, and fundraising stage for an extended period. There is a fine line between planning well and overplanning. After several months of research, designing, planning, and outreach efforts, gardeners will wonder if their efforts produce a community garden program. Therefore, it is important to plant something on the site during the first season. People need to see tangible results, or they may lose interest in the project. Keep the momentum going by implementing the following steps after sufficient funding is confirmed to start the project, sign a lease, and obtain liability insurance.
- Clean up the Site – Schedule community workdays to clean up the site. The number of workdays needed will depend on the size of the site, as well as the kind and volume of debris.
- Install an Irrigation System – Without water, vegetable quality, and yields will dramatically suffer. It is important to get this key element into place as soon as possible. Installing the system provides an opportunity for community involvement. More hands digging trenches and installing PVC pipe will help the process go smoothly.
- Plant Something – After obtaining water access, there are many options for in-garden action. Plan out beds and pathways by marking them with stakes and twine. Mulch the pathways. If fencing is unavailable or delayed, some people might still want to accept the risk of vandalism and get their plots started. Gardeners can also plant shade and fruit trees and begin to landscape the site. If the garden does not have the infrastructure to support perennials, trees, or vegetables, consider wildflower seeds because they grow quickly and can be replaced later.
- Construct the Garden – Continue to construct the garden as materials and funds become available.
Step 15. Celebrate Your Accomplishment
At this point, the garden idea and hard work have finally become a community garden. Be sure to take time to celebrate! Have a grand opening such as a barbecue or another fun event to commemorate the day. Be sure to recognize the businesses that donated resources. Invite existing gardeners, adjacent neighbors, local elected officials, and others that have supported or may support the garden in the future. This is a great time to recognize those who gave donations with a special certificate, bouquet, or basket of goodies.
Step 16. Troubleshoot as Garden Develops

Figure 5. Record your yields to track progress. Source Tyler Mason 2017.
Community gardens experience setbacks during the planning process and conflict after their establishment. Try to remain positive and stay organized. The key to success for community gardens is preventing the problems you can anticipate and collaboratively resolving the ones you cannot. Here are some suggestions for the most common problems that arise in a community.
- Vandalism – Most gardens experience occasional vandalism. The best action to take is to replant immediately. Vandals typically become bored after a while and stop. Outreach and education in your community to youth and the garden’s adjacent neighbors is very important. Try not to let a little vandalism discourage the group. It is likely to happen. Some people consider incorporating barbed-wired fences, but this is not recommended because it discourages community relations, looks off-putting, and may be illegal for anyone to install without a permit. Consider planting bougainvillea or pyracantha as deterrents because their thorns are abundant.
- Security – Invite the neighborhood resource officer from the local precinct to a garden meeting to get their suggestions on ways to make the garden more secure. Community officers can also be a great resource for managing issues related to vandalism and other undesirable Increased patrolling of the area once planting begins is another option.
- Communication – Clear, enforceable garden rules and a proactive garden coordinator (community garden chair) will go a long way towards minimizing conflict in the Still, communication problems will arise. It is the job of the garden committee to resolve those issues. If an issue is not clearly addressed in the rules, the membership can take a vote to add new rules or make modifications to existing rules. Be aware that language barriers can be a common source of misunderstanding. Garden committee leadership is advised to have a translator at garden meetings when participants are bilingual. The translator could be a family member or a garden member that speaks the language.
- Trash – It is important to get a compost system started right away and get some training for gardeners on how to use it. If gardeners do not compost, large quantities of waste will build up, create an eyesore, and could negatively impact relationships with neighbors and/or the property owner. Waste can also become a fire hazard. Make sure gardeners know how to sort trash properly, what is compostable, and what is recyclable. Trash cans that are placed in accessible areas and emptied regularly will help to keep the garden clean.
- Gardener Drop-Out – Often, people sign up for plots and cannot follow through. Remember that gardening is hard work. Be sure to create a clause in your gardener agreement that states gardeners may be expected to forfeit their right to the plot if they do not plant it by a certain date or if they are not maintaining Gardeners should be given ample opportunity to follow through. However, the plot may need to be reallocated if several reminders via telephone, email, or letter go unanswered. It is also advisable that every year, the leadership team conduct a renewed community outreach campaign by contacting churches and other organizations in the neighborhood to let them know about the garden and any available plots.
- Weeds – Gardeners tend to visit their plots less during the winter. This lower participation, combined with rain, tends to create a weed issue in January, February, and March. Remember, part of the agreement with the landowner is that the lot will be maintained and that weeds will be prevented from taking over. In the late summer/early fall, provide gardeners with a workshop or article about what can be grown in a fall or winter garden. Also, schedule garden workdays for the spring in advance since they are also needed at the end of winter to clear weeds and any accumulated debris. Apply a thick layer of mulch to the beds and paths to reduce weed proliferation if plots are untended during the winter months.
Appendices
For questions about accessibility or to request accommodations, contact Extension Communications and Marketing at 334-844-5696 or extcomm@aces.edu.
This document was adopted and appended from the original University of California Cooperative Extension, Los Angeles County publication (Community
Garden Start-Up Guide by Rachel Surls) for the Alabama Cooperative Extension System.

Project Editor: Rudy Pacumbaba, PhD, Extension Horticulture Specialist, Home Grounds & Urban Agriculture
New June 2023, A Guide to Starting a Community Garden, UNP-2193