Lawn & Garden
Raised bed gardening is a convenient and easy way to produce homegrown vegetables. Unlike traditional in-ground gardening, where lots of space is usually required, raised bed gardening is a perfect alternative for people who cannot garden due to limited garden space, poor or rocky soil, inadequate soil drainage, or physical limitations.
Regardless of family size or gardening experience, raised beds present homeowners the opportunity to grow vegetables themselves.
The idea of raised bed gardening is nothing new. For centuries, farmers and gardeners have mounded up soil to grow plants. Raised bed gardening is unique in that the soil level is higher than the surrounding soil, 6 inches to waist-high, and enclosed with materials to prevent soil from spilling out. The contained soil is formed into planting beds 3 to 4 feet wide, small enough that a person can maintain it without actually stepping onto and disturbing the planting area.
Raised bed gardens offer several advantages (and some disadvantages) over conventional garden plots:
Advantages
- Raised bed gardens can help maximize all available space and are typically smaller than traditional gardens, making them a more convenient option in areas with limited space.
- Raised bed gardens can be used as a solution for areas with poor and rocky soil or sloped terrains.
- Beds are usually filled with high-quality soil mixes that have large amounts of organic matter, which improves drainage and may increase yields.
- Soil raised above ground level tends to drain better and warm up much quicker in the spring, thus allowing for faster seed germination and transplant growth.
- Higher soil levels and improved soil quality offer better access, less maintenance, and easier harvest.
- Dense planting techniques result in higher production per square foot of garden and help reduce weed seed germination.
- Raised bed gardens can be entered and maintained soon after rains or irrigation without compacting soils.
- No expensive power cultivation equipment is needed.
- The formal orderliness and arrangement of a raised bed garden can be extremely attractive and a prized addition to the home landscape.
Disadvantages
- Elevated beds tend to dry out faster in the hot summer months, thus increasing the need for supplemental watering.
- Frame and soil materials for establishing a raised bed are an added expense.
- Limited rotation of crop families may lead to increased soilborne disease pressure and nematode problems.
- Increased plant density may increase some pest concerns, especially foliar diseases.
- They are not well suited to sprawling vegetables such as watermelons.
Location
Like any garden site, a raised bed should be in full sun for best production. A minimum of 6 to 8 hours of direct sun is required for most vegetables and flowers. Expect less-than-optimum production and leggy plants if full sun is not available. The bed should also be located in a convenient spot near the home and a water source. Regular irrigation is necessary for raised beds.
Materials and Size
Raised beds can be made just by mounding the soil, but these beds require a lot of maintenance. Most gardeners prefer to use framing materials to contain the new soil mixture. Old railroad ties, landscape timbers, wood planks, rock, concrete blocks, or decorative bricks are commonly used to hold and raise the soil up 6 to 12 inches. If wood products are used, they should be treated with wood preservatives′ to increase the life of the structure.
Materials for building a raised bed can vary greatly from inexpensive to expensive. Prices for framing materials and soil media to construct a raised bed have increased since 2020. Table 1 lists the common frame materials used to construct a raised bed, the quantity of materials needed, and the average costs associated with building four different-size beds. Depending on the frame materials and growing media used, one can spend approximately $60 or several hundred dollars for a 4’ × 4’ × 12” raised bed. Construction for a 4’ × 8’ × 12” raised bed with twice the growing space on average doubles in cost.
Table 1a. Frame Expenses and Comparisons for a Raised Bed*
| Frame Materials | Quantity | Cost for 4′ × 4′ × 10″ Raised Bed 13.33 feet3 | Quantity | Cost for 4' × 8' × 10" Raised Bed 26.66 feet3 |
|---|---|---|---|---|
| Pressure-Treated Lumber Planks Two (2″ × 10″ × 8′) | 2 | $27 to $30 | — | — |
| Pressure-Treated Lumber Planks One (2″ × 10″ × 8′) +Two 2″ × 10″ × 12′) | — | — | 3 | $56 to $61 |
Table 1b. Frame Expenses and Comparisons for a Raised Bed*
| Frame Materials | Quantity | Cost for 4′ × 4′ × 12″ Raised Bed 16 feet3 | Quantity | Cost for 4′ × 8′ × 12″ Raised Bed 32 feet3 |
|---|---|---|---|---|
| Pressure-Treated Lumber Planks (2″ × 12″ × 8′) | 2 | $36 to $43 | 3 | — |
| Pressure-Treated Lumber Planks One (2″ × 12″ × 8′) + Two 2″ × 12″ ×12′) | 1 + 2 | — | 3 | $72 to $92 |
| Pressure-Treated Lumber Planks (2″ × 12″ × 16′) | 1 | $31 to $42 | 2 | $62 to $84 |
| Semi-Treated Landscape Timbers (4″ W × 3″ H × 8′ L) | 8 | $37 | 12 | $55 |
| Composite Decking Boards (1″ W × 6″ H × 8′ L) | 4 | $84 to $212 | — | — |
| Composite Decking Boards (1″ W × 6″ H × 16′ L) | 2 | $132 to $164 | 4 | $265 to $330 |
| Retaining Wall Block & Decorative Stone (4″ H × 6″ D × 12″ L) | 54 | $123 to $161 | 78 | $178 to $233 |
Table 1c. Frame Expenses and Comparisons for a Raised Bed*
| Frame Materials | Quantity | Cost for 4′ × 4′ × 12″ Raised Bed 16 feet3 | Quantity | Cost for 4′ × 8′ × 12″ Raised Bed 32 feet3 |
|---|---|---|---|---|
| Used Railroad Ties (8″ W × 8″ H 8′ L) | 2 | $44 to $54 | 3 | $66 to $81 |
| Concrete Blocks (8″ W × 8″ H × 16″ L) or (4″ W × 8″ H × 16″ L) | 14 | $32 to $36 | 22 | $50 to $57 |
The size of a raised bed depends on the gardener and can vary based on need. Ideally, frames will range in size from 4 × 4 feet to 4 × 12 feet. The 4-foot width is preferred because it allows for easy reach from either side without requiring the gardener to step into the bed, keeping soil compaction to a minimum. The length of the bed can also vary depending on the type of construction materials used and available space. A bed 4 to 12 feet in length is suitable for most home gardens.
A soil depth of 6 to 12 inches is desirable as this will allow for improved drainage and adequate root development to produce healthy plants. Beds may be higher and deeper for better access but require more soil or a porous bottom for adequate drainage.
Concerns sometimes arise over the use of treated lumber in vegetable beds. The most common wood preservative traditionally used (chromated copper arsenate, or CCA) was phased out on December 31, 2003, for virtually all residential use, including raised beds. Two other products, ACZA (ammoniacal copper zinc arsenate) and ACQ (ammoniacal copper quat), have replaced CCA and may be used for raised bed construction. Well-documented research has shown that CCA, ACZA, and ACQ may be safely used to construct vegetable beds. However, some gardeners still prefer to line the sides of beds with polyethylene plastic so roots do not come into contact with the material. Do not use plastic on the bottom of the beds, as this will prevent drainage.
Soil Preparation
One of the greatest advantages of raised bed gardening is the ability to amend the soil or create new soil for the bed. This is especially important in areas where soils are high in clay and tend to drain poorly or on newly constructed areas where severe soil compaction has occurred. Raised beds are often the best option in these situations.
Many growing media options are available for creating a raised bed. Any combination of purchased topsoil, compost, fine pine bark mulch or soil conditioner, or peat will work well for growing vegetables in a raised bed. Commercially prepackaged growing mixes that contain such items are also available. Like frame materials, new growing media can vary significantly from inexpensive to expensive. Table 2 lists the common growing media used to construct a raised bed, compares costs by bulk and by the bag, and shows the average costs associated with building a 4′ × 8′ × 12″ bed or 32-cubic-foot bed. If available, buying soil media in bulk and even mixing it yourself will offer some savings.
Table 2. Growing Media Expenses and Comparisons for a Raised Bed*
A combination of media options, such as topsoil + compost, can raise or lower overall cost per bed.
| Growing Media | Bulk (Cost per Cubic Foot) | Cost for 4' × 8' × 12" 32 feet3 Raised Bed | Bags (Cost per Cubic Foot) | Cost for 4' × 8' × 12" 323 Raised Bed |
|---|---|---|---|---|
| Topsoil | $1.07 to $2.22 | $34 to $71 | $2.18 to $7.50 | $70 to $240 |
| Gro Mixes and Blends | $1.67 to $2.22 | $54 to $71 | $6.65 to $7.99 | $213 to $256 |
| Soil Conditioner – Aged or Fine Pine Bark | $0.81 to $1.48 | $26 to $48 | $2.29 to $2.50 | $74 to $80 |
| Compost or Humus | $0.81 to $1.48 | $26 to $48 | $2.88 to $12.99 | $92 to $416 |
| Mushroom Compost | — | — | $4.47 to $9.32 | $143 to $298 |
| Composted Manure | — | — | $3.27 to $9.99 | $105 to $320 |
| Various Labeled Garden Soils | — | — | $3.98 to $8.59 | $128 to $275 |
| Various Labeled Flower & Vegetable Soils | — | — | $3.99 to $7.99 | $128 to $256 |
| Various Labeled Raised Bed Soil Mixes | — | — | $4.99 to $8.66 | $160 to $278 |
| Sphagnum Peat Moss | — | — | $5.96 to $8.99 | $191 to $189 |
Several amended soil mixes can be used, but any of them should include good topsoil and lots of organic matter (ground pine bark, peat moss, compost, rotted leaves, etc.). This gives a planting mix that drains well and is easy to till. If you use a potting soil mix, several options are available. These may be mixed and added to the raised bed or mixed in the raised bed by hand or by using a small garden tiller.
Before adding the soil mix, loosen or spade the existing soil and leave it rough. This is easily done by turning the soil with a shovel when moisture is sufficient to soften the soil. By leaving the soil surface rough, roots are more likely to grow into the natural soil once they grow through the soil mix; as consequently, the soil mix will drain more easily. Adding about 20 pounds agricultural gypsum per 100 square feet (about 4 cups per 4 × 4 area) to the natural soil will help with deep root growth and will supply extra calcium to the soil. (Check soil pH and add lime as needed.)
Spade or till 6 to 8 inches deep. Next, blend about 2 inches of the soil mix into the upper few inches of native soil. This will help avoid problems that can arise from having two different soil layers abruptly meeting. Then, fill the rest of the raised bed. Adjust the pH of the soil mix as needed. The result will be a foot or more of rich soil for plants to grow in. (You may need to replace 1 or 2 inches of the soil mix each year as the organic components begin to compost and shrink.)
If you plan to use the naturally occurring topsoil with a minimum of soil amendments, a soil test is necessary for applying ground limestone and fertilizers. If one of the soil mixes listed in the Potting Mixes for Raised Beds and Container Gardens chart is used, ground limestone and fertilizers are already added to the mix.
Potting Mixes for Raised Beds and Container Gardens
 The following potting mixes are widely used in the commercial horticultural industry and should be suitable for home garden trials.
Potting mix for container-grown, woody ornamentals and planting beds:
- 6 parts pine bark mulch
- 1 part sand
- 10-pound ground dolomitic limestone per cubic yard (½ cup per cubic foot)
- 14-pound slow-release fertilizer high in N (e.g., 18-6-12) with micronutrients per cubic yard ( about ¾ cup per cubic foot)
- Always choose a fertilizer with about three times more N than P2O5 (e.g., 3:1:x ratio of N:P2O5:K2O— Sta-Green 18-6-12 or Osmocote 19-6-12).
- Use about 10 percent compost in mix.
Potting mix for tender annuals and container gardening:
- 4 parts pine bark
- 1 part peat
- 10-pound ground dolomitic limestone per cubic yard. (½ cup per cubic foot)
- 14-pound slow-release fertilizer high in N (e.g., 18-6-12) with micronutrients per cubic yard (about ¾ cup per cubic foot)
- Always choose a fertilizer with about three times more N than P2O5 in fertilizer.
- Use about 10 percent compost in mix.
Potting mix with slow-release fertilizer for seedlings and tender annuals in greenhouses:
- 1 part peat
- 1 part horticultural vermiculite
- 10-pound ground dolomitic limestone per cubic yard (½ cup per cubic foot)
- 3-pound premium grade 13-13-13 with micronutrients per cubic yard (¼ cup per cubic foot)
- 5-pound Osmocote (14-14-14) per cubic yard (1/3 cup per cubic foot)
Useful measurements:
- 1 ¼ 5-gallon plastic bucket ≈ 1 cubic foot
- 5-gallon plastic bucket ≈ 0.8 cubic foot
- 27 cubic feet = 1 cubic yard
- 34 5-gallon plastic buckets ≈ 1 cubic yard
- 1 pint mixed fertilizer or coated fertilizer ≈ 16 ounces (1 pound)
- 1 pint ground dolomitic limestone ≈ 26 ounces (1 pound 10 ounces)
- 1 pint pelleted limestone ≈ 22 ounces (1 pound 6 ounces)
- 1 pint = 2 cups ≈ 16 ounces = 1 pound
Plant Spacing
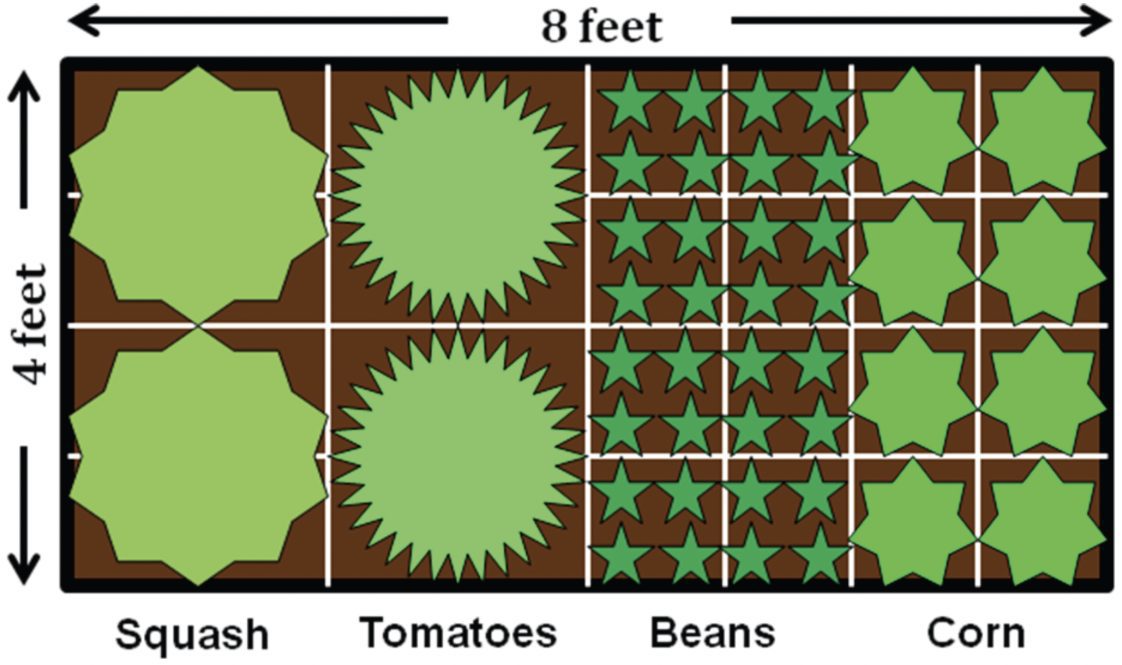
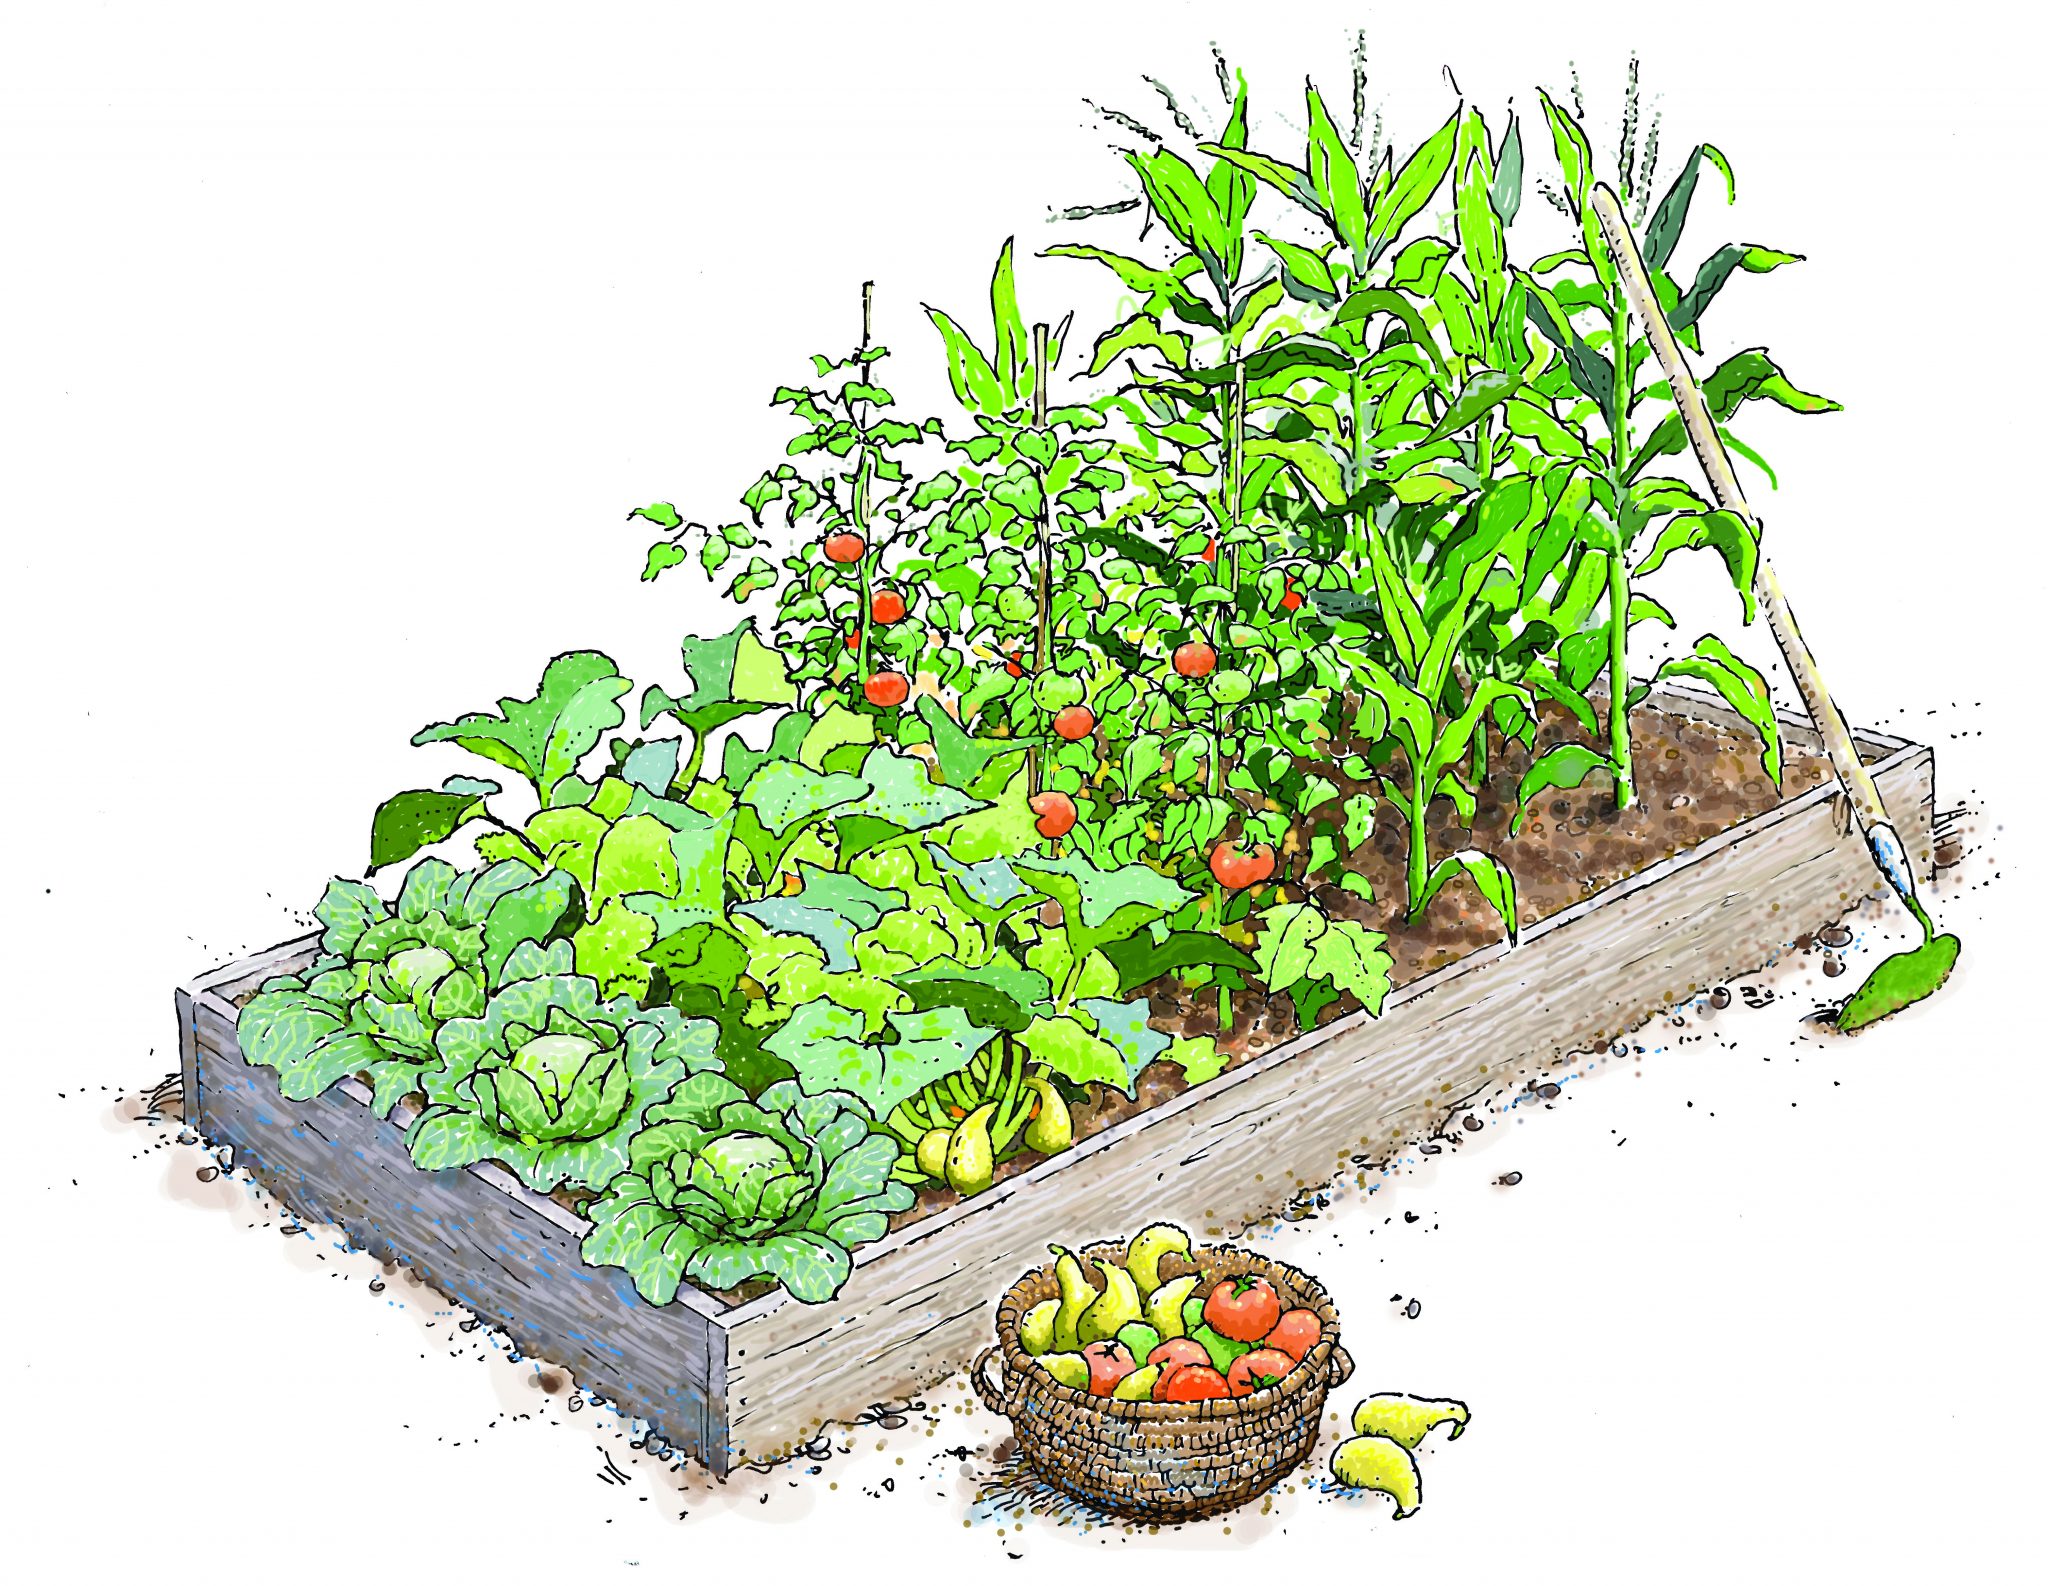
Figure 1. Example of blocking planting—vegetable spacing and grouping
For a truly productive raised bed garden, the gardener must relearn many aspects of planting. Gone are the long straight rows and wide spacing between rows. Raised bed gardens use space more efficiently to maximize production. In fact, rows may not even be used. Block planting, with proper spacing between plants, is used to optimize yield (figure 1). For example, large crops such as tomatoes or squash will need to be on 24-inch centers, whereas cabbage, potatoes, or corn are spaced 1 foot apart. Medium-sized vegetables, such as snap beans, peas, or onions, are planted about 4 to 6 inches apart. Small crops, such as the leafy greens and root crops, can be planted by scattering the seeds over a small section of the soil. Staking or caging the plants will allow for the highest plant density. Other devices can be used to increase plant density. Trellises and other structures can be made to let vine crops and other plants grow up instead of sprawling.
Efficient Use of Space
An efficient gardener will use the bed to its fullest potential. It is important to plan carefully to achieve the maximum benefit. Try to group vegetables based on their maturity time or length of productivity (figure 1). Plant all short-season crops in one area so another crop can replace them when they finish producing. This is referred to as succession planting. For instance, plant lettuce, spinach, radishes, and other leafy crops in one area so the area can be replanted with beans, cucumbers, or some other warm-season crop after the first crop is harvested. Also, interplanting compatible crops to use empty bed space is a great practice. For example, plant peppers or tomatoes between rows of onions. By the time the onions are harvested, the other plants will just be reaching a large size. Succession planting and interplanting will help you get the full potential of the bed. Do not overlook fall and winter gardening. Most crops that produce well in the spring months will do much better in the fall (broccoli, cauliflower, cabbage, carrots, rutabaga, collards, turnips).
Planting Dates
 You might be able to plant a raised bed garden a little earlier than a conventional garden because raised beds warm up more quickly in the spring. By using mulches and row covers, you could plant as much as 2 weeks earlier than a traditional garden. Row covers can also extend your harvest later into the fall and early winter.
Watering
The soil mixes used in raised beds tend to drain excessively the first year after establishment. This will require more frequent watering than traditional plantings. Check the soil and water whenever it is dry, about 2 to 4 inches deep. This could require up to 2 inches of irrigation water per week if it doesn’t rain. However, you might be irrigating with a soaker hose or drip irrigation rather than a sprinkler. In this case, you should water until the entire bed is moist.
Drip irrigation offers many benefits, including less water and more efficient water use. Drip tubing or soaker hoses can be purchased at local nurseries and garden centers. The tubes or hoses are then laid out over the bed, spaced about 2 to 3 feet apart, depending on how porous the soil is. With very low pressure (7 to 10 psi), the water slowly drips or oozes from the hose and filters down into the soil. Soaker hoses will work at typical household water pressure. Both options place the water at the root system, which allows for less evaporation and prevents water from moving to nontarget areas, such as the path. Drip tubing can also be buried below the soil surface for the most efficient delivery method and to help avoid animal damage.
After the garden’s first year, you will notice that the soil mix begins to hold more water as the organic matter gradually composts and turns into humus. You could need less irrigation as the native soil improves and plants grow deeper roots.
 Fertilization
The fertilization needs of a raised bed garden are similar to those of a traditional garden. Start with a soil test for mineral soils and soils based largely on the natural topsoil. For a soil testing “medium” in phosphorus (P) and “medium” in potassium (K), a general recommendation would be to use about ½ cup of 13-13-13 fertilizer per 4 × 4–foot bed at planting, and an additional 1/3 cup of 13-13-13 a few weeks later for long-season crops. For green, leafy vegetables, use a fertilizer high in nitrogen (the first number on the fertilizer bag) to maintain vigor and green color. Overfertilization is always a concern when raising vegetables.
If one of the soil mixes listed in the Potting Mixes for Raised Beds and Container Gardens chart is used, then the mix contains adequate fertilizer for the first few months of the bed. Afterward, use a fertilizer high in nitrogen (N), low in phosphorus (P), and high in potassium (K), such as a 15-0-15 at a rate of 1/3 cup per 4 × 4–foot bed.
Organic fertilizers such as composts, rotted manures, bone meal, blood meal, fish meal, and cottonseed meal can be used instead of the inorganic fertilizers listed in the Potting Mixes for Raised Beds and Container Gardens chart.
Mulches
 Summer mulches such as straw or mini pine bark nuggets should be placed around vegetable plants to help conserve moisture, cool the soil, and control pesky weeds. Apply a 2- to 4-inch layer around young and emerging plants and over the soil after it has warmed. Do not apply too early as you might keep the soil cool and slow the growth of warm-season crops. Old newspapers can also be recycled and used as free and biodegradable mulch in the vegetable garden. Layers of newspapers can be placed down before adding other mulch. The newspaper will break down in a year, adding valuable nutrients back into the soil.
Raised bed gardening allows for more efficient use of space to maximize your investment of time, energy, and money. As with any gardening product, the fun and rewards come from your own experimentation and from finding techniques that work best for you. For more information, contact your county Extension office or visit www.aces.edu.
 Shane Harris, County Extension Coordinator, Home Grounds, Gardens, and Home Pests, and Charles Mitchell, former Extension Specialist, both with Auburn University.
Revised March 2024, Raised Bed Gardening, ANR-1345
Adapted from Raised Bed Gardening by Dennis Patton and Ward Upham (Kansas State University, 2006). The chart on page 5 was adapted from Charles Mitchell, Raymond Kessler, and Charles Gilliam’s Potting Mixes for Container Gardens (ACES, 2006).
Appreciation is expressed to the artist, Bruce Dupree.