Food Safety
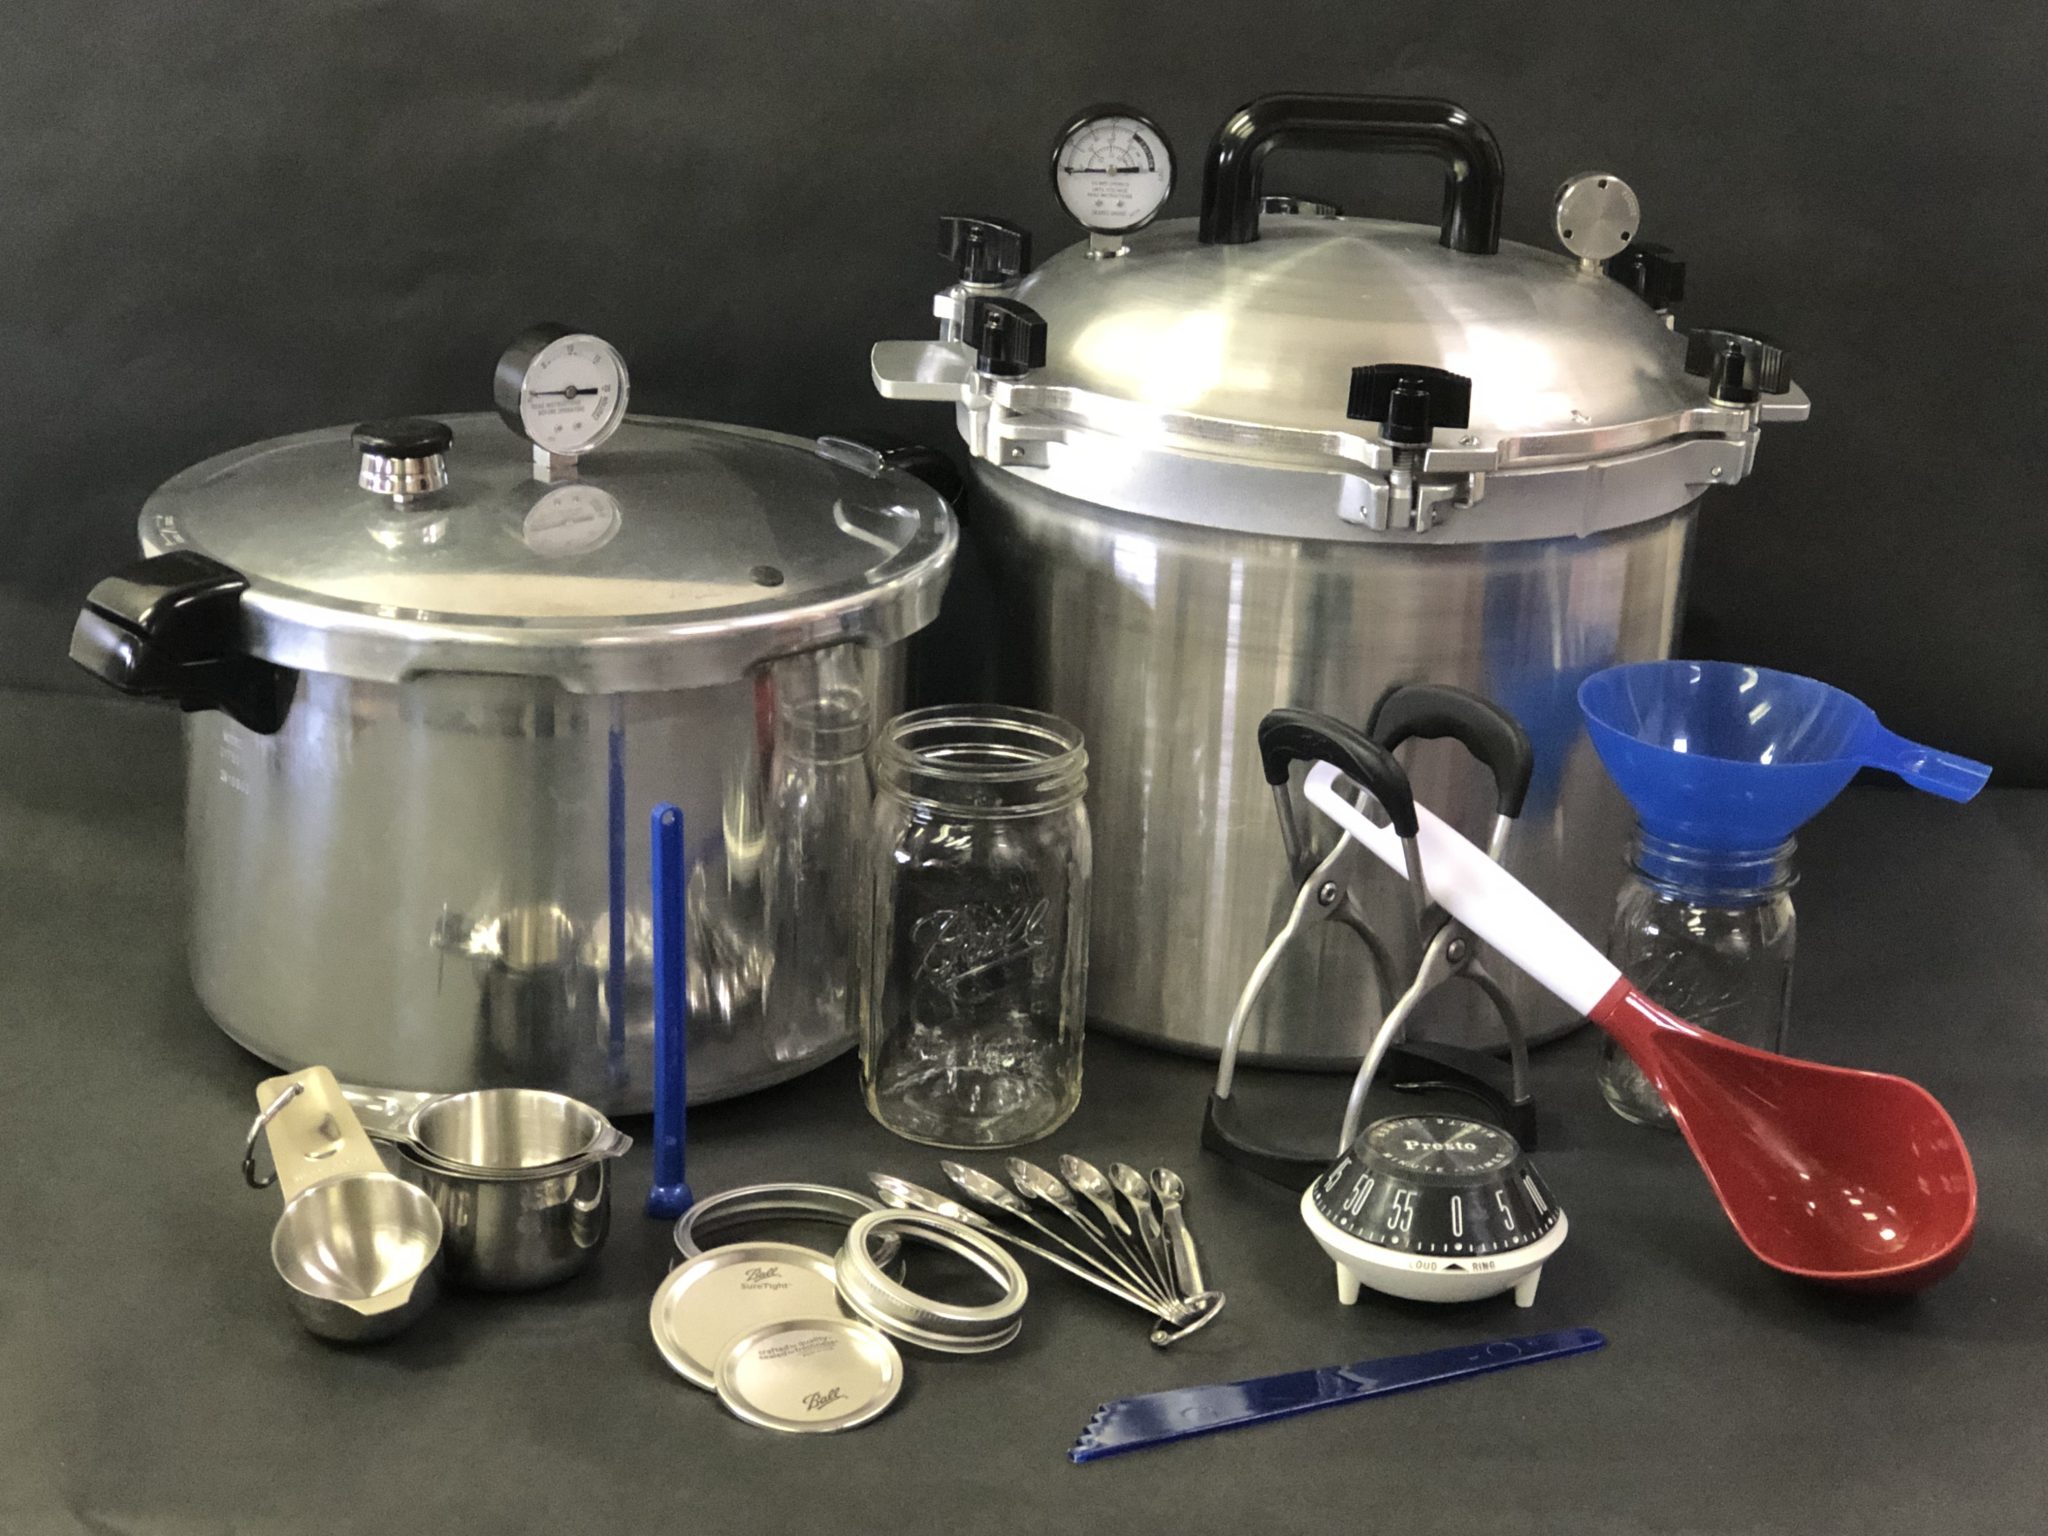

Figure 1. Tools for proper canning. Never process low acid vegetables or meat in a boiling water canner. See the chart in table 1 for proper canning times and pressure.
Aren’t you proud when you look in your pantry and see all those jars of pretty canned food? Or has your canned food begun to turn dark, leaking liquid from under the lid, or is it cloudy looking? Learn the latest methods and techniques.
Have you canned for years using your mother’s or grandmother’s possibly outdated recipes? This document provides updates and the latest information on the proper methods of canning vegetables at home.
After gathering, preparing, and processing vegetables, you want your family to enjoy eating them. Canned food, if properly gathered, prepared, processed, and stored, is very nutritious. Proper canning of fresh vegetables is an excellent way to preserve them for later use when they are not in season.
Many people prefer some canned vegetables to frozen ones, such as green beans and tomatoes. Some say they are much better canned and, if the power goes off, you will still have the canned items while the frozen ones will thaw over a period of several days.
DANGER: Vegetables not canned using current research-based canning methods pose a serious health risk from botulism poisoning.
Clostridium Botulinum
Pressure canning is the only safe method for home canning vegetables. Vegetables and meats are low- acid foods and must be canned in a pressure canner at the appropriate pressure for the correct amount of time to guarantee their safety. Deadly foodborne illness can occur when low-acid vegetables and meats are not properly preserved. Clostridium botulinum is the bacterium that causes botulism food poisoning. In vegetables and meat not properly preserved, the bacteria, if present, can produce spores that can only be destroyed by temperatures that reach 240°F for the correct amount of time in a pressure canner. The Clostridium botulinum bacterium is harmless until it is in a moist, low-acid, oxygen- free environment or in a vacuum sealed–environment. Jars on your pantry shelf at room temperature are a great place for them to grow. Under these conditions, the bacterium can grow and produce toxins dangerous to people and animals.
Importance of Canning Right
It is important for you to understand what takes place in the canning process. Unless you know this, you won’t appreciate why you must use certain equipment and be so careful about canning temperatures and time limits.
Foods spoil because they are constantly under attack by microorganisms—bacteria, yeast, mold, etc. These are always present in the air, water, and soil.
Then, too, vegetables contain chemical substances called enzymes. These help bring about normal ripening and maturing. Enzyme action, unless halted, can cause over-ripening; undesirable changes in flavor, color, and texture; and even spoilage.
When you can vegetables, you must heat them at a high enough temperature and for a long enough time to destroy spoilage microorganisms and stop enzyme action.
The main point to remember is that each step in the canning process is important. One step depends on another.
Wise Canning Starts with These Steps:
Harvest Vegetables at the Right Stage
- It is very important that vegetables be gathered at the right stage of maturity. If the vegetable is not mature, it will not have the characteristic flavor; if too mature, it will be tough and lack flavor. The important thing is to gather the vegetable when it is just mature and tender.
Prepare Correctly
- Regardless of what vegetable is being canned, a good rule to follow is “From the garden to the canner in 2 hours.” As soon as the vegetable is brought from the garden, spread it out in the coolest place available. A refrigerator is excellent, but often there isn’t enough room. If you put ice over the vegetable and leave it too long, the pieces in the bottom of the pan will get waterlogged. This is not desirable.
- Wash the vegetable thoroughly—enough for one canner load. Wash small amounts at a time under running water or through several changes of water. Lift vegetable from the water each time so dirt that has been washed off won’t collect on the food again. Do not let vegetables soak or stand in water.
- Sort pieces of vegetable by size or maturity. This aids in filling the jars. Beans, for example, can be sorted as you remove the ends. Some people snap beans while others cut them. Remove strings on beans as you go. If the string is tough, the bean is generally too mature to can for best flavor and texture. Nothing is worse than opening canned green beans with strings that do not dissolve with cooking or over time.
Choose Method of Packing Your Jars
The next step is to use either the raw pack or the hot pack method. Either is good. The quality of the product is about the same, but you may prefer one method over the other. If you do raw pack, for instance, of green beans, you will discover that they are going to shrink, which may cause the look of less product in your jar and more liquid, but as long as the liquid is above the produce, it’s fine. It just may not look as good.
Hot Pack Method
In the hot pack method, the vegetable is placed in boiling water and heated for a few minutes (table 1 for timing). This destroys some of the enzyme action and some microorganisms and shrinks the vegetable. Heat no more than 2 to 3 quarts at a time in one container. Then the water will return to a boil much more quickly. Use enough boiling water to cover the vegetable. Use this same liquid to fill the jars after the vegetable is packed.
Raw Pack Method
The only difference in this method is that you don’t preheat the vegetable before putting it in the canning jar. Generally, the recommended canning time is different.
Use Standard Canning Jars
Use standard canning jars—they generally have the manufacturer’s name in big letters printed on the side of the jar and/or the word MASON. Do not use peanut butter, mayonnaise, or pickle jars, etc., because they may not withstand the 10-pound (240°F) pressure needed to can vegetables. If you are reusing standard canning jars you have on hand, be sure to check your jars for chips or cracks. Run your finger around the mouth of the jar to see if it has any chips or breaks. If it does, the jar will not seal. Jars can be used for years if handled correctly and have no nicks or cracks.
Wash and rinse the jars by hand or in the dishwasher just before you fill them with hot produce to keep them from breaking them. Keep jars warm until ready to place hot product in them. Preheat your pressure canner or the water you place in it so it will be ready for the hot jars to be placed in. This also reduces the time it takes the canner to come up to pressure if the water is heated already.
To get a 7-quart pressure canner ready for processing, add about 3 inches of hot water. (Larger canners need more water; read the manufacturer’s instructions.) Put the rack in the bottom of the canner and place the canner on the range unit to heat.

Canning Lids
The best thing to use is the two-piece lid, which is a screw band and a flat metal lid (flat metal lid can only be used once, but the screw bands, if not rusted, can be used over and over). Read the manufacturer’s instructions that come with the lids on how to treat the lids before applying them to your jars. Some call for heating and others do not.
Preparing Vegetables and Placing in Jars
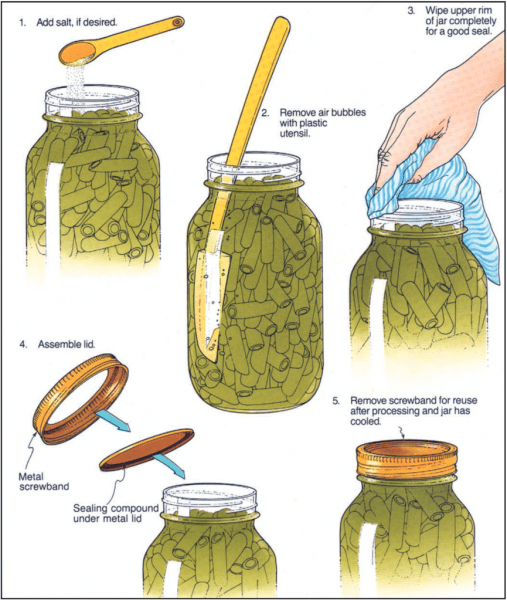
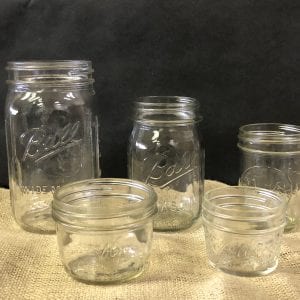
Figure 2. Properly pack the jars. (Photo credit: Complete Guide to Home Canning, Guide 1, Principles of Home Canning. United States Department of Agriculture)
When the vegetables have been preheated for the recommended time, remove a canning jar from the hot water and empty it. At this time, salt can be added if you desire to use salt. It is not a preservative in canning vegetables unless you are pickling items. Use only canning salt. Canning salt has not been processed with an anticaking substance as table salt has been.
Fill the jar with hot food within 1⁄2 inch of the top; for starchy vegetables, 1 inch. Add the hot liquid in which the vegetable was cooked. The vegetable pieces should be loose enough to allow the liquid between them. Too tight a pack will keep the liquid from circulating around the food while it is being processed in the pressure canner.
Slide a plastic spatula down the inside of the jar on each side, all the way to the bottom. This will allow air bubbles to come to the top. Air left in the jar takes up space and can cause food to darken. Be sure the liquid completely covers the vegetable. Leave 1⁄2 inch of headspace.
After filling jars, you need to wipe jar rims to make sure no debris, such as vegetable pieces, is present to keep the lid from sealing. Place the lid on the jar, and screw the band on the jar mouth. Do not screw too tightly or the sealing compound may be cut—a fingertip tight closure is what you want. As soon as the lid is in, place the filled jar on the rack in the pressure canner. Leave space between the jars so water (and later steam) can circulate around them.
Use a Pressure Canner
All vegetables, except tomatoes, should be canned in a pressure canner at 10 pounds pressure (240°F). You may can tomatoes in either a water bath canner or a pressure canner, but you should always hot pack them. Have your gauge checked for accuracy at your county Extension office. There is no charge.
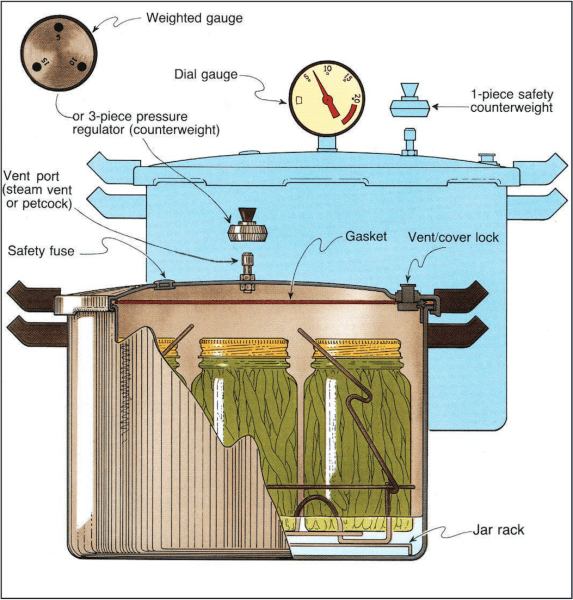
Figure 3. Use a pressure canner for all vegetables except tomatoes. (Photo credit: Complete Guide to Home Canning, Guide 1, Principles of Home Canning. United States Department of Agriculture)
In a water bath canner, the temperature never gets higher than 212°F. When doing high acid foods such as fruits and tomatoes, it only takes 212 degrees to kill mold and yeast and other spoilers. Vegetables (except tomatoes) are nonacid foods and require the higher temperature to kill microorganisms, such as Clostridium botulinum. Molds and yeasts will also be killed, but Clostridium botulinum takes a temperature of 240 degrees, which can only be reached under pressure for a certain amount of time.
All home-canned vegetables should be boiled for at least 10 minutes after they are removed from the jar or can for serving. This destroys any toxin that may be present. Never open a canned vegetable and taste it; boil for at least 10 minutes and then taste. Boil starchy and leafy vegetables for 20 minutes. If the food looks spoiled, foams, or has an off-odor during heating, destroy it.
Caution! Canning Tomatoes Requires Special Preparation
Acidification: To ensure safe acidity in whole, crushed, or juiced tomatoes, add 2 tablespoons of bottled lemon juice or 1⁄2 teaspoon of citric acid (not ascorbic acid) per quart of tomatoes. For pints, use 1 tablespoon bottled lemon juice or 1⁄4 teaspoon citric acid. Acid can be added directly to the jars before filling with product. Add sugar to offset acid taste, if desired. Four tablespoons of a 5 percent acidity vinegar per quart may be used instead of lemon juice or citric acid. However, vinegar may cause undesirable flavor changes.
If a procedure from the USDA Complete Guide to Home Canning for canning tomatoes offers both boiling water and pressure canning options, all steps in the preparation (“Procedure”) are still required even if the pressure processing option is chosen. This includes acidification. The boiling water and pressure alternatives are equal processes with different time/temperature combinations calculated for these products. The pressure processing options in these products were not developed for tomatoes without added acid.
Points to Remember
- Use the variety of produce your family likes.
- Select mature, yet tender, vegetables.
- Remember: From the garden to the canner in 2 hours.
- Wash and prepare the vegetable carefully.
- Preheat the vegetable if using hot pack method.
- Pack in standard canning jars; cover with liquid; remove air bubbles.
- Wipe jar mouth and threads; adjust lid according to manufacturer’s instructions.
- Place jar on rack in 7-quart pressure canner with 3 inches of hot water.
- Adjust pressure canner lid in locked position.
- Let steam escape from pet cock for 10 minutes, then close.
- Start counting time when pressure gauge registers 11 pounds or weighted gauge 10 pounds.
- Use recommended USDA timetable.
- When time is up, slide canner from range unit; let it cool.
- About 3 or 4 minutes after gauge has returned to 0, open petcock slowly.
- Open canner lid away from your face to prevent steam burn. Lift side of canner lid away from you.
- Take out hot jars one at a time.
- Place jars on a rack to cool—out of a draft.
- The next day, check lids to make sure they sealed with the lids being concave; clean jars and put away in storage in a clean, dark, dry area for a year to a year and a half.
- If a jar did not seal, either place it in refrigerator and use in the next few days or completely reprocess the product by replacing the lid with a new one.
Remember—each step in canning depends on completing the previous step correctly.
Table 1. Timetable for Canning Low Acid Vegetables
Table used with permission of Ohio State University Extension.
Minutes at 11 pounds pressure with a dial gauge canner (240°F)
Do not mash potatoes. It makes them too dense to preserve safely.
| Vegetables | Pre-Preparation | Pack | Processing Time (in minutes): Pints | Processing Time (in minutes): Quarts |
|---|---|---|---|---|
| Asparagus (spears or pieces) | Use tender, tight-tipped spears, 4 to 6 inches long. Wash and remove tough scales. Break off stems and wash again. Cut in pieces or leave whole. | Raw pack: Fill jars with raw asparagus, pack tightly (but avoid crushing), then cover with boiling water, leaving 1 inch headspace. Remove air bubbles. Wipe jar rims. Adjust lids. Hot pack: Cover asparagus with boiling water. Boil 2 or 3 minutes. Loosely fill jars with hot asparagus and cover with boiling water, leaving 1 inch headspace. Remove air bubbles. Wipe jar rims. Adjust lids. | 30 | 40 |
| Beans or peas (dry, all varieties) | Sort and wash dry seeds. Cover with cold water and let stand 12 to 18 hours in cool place. Drain. | Hot pack only: Cover soaked beans with fresh water and boil 30 minutes. Fill jars with beans or peas and cooking water, leaving 1 inch headspace. Remove air bubbles. Wipe jar rims. Adjust lids. | 75 | 90 |
| Beans (fresh lima, butter, pintos, soy or shelled beans) | Can only young, tender beans. Shell beans and wash thoroughly. | Raw pack: Pack raw beans loosely into jars. For small beans, fill 1 inch from top for pints and 1 1/2 inches for quarts. For large beans, fill 1 inch from top for pints and 1 1/4 inches for quarts. Do not press or shake down. Fill jars with boiling water, leaving 1 inch headspace. Remove air bubbles. Wipe jar rims. Adjust lids. Hot pack: Cover with boiling water, bring to a boil and boil 3 minutes. Pack hot beans loosely in jars and cover with boiling water, leaving 1 inch headspace. Remove air bubbles. Wipe jar rims. Adjust lids. | 40 | 50 |
| Beans (green, snap, wax, Italian) | Wash and trim ends. Cut or snap into 1-inch pieces, or leave whole. | Raw pack: Fill jars tightly with raw beans, leaving 1 inch headspace. Add boiling water, leaving 1 inch headspace. Remove air bubbles. Wipe jar rims. Adjust lids. Hot pack: Cover with boiling water, boil 5 minutes. Fill jars loosely, leaving 1 inch headspace. Remove air bubbles. Wipe jar rims. Adjust lids. | 20 | 25 |
| Beets (whole, cubed or sliced) | Sort for size. Cut off tops, leaving tap root and 1 inch of stem to reduce color loss. Wash. | Hot pack only: Boil beets until skins slip off easily (15 to 25 minutes, depending on size). Cool; remove skins, stems and roots. Can baby beets whole. Cut medium and large beets in 1⁄2-inch slices or cubes, or halve or quarter. Fill jars with hot beets and cover with fresh boiling water, leaving 1 inch headspace. Remove air bubbles. Wipe jar rims. Adjust lids. | 30 | 35 |
| Carrots (sliced or diced) | Wash, peel and rewash. Can baby carrots whole. Slice or dice larger ones. | Raw pack: Pack carrots tightly into jars to 1 inch of jar tops and cover with boiling water; leave 1 inch headspace. Remove air bubbles. Wipe jar rims. Adjust lids. Hot pack: Cover carrots with boiling water; simmer 5 minutes. Fill jars loosely and cover with boiling water, leaving 1 inch headspace. Remove air bubbles. Wipe jar rims. Adjust lids. | 25 | 30 |
| Corn (cream-style) | Husk corn, remove silk and wash. Blanch ears 4 minutes in boiling water. Cut corn from cob at about the center of kernel. Scrape cob. | Hot pack: To each quart of corn and scrapings in saucepan, add 2 cups boiling water. Heat to boiling. Fill pint jars with hot corn mixture, leaving 1 inch headspace. Remove air bubbles. Wipe jar rims. Adjust lids. | 85 | Not recommended |
| Corn (whole-kernel) | Husk corn, remove silk and wash. Blanch 3 minutes in boiling water. Cut from cob at about 3⁄4 depth of kernel. Do not scrape cob. | Raw pack: Pack corn in jars, leaving 1 inch head- space. Do not shake or press down. Add fresh boiling water, leaving 1 inch headspace. Remove air bubbles. Wipe jar rims. Adjust lids. Hot pack: To each quart of kernels in saucepan, add 1 cup hot water. Heat to boiling and simmer 5 minutes. Fill jars with corn and cover with cooking liquid, leaving 1-inch headspace. Remove air bubbles. Wipe jar rims. Adjust lids. | 55 | 85 |
| Greens (including spinach) Greens can be canned; however, freezing results in a better product. | Sort and wash thoroughly. Cut and remove tough stems and midribs. Remove any discolored or damaged portions | Hot pack only: Steam greens, 1 pound at a time, for 3 to 5 minutes or until wilted. Fill jars loosely with greens; add fresh boiling water, leaving 1 inch headspace. Remove air bubbles. Wipe jar rims. Adjust lids. | 70 | 90 |
| Mushrooms (whole or sliced) | Use only high-quality, small- to medium-sized domestic mushrooms with short stems. Do not can wild mushrooms. Trim stems and discolored parts and soak in cold water for 10 minutes to remove dirt. Rinse in clean water. Leave small mushrooms whole; cut large ones. | Hot pack only: Cover mushrooms with water in a saucepan and boil 5 minutes. Fill jars with hot mushrooms. Add 1/8 teaspoon of ascorbic acid powder or a 500-milligram tablet of vitamin C to each jar to prevent discoloration. Add fresh hot water, leaving 1 inch headspace. Remove air bubbles. Wipe jar rims. Adjust lids. | 45 | Not recommended |
| Peas (green or English- shelled) | Select filled pods containing young, tender, sweet seeds. Shell and wash peas. | Raw pack: Pack peas into hot jars, leaving 1 inch headspace. Do not shake or press down; add boiling water; leave 1 inch headspace. Remove air bubbles. Wipe jar rims. Adjust lids. Hot pack: Cover peas with boiling water; boil 2 minutes. Fill jars loosely with hot peas and add cooking liquid, leaving 1 inch headspace. Remove air bubbles. Wipe jar rims. Adjust lids. | 40 | 40 |
| Peppers (hot or sweet, including chilies, jalapeño, pimento) | Select firm yellow, green or red peppers. Wash and drain. Caution: Wear plastic gloves while handling hot peppers, or wash hands thoroughly with soap and water before touching face. Small peppers may be left whole. Large peppers may be quartered. Remove cores and seeds. | Hot pack only: Slash 2 or 4 slits in each pepper. Blanch in boiling water or blister skins by placing peppers in hot oven (400°F) or broiler for 6 to 8 minutes. Place blistered peppers in pan and cover with damp cloth. Let cool several minutes, then peel. Flatten whole peppers. Fill jars loosely with peppers and add boiling water, leaving 1 inch headspace. Remove air bubbles. Wipe jar rims. Adjust lids. | 35 | Not recommended |
| Potatoes (white) | Wash and pare. Leave whole if 1 to 2 inches in diameter, or cut into 1⁄2-inch cubes. Dip potatoes into solution of 1⁄2 teaspoon ascorbic acid per quart of water to prevent darkening. Drain. | Hot pack only: Place potatoes in saucepan and cover with boiling water. Boil cut potatoes for 2 minutes; whole for 10 minutes. Drain. Fill jars with hot potatoes and cover with fresh hot water, leaving 1 inch headspace. Remove air bubbles. Wipe jar rims. Adjust lids. | 35 | 40 |
| Pumpkin and Winter Squash (cubed) Do not purée or mash. | Wash, remove seeds and pare. Cut into 1-inch cubes. | Hot pack only: Place in saucepan and cover with boiling water. Boil 2 minutes. Fill jars with cubes and cover with cooking liquid, leaving 1 inch headspace. Remove air bubbles. Wipe jar rims. Adjust lids. | 55 | 90 |
| Sweet Potatoes (pieces or whole) Do not purée or mash. | Choose small- to medium- sized potatoes. Wash well. | Hot pack only: Boil or steam until partially soft (15 to 20 minutes). Remove skins. Cut medium potatoes, if needed, to make pieces uniform in size. Fill jars and cover with fresh boiling water or boiling syrup (1 cup sugar and 43⁄4 cup water for light syrup), leaving 1 inch headspace. Remove air bubbles. Wipe jar rims. Adjust lids. | 65 | 90 |
Revised by Angela Treadaway, Regional Extension Agent, Food Safety and Quality, Auburn University. Written by Evelyn F. Crayton, former Extension Foods and Nutrition Specialist.
Reviewed June 2025, Wise Methods of Canning Vegetables, HE-0019