Farming
Having enough water flowing into your poultry house is important to meet both the needs of your birds and those of the evaporative cooling system. Measuring the water flow rate will verify that you have enough water capacity and will also identify issues that might arise from closed valves, dirty filters, and clogged pipes.
Having enough water flowing into your poultry house is important to meet both the needs of your birds and those of the evaporative cooling system. Measuring the water flow rate will verify that you have enough water capacity and will also identify issues that might arise from closed valves, dirty filters, and clogged pipes. This publication outlines the steps for properly measuring water flow rate on your farm using either the bucket test method or a water flow meter.
Steps to Measure Water Flow Rate Using Bucket Test
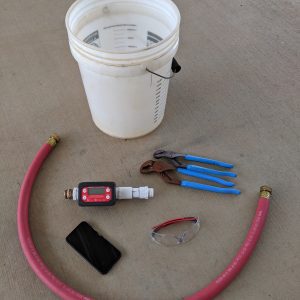
1. Gather the following tools as shown in figure 1:
- Personal protective equipment (PPE), including safety glasses
- A clean 5-gallon bucket, preferably white or transparent so you can see fill line mark
- A stopwatch, timer, or smartphone to measure bucket fill time
- Pliers (channellock, vice-grip, or equivalent) to help remove hose/valve connections
- A short, large-diameter water hose to reach between the hose bib/valve and the bucket Note: Do not use a hose 25 feet or longer as this will reduce the actual flow rate due to restriction from the hose.
2. Put on your PPE, and ensure that any electrical appliances that could create shock hazards if water is sprayed across the room or drained on the floor are unplugged.
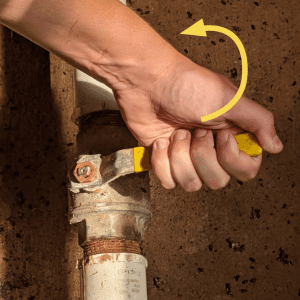
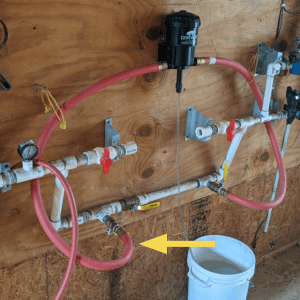
3. Ensure that the main water valve to the house you are evaluating is turned on and is completely open (figure 2).
4. Identify the plastic or painted line fill mark on the 5-gallon bucket (figure 3).
-
- Figure 1. Tools needed to perform a water flow rate test.
-
- Figure 2. Turn main valve on and completely open.
-
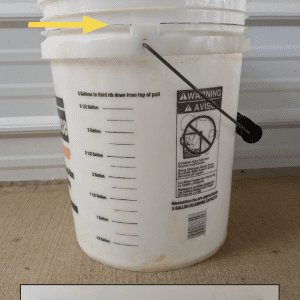
- Figure 3. Yellow arrow shows the 5-gallon mark on this bucket. Beneath is the description of where the mark is located.
If the bucket does not have a fill line, use a measuring pitcher to fill the bucket to 5 gallons, and mark the fill line, using a permanent marker (figure 4). Carefully empty the bucket, dry the inside, and then mark over the fill line a second time to improve its visibility (figure 5). If using a white or transparent bucket, make the first mark on the outside and then mark the inside.
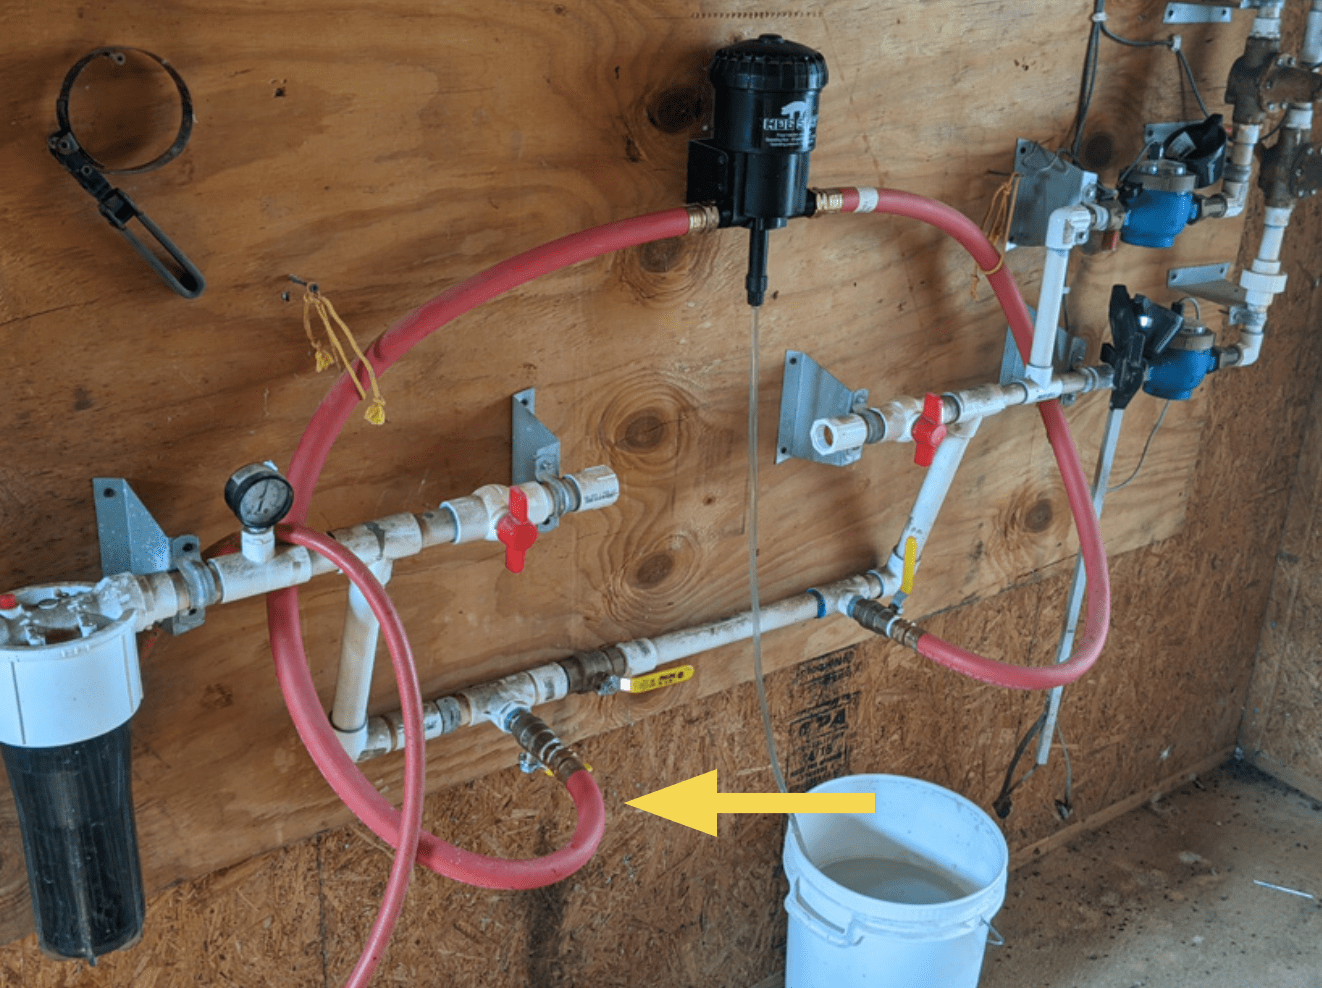
5. Identify the hose bib/valve that you want to test.
For this test, we will be evaluating the flow rate going into a medicator (figure 6).
-
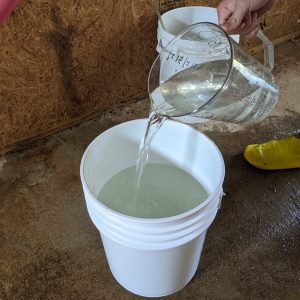
- Figure 4. Using a gallon pitcher to identify where to mark for 5-gallons.
-

- Figure 5. Use the top of the water line to mark the 5-gallon level.
-
- Figure 6. For this demonstration, the flow rate that is being evaluated is going into the medicator through a ball valve emphasized with the yellow arrow.
6. Position the bucket directly below the hose bib/valve being tested, and attach the water hose to the valve to prevent water from spilling and creating electrical safety hazards. Place the other end of the hose into the bucket (figure 7).
WARNING: Do not allow the water test hose to fall out of the bucket and shoot water onto the high voltage (120 to 230V) main electrical disconnects, panels, or other electronic controls or switches inside the control room as this could be a personal safety hazard, could cause loss of power to the flock, or both.
Note: Do not use a hose that has a smaller diameter hose than the water line you are testing as this may restrict the flow rate and affect your reading (figure 8). Do not use a residential black washer hose or green garden hose jumper as they have a smaller inside diameter (ID). Certain hose bibs or faucets also restrict water flow regardless of nominal fitting size. See Extension publication ANR-2721, “Do Your Valves and Hose Bibs Restrict Water Capacity?” for details.
-
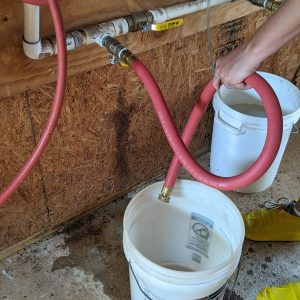
- Figure 7. Use a short water hose to ensure all the water is flowing into the 5-gallon bucket.
-
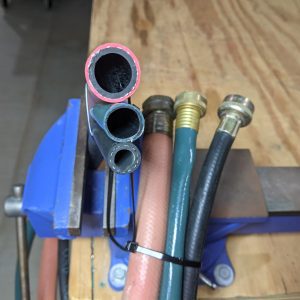
- Figure 8. Medicator hose (11/16-inch ID), garden hose (5/8-inch ID), and residential washer hose (3/8-inch ID) showing the smaller hose diameters that can lead to restricted water flow.
-
- Figure 9. Turning on the water supply and starting the smartphone timer simultaneously.
-
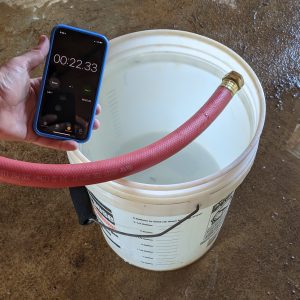
- Figure 10. The smartphone timer shows the time it took to fill the bucket to the 5-gallon mark.
7. Set your smartphone, stopwatch, or timer to record the fill time.
8. Have someone securely hold the hose in the bucket so it does not fall out during the flow test.
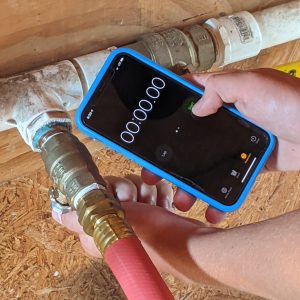
9. When ready, simultaneously open the hose bib or valve and start timing (figure 9).
10. When the water reaches the 5-gallon mark, first stop the timer, and then shut off the water supply (figure 10).
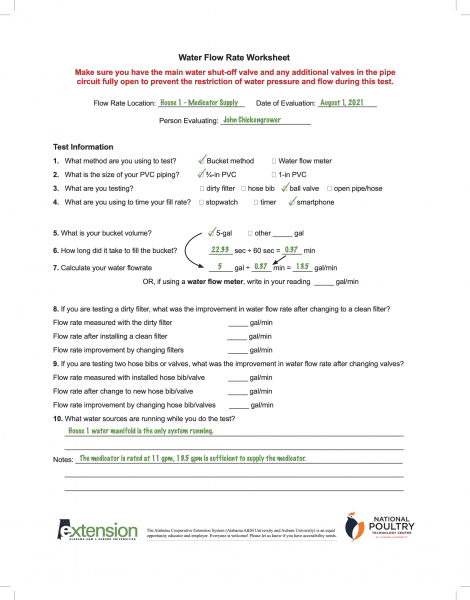
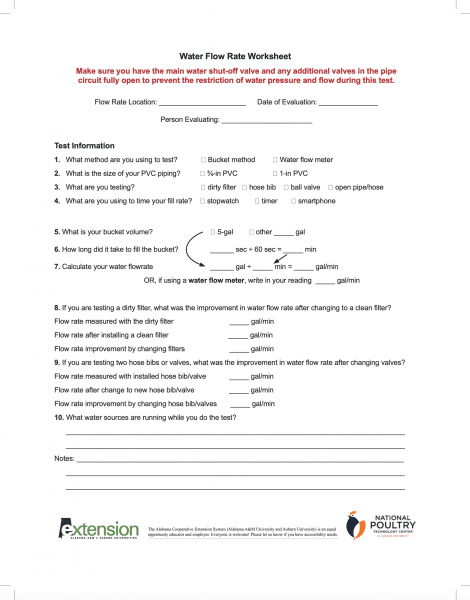
11. Using the Water Flow Rate Worksheet at the end of this publication, record the time it took to fill your 5-gallon bucket in question 6.
For this demonstration, it took 22.33 seconds to fill the 5-gallon bucket.
12. Convert the fill time from seconds to minutes by dividing by 60 seconds, and then write the answer in question 6 on the worksheet.
22.33 seconds ÷ 60 seconds = 0.37 minutes
13. Divide the volume of your bucket by the time it took to fill it to determine the flow rate, and record the answer in question 7 on the worksheet.
5 gallons ÷ 0.37 minutes = a flow rate of 13.5 gpm
Note: Consult your company for recommended flow rates for birds and equipment manufacturers for required flow rates for evaporative cooling systems.
14. Record all water sources that were running while you were performing this test in question 10 of the worksheet.
Note: The water flow rate will be highest when no other water systems are running from the same water supply system and will decrease as more systems demand water.
To measure the expected water flow rates during a flock, conduct the test when the water system is at its maximum and all water demands are running at full capacity. An example of a good time would be a day when the temperature is 95 degrees, large birds are drinking, and all of the evaporative cooling systems are running.
To evaluate how much flow you are losing to a dirty filter or a hose bib, measure the water flow rate before and after changing a dirty filter (question 8) or changing a hose bibb (question 9) to document any improvement.
Steps to Measure Water Flow Rate Using Water Flow Meter
1. Put on your PPE, and ensure that any electrical appliances that could create shock hazards if water is sprayed across the room or drained on the floor are unplugged.
2. Select a water flow meter that can be used with a garden hose fitting, ensuring that the maximum rated flow of the water meter is higher than the flow you expect from your system.
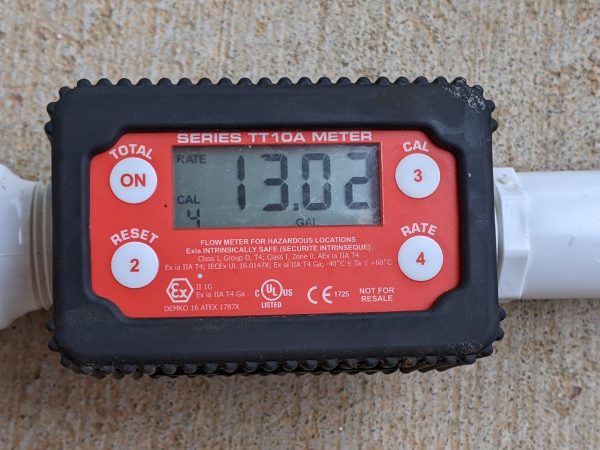
Figure 11. Fill-Rite TT10A series meter displaying the water flow rate at 13.02 gpm.
Note: The Fill-Rite TT10A flow meter (figure 11) used in this demonstration accurately measures water flow rates from 2 to 35 gpm. The meter costs approximately $160 and has 1-inch threaded fittings that can be reduced to 5/8-inch garden hose fittings. This meter will record both water flow rate (gpm) and total water (gallons).
3. Securely connect your meter to the valve or water hose you are testing.
Note: It may be helpful to have a second short hose to install on the meter outlet to get the water out of the control room.
4. Turn on your meter to ensure it is working, and replace batteries if needed.
5. Turn on the water, and allow the meter reading to stabilize, which may take a few seconds.
6. Record the flow rate (gpm) in question 7 of the Water Flow Rate Worksheet at the end of this publication.
Note: Consult your company for recommended flow rates for birds and equipment manufacturers for required flow rates for evaporative cooling systems.
7. Record all water sources that were running while you were performing this test in question 10 of the worksheet.
Note: The water flow rate will be highest when no other water systems are running and will decrease as more systems demand water.
To evaluate how much flow you are losing to a dirty filter or a hose bib, measure the water flow rate before and after changing a dirty filter (question 8) or changing a hose bibb (question 9) to document any improvement.
![]()
 Drew Johnson, National Poultry Technology Center (NPTC) Undergraduate Research and Extension Intern, Jeremiah Davis, Extension Specialist, Associate Professor, Director, NPTC, Jesse Campbell, Extension Specialist, Assistant Extension Professor, NPTC, Joseph Purswell, Research Leader, USDA ARS Poultry Research Unit, Kelly Griggs, Research Engineer, NPTC, Cody Smith, Research Engineer, NPTC, Martha Sabine Rueda Lastres, Graduate Research Assistant, NPTC, and Carson Edge, Graduate Research Assistant, NPTC
The authors would like to thank fellow students Baylor Arnold, Amanda Burgett, Abigail Lane, Juliana Rezek, and Leah Smith for their assistance in this effort as part of the 2021 NPTC Research and Extension Experience for Undergraduates (NPTC REEU) Program.
New September 2021, NPTC Tools of the Trade: Measuring Water Flow Rate, ANR-2827