Farming
Learn the necessary steps to properly test, identify, and mark gas leaks on your gas piping system.
Poultry farms have hundreds of feet of rigid gas lines and connections. Gas leaks can occur during installation due to issues in craftsmanship and over time through expansion and contraction as the system ages. It is important to check for leaks after the house has been constructed and to monitor the lines periodically. Identifying leaks and gauging severity is vital to prevent catastrophic fire loss, ensure farmer and animal safety, and reduce costs over time.
Getting Started
It is recommended that you test for gas leaks with the help of someone who can carry a ladder if necessary, spot potential tripping hazards, locate pipe fittings, and document leaks. Since the tester will be required to walk along the exterior of the house while looking up at the gas lines, grass should be trimmed to ensure that all tripping hazards are visible.
If you suspect or identify major gas leaks on the propane tank or natural gas fittings on the gas company side of the meter, contact your gas supplier immediately. DO NOT attempt to correct leaks on the supply (gas company) side of the system. DO NOT attempt to repair gas plumbing leaks unless you are trained and qualified to do so.
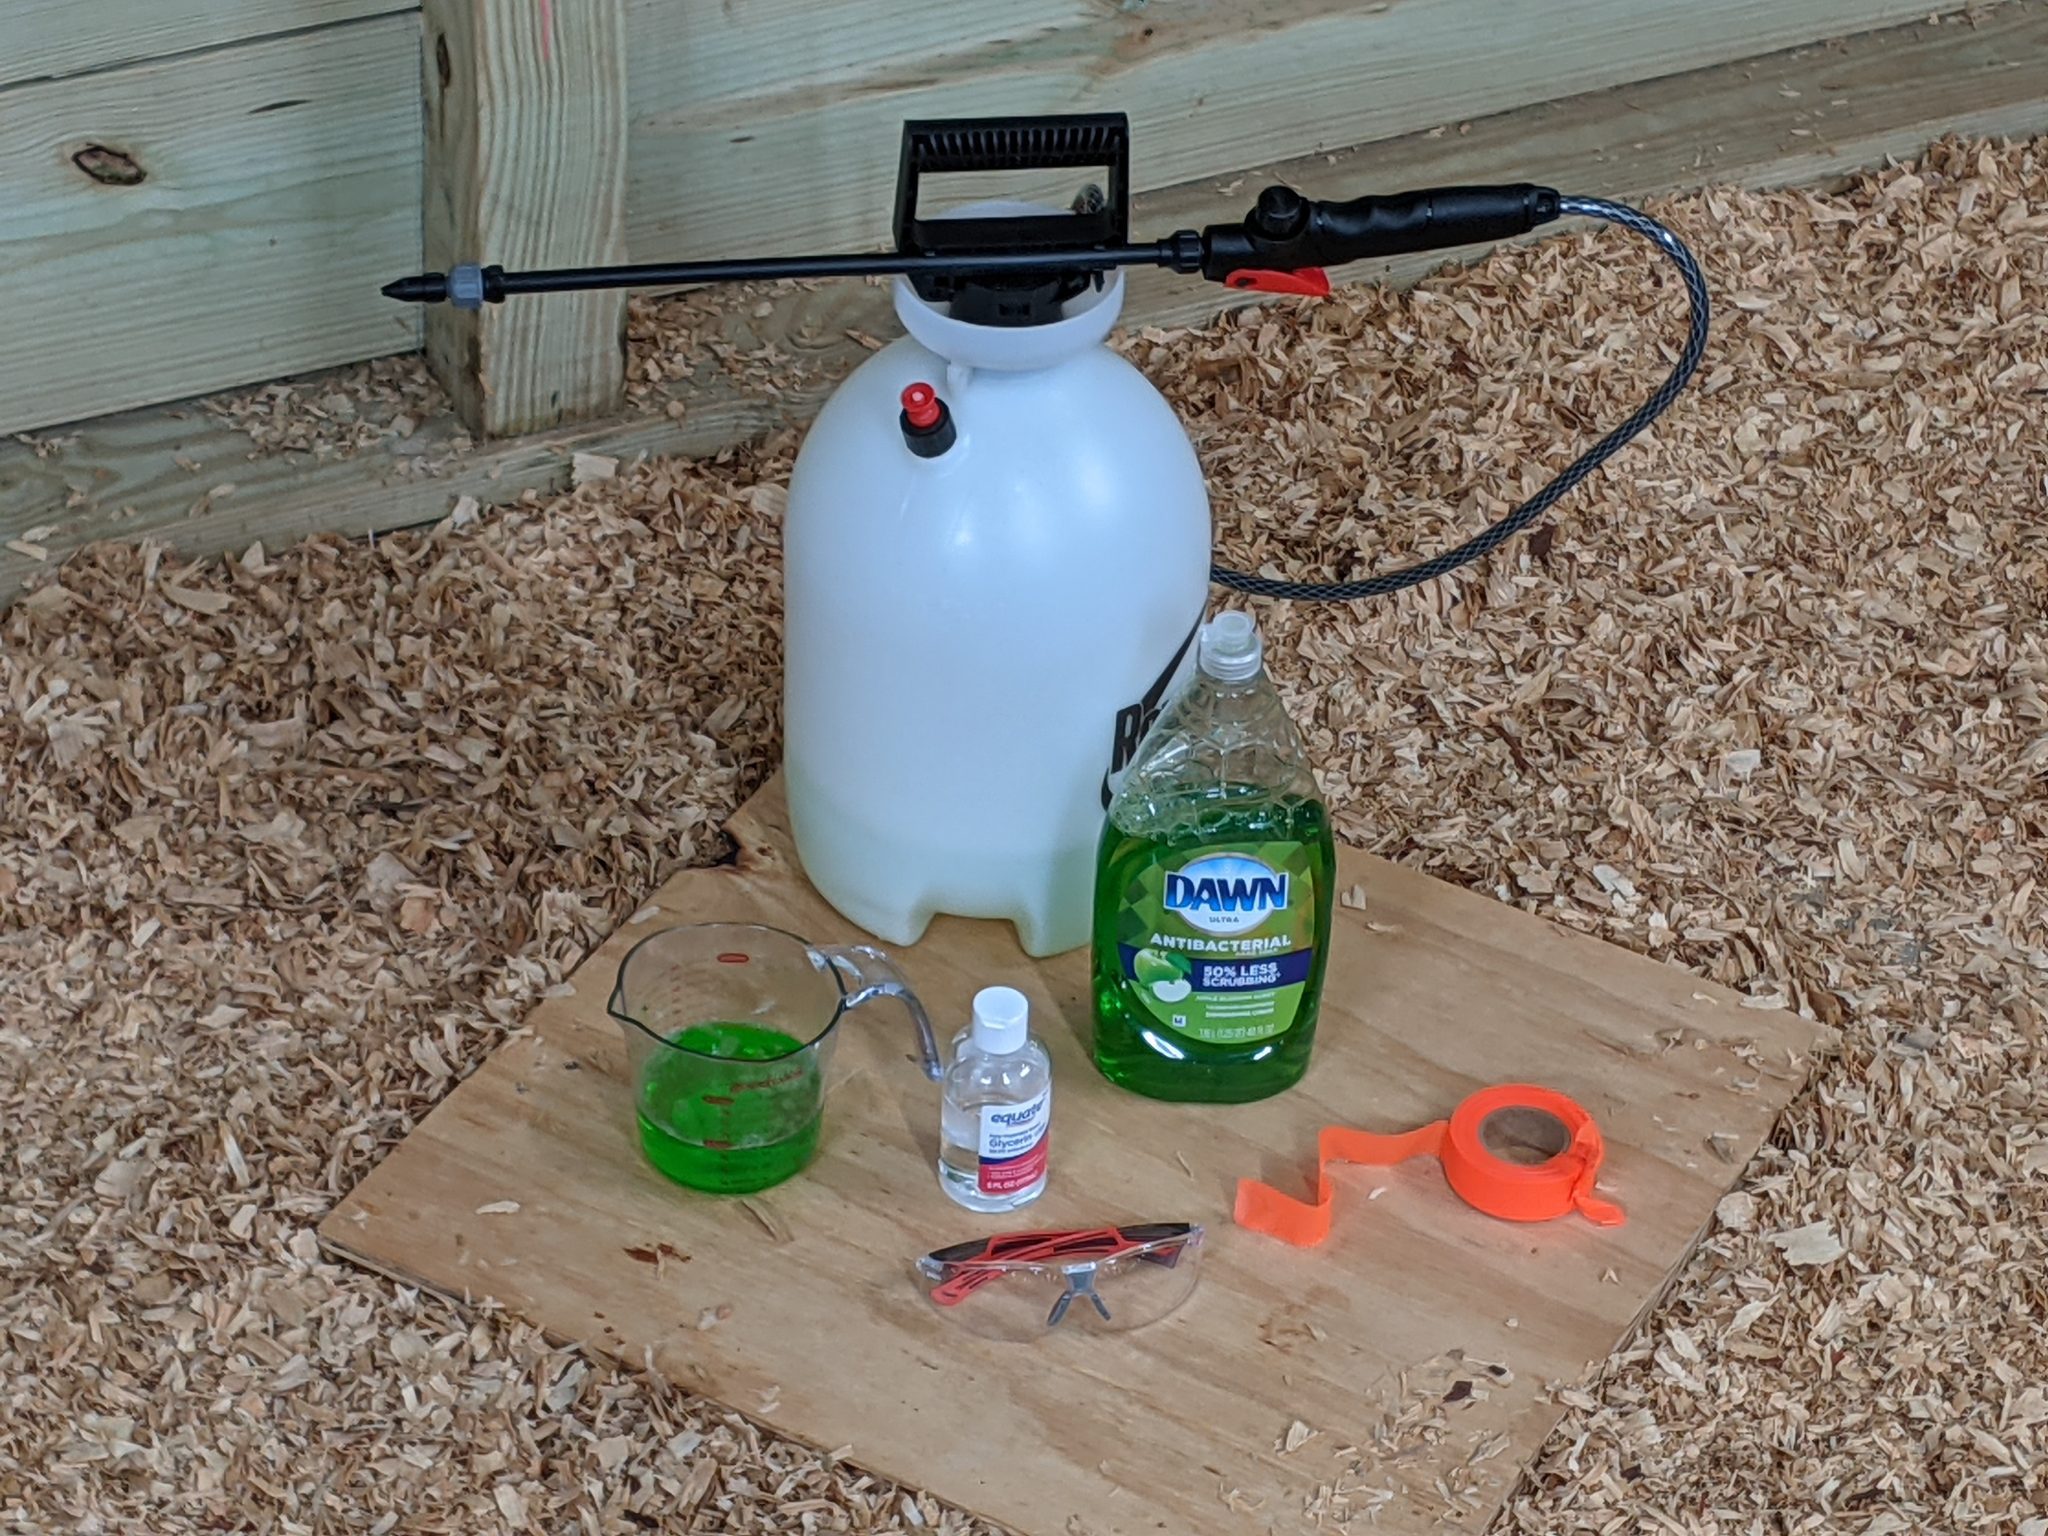
Before you begin identifying gas leaks, gather the necessary tools (figure 1):
- Hand-pump sprayer (1 to 2 gallons) to efficiently spray the soap solution
- Measuring cup to measure liquid soap and glycerin
- Liquid dish soap to develop bubble solution
- Glycerin (optional) to help keep soap bubbles from popping in the wind
- Water to dilute soap/glycerin mixture
- Flagging tape (marking tape) to mark each leak when it is found
- Safety glasses to prevent soap mixture from getting in eyes
- Ladder to reach the trunk line to inspect leaks and mark with flagging tape
-
- Figure 1. Tools and supplies to perform a gas leak test: hand-pump sprayer, liquid soap, glycerin (optional), water, flagging or marking tape, safety glasses, and a ladder if needed.
-
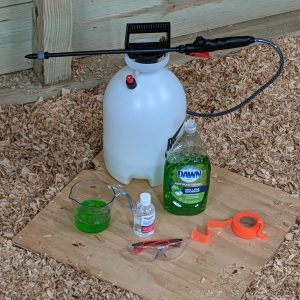
- Figure 2. Measure 3⁄4 cup liquid dish soap (left) in a measuring cup for each gallon of water. You can also add 1⁄4 cup glycerin (right) per gallon of water to improve bubble stability
-
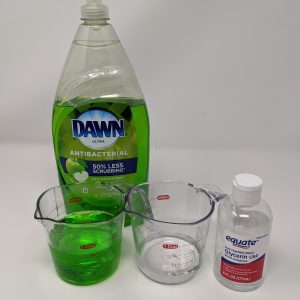
- Figure 3. Once the solution has been mixed, pump the sprayer handle to create pressure.
Mixing Bubble Solution in a Hand-Pump Sprayer
1. Purchase a hand-pump sprayer that is 1 to 2 gallons in volume. If using a hand sprayer from the farm, make sure it has been thoroughly washed before using. This prevents potential equipment damage from corrosion or grass damage from residual chemicals.
2. Measure 3⁄4 cup of liquid dish soap for every gallon of water used in the hand sprayer, and pour it in the sprayer (figure 2). Dawn dish soap creates good bubble creation. You are trying to achieve a thick spray that will not drip off the fitting too fast. Add
1⁄4 cup glycerin per gallon of water to improve bubble stability against wind.
3. Screw the cap on the hand sprayer and shake well to mix the solution. Pump the sprayer handle to create pressure in the sprayer (figure 3).
Checking for Gas Leaks on the High-Pressure Side (Trunk Line)
Be cautious when checking for gas leaks. Insects such as wasps and spiders like to dwell in these areas (figure 4). If you are allergic to any insect, have someone else carry out this task.
1. Turn off the circuit breaker to your heaters before starting this test. You do not want the brooders to turn on while stowed near the ceiling; this could be a potential fire hazard.
2. Turn on the gas at the propane tank (figure 5a) or at the natural gas meter (figure 5b). If your farm uses propane tanks, make sure they are at least half full on a cold day before conducting this test. If the tank is low, the pressure could be too
low and the presence and severity of a leak may be misidentified.
3. Beginning at the propane tank or natural gas meter, spray all fittings with the soap solution (figure 6). Depending on the height of the trunk line, a ladder may be needed to get to each fitting. Spray every threaded connection: regulators (figure 7), threaded couplings, threaded 90-degree elbows, threaded caps, etc. (figure 8).
4. When a leak is found, mark the leak with flagging tape (figure 9). If both sides of a coupling leak, mark each side. Marking leaks allows for the severity to be checked and monitored the following year.
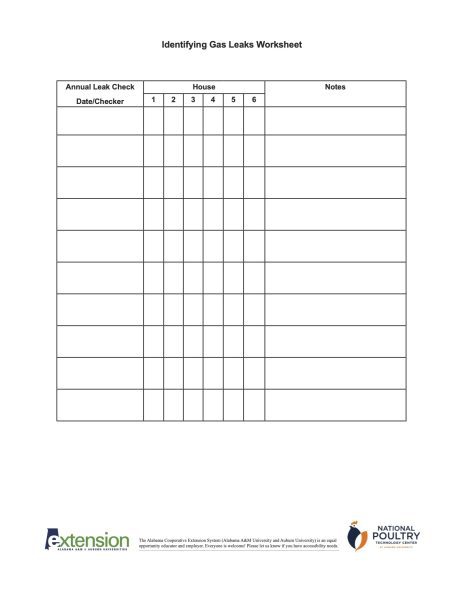
5. If a leak is present, note the location and severity (figure 10) on an identifying gas leaks worksheet (example at end of document). A minor leak results in a small number of bubbles generated over a minute or two. A large leak results in a large number of bubbles generated in less than a minute. A severe leak can be felt, easily heard, or smelled. If a major gas leak is found, turn off the gas line and repair as soon as possible.
6. When finished with these checks, make sure to turn off the gas.
-
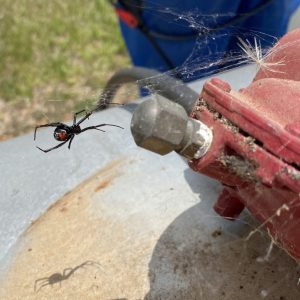
- Figure 4. Black widow spider found under the cover of a propane tank.
-
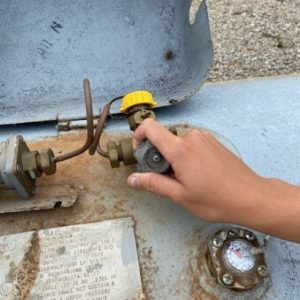
- Figure 5a. Open the shutoff valve on a propane tank with your hand.
-
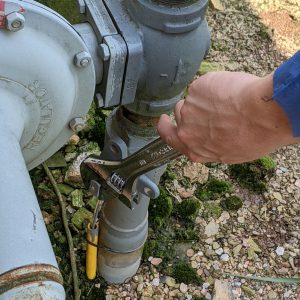
- Figure 5b. Open the shutoff valve entering the natural gas meter with a wrench.
-
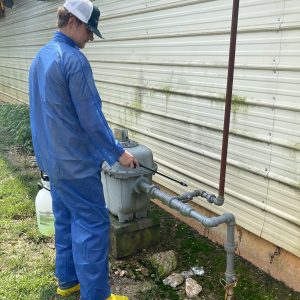
- Figure 6. Using a hand sprayer, begin at the tank or gas meter and spray every threaded fitting on the gas trunk line.
-
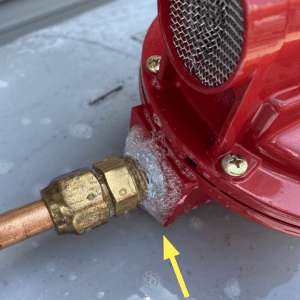
- Figure 7. Check every fitting on all regulators. This shows a leak coming out of the 10 psi regulator leaving the propane tank.
-
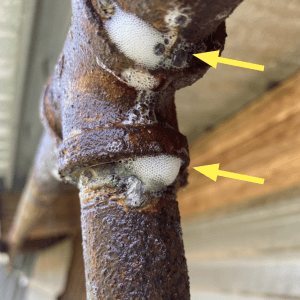
- Figure 8. Check each side of threaded couplings, tees, 90-degree elbows, and caps. The tee in this photo has two small leaks.
-
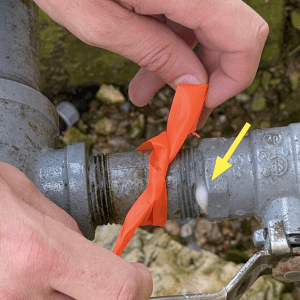
- Figure 9. Mark each leak with flagging tape or equivalent and note it on the worksheet. This brass shutoff valve has a small leak near the natural gas meter.
-
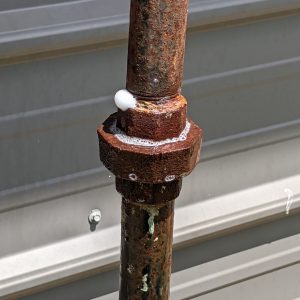
- Figure 10a. Example of a minor leak with a small volume of little bubbles.
-
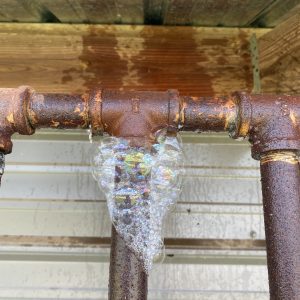
- Figure 10b. Example of a large leak that rapidly generates large bubbles.
Checking for Gas Leaks on Low-Pressure Side (Branches to Heating Zones)
The steps to check for gas leaks on the trunk line can be repeated for the lower-pressure gas line inside the house. The gas pressure within the house will be lower than the trunk line, either 11 inches of water column (considered low pressure for heaters) or 5 psi (considered high pressure for heaters).
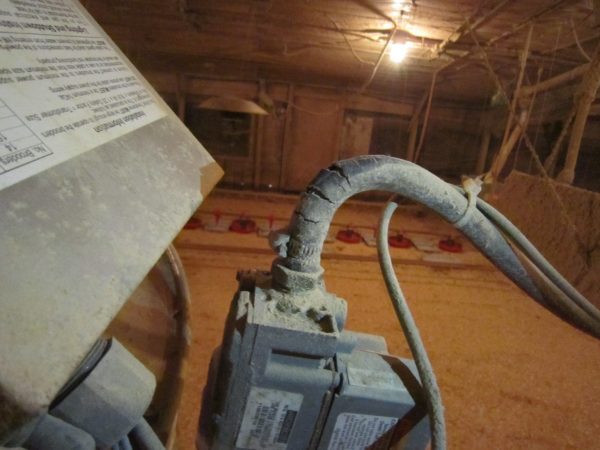
Figure 11. Heater hoses can begin to crack over time, creating a potential gas leak.
Lower pressure will make it more difficult to visually identify gas leaks and require more patience. The threaded fittings are the primary focus on the exterior. Interior gas leaks will be more prevalent on the flexible gas lines and hoses that connect the heaters to the piping. Over time, heater hoses can kink and crack (figure 11), creating leaks at the fittings or at kinked portions of the hose. Interior fittings will need to be thoroughly cleaned prior to testing.
1. Make sure the gas is turned on fully and the heater circuit breaker is turned off before beginning a gas leak check inside the house.
2. Begin the gas check where the gas piping enters the house. Spray all fittings with the soap solution. Depending on the height of the gas line, a ladder may be needed to get to each fitting. Spray every threaded connection: threaded couplings, threaded 90-degree elbows, threaded caps, etc.
3. Spray the connections and hose between the gas piping and heater.
4. When a leak is found, mark the leak with flagging tape.
5. If a leak is present, note the location and severity on an identifying gas leaks worksheet (example form at end of document). A minor leak results in a small number of bubbles generated over a minute or two. A large leak results in a large number of bubbles generated in less than a minute. A severe leak can be felt, easily heard, or smelled. If found, the gas line should be turned off and the leaks repaired as soon as possible.
6. When finished with these checks, make sure to turn off the gas.
Safety Warnings
- Always wear personal protective equipment (PPE).
- Do not check for gas leaks with an open flame!
- Do not smoke or have open flames when performing these activities.
- Remember that working in or around the farm may present dangers such as trip hazards, insects, snakes, sun exposure, and heat exhaustion.

![]()
 Baylor Arnold, Undergraduate Research and Extension Intern, Jeremiah Davis, Extension Specialist, Associate Professor, Director, Jesse Campbell, Assistant Extension Professor, Kelly Griggs, Research Engineer, Cody Smith, Research Engineer, Martha Sabine Rueda Lastres, Graduate Research Assistant, Carson Edge, Graduate Research Assistant, all NPTC, and Joseph Purswell, Research Leader, USDA ARS Poultry Research Unit.
The authors would like to thank fellow students Amanda Burgett, Drew Johnson, Abigail Lane, Juliana Rezek, and Leah Smith, all students in the 2021 NPTC Research and Extension Experience for Undergraduates (NPTC REEU) Program.
New December 2021, NPTC Tools of the Trade: Identifying Gas Leaks, ANR-2835