Farming
Learn the necessary steps to properly check fan pulley alignment on ventilation fans.
Many tasks are associated with keeping poultry exhaust fans in top performing order during hot weather and extended hours of fan operation. Among these are replacing worn belts, servicing tensioners, checking pulleys for wear, and cleaning shutters. Just as important is checking for pulley alignment.
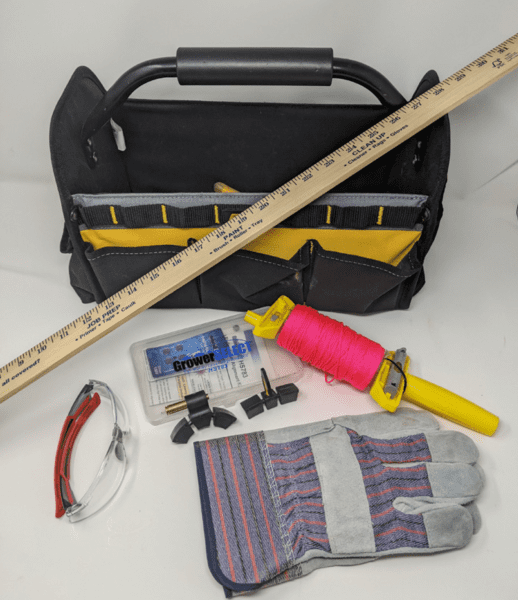
Figure 1. Tools to check fan pulley alignment: nylon construction string, yardstick, laser alignment tool, gloves, safety glasses, and hand tools.
Pulley misalignment results in premature belt failure, lower fan rpms, and reduced fan performance. Lower fan rpms and reduction in fan performance results in a list of problems:
- Less moisture removal during minimum ventilation, causing wet litter, poor air quality, and increased bird condemnations.
- Reduced heat removal and temperature control during transitional ventilation that forces additional fans to operate to control temperature.
- Lower tunnel wind speed capacity during tunnel ventilation.
- Reduction in bird heat removal and higher mortality rates in hot weather.
- Increased electrical rates while yielding less marketable pounds of bird product.
Time spent on this preventative maintenance task can save you considerable time and money in the long run.
Before you begin checking fan pulley alignment, you need to gather a few tools (figure 1):
- Nylon construction string or equivalent to test pulley alignment
- Yardstick or something with equivalent straight edge to test pulley alignment
- Laser alignment tool to test pulley alignment
- Soft chock, such as a towel, leather glove, or equivalent, for fan blade
- Hand tools, such as a socket set, Allen wrench set, jaws gear puller, hammer, and spray lubricant (penetrating catalyst), to remove/adjust pulleys
- Personal protective equipment such as safety glasses
Frequency of Pulley Alignment Checks
Fan pulley alignment should be checked at least once per year in spring for tunnel fans and anytime you notice a specific fan belt wearing more than others on the farm in the same ventilation sequence. During minimum ventilation, min-vent fans cycle 288 times each 24-hour period. This causes belts to wear faster than on tunnel fans.
Pulley alignment must be verified after the fan motor, tensioner, or fan pulley is replaced. Fan belt wear is arguably the most frequent occurrence when misalignment is created by mistake. Next time you replace a fan motor, don’t just eyeball the alignment before tightening the bolts on the motor mounts.
Alignment Methods
There are three methods a producer can use to check for pulley alignment:
- String method
- Yardstick method
- Laser alignment method
Before using any of these methods, you need to turn off the power and verify that the fan you will be inspecting is disconnected (lockout tag out). The best way to ensure that the power is disconnected is to physically unplug the fan. However, there are many instances where fans have a waterproof switch that shuts off the fan. In these cases it may be necessary to shut off the circuit breaker to the motor as well.
String Method
1. Disconnect the power to the fan by unplugging and turning off the circuit breaker.
2. Remove the fan shutter or wire screen on butterfly fans.
3. Remove the fan belt for this check, if you want, but it is not required. It may be necessary to use a towel, leather glove (figure 2) or other soft chock to keep the fan blade from spinning if the fan belt is removed. This is especially true if other fans are on inside the house. Do not bend the fan blades during this process.
4. Cut a piece of bright nylon construction string that is long enough to span the outside edges of the fan and motor pulleys. A 3-foot piece usually will be sufficient. Do not use thicker-diameter rope that is used to hang feed lines; it is harder to stretch and harder to see the misalignment.
5. Stretch the piece of string, holding your hands on the outside edges of the motor and fan pulleys (figure 3). Do this on the side of easiest access and visibility. Some older fans have the motor pulley facing the fan blades.
-
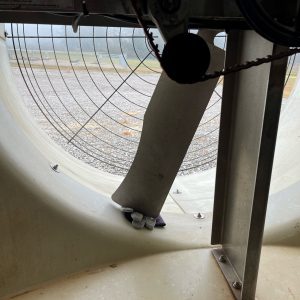
- Figure 2. If you remove the fan belt, make sure to chock the fan with something soft like these leather gloves to prevent the fan from spinning against wind pressure or other running fans.
-
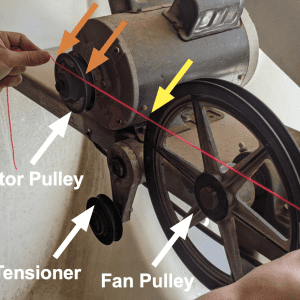
- Figure 3. A 3-foot piece of bright nylon construction string is stretched across the face of both the motor pulley and fan pulley. The fan belt has been removed during this check. You want to have four points of contact (shown by orange arrows for the motor pulley and yellow arrows for the fan pulley). Make sure not to lap over any raised areas near the shaft, this will give a false reading.
6. Make sure the string has two points of contact for each pulley and tensioner. The string in figure 3 shows two points of contact for the motor pulley (orange arrows) and two points of contact for the fan pulley (yellow arrows). These pulleys are in correct alignment.
7. This method works when the motor pulley and fan pulley are the same thickness. Make sure the string is not resting on any raised edges at the center of the pulleys.
8. If you have less than four points of contact (figure 4), this indicates a potential misalignment. The string method shows that the fan pulley is
out of alignment with the motor pulley by 5/8 inch. This would cause significant premature belt wear.
9. The fan motor in figure 4 can only be moved away from the fan pulley to tighten the fan belt. Loosen the set screw holding the fan pulley on
the fan shaft (figure 5). Adjust the fan pulley out away from the fan blades until the string makes the correct four points of contact. Moving the pulley may require application of spray lubricant, a jaws gear puller, and a hammer to move the pulley on the fan shaft.
10. Tighten the fan pulley set screw, replace the fan belt, remove the fan blade chock if used, check the fan for any tools or loose parts, reinstall the shutter, and restore power to the fan to check it for proper operation.
11. Use a fan pulley alignment worksheet, like the example at the end of this document, to annually record the fan number, house number, date of evaluation, and the person evaluating pulley alignment. Keep these worksheets as a record to track alignment issues over time.
-
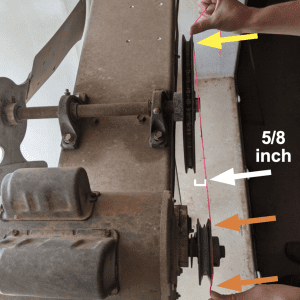
- Figure 4. String method used on a fan where the pulleys are out of alignment (approximately 5/8 inch). The fan motor here can only be moved out away from the fan pulley to tighten the fan belt.
-
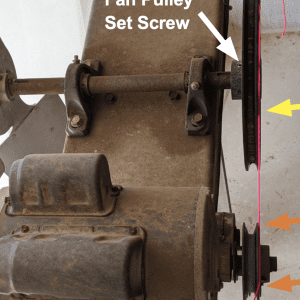
- Figure 5. String method showing four points of contact with pulleys in correct alignment after adjustment. The fan pulley set screw was loosened, and the pulley was adjusted out away from the fan until it properly aligned with the motor pulley.
Yardstick Method
1. Disconnect the power to the fan by unplugging and turning off the circuit breaker.
2. Remove the fan shutter or wire screen on butterfly fans.
3. Remove the fan belt for this check, if you want, but it is not required. It may be necessary to use a towel, leather glove, or other soft chock to keep the fan blade from spinning after the fan belt is removed. This is especially true if other fans are on inside the house. Do not bend the fan blades during this process.
4. Select a yardstick or equivalent piece of material with a straight edge that will fit into the space of the fan and motor pulleys.
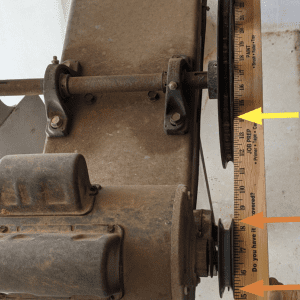
5. Set the narrow edge of the yardstick along the face of the motor and fan pulleys (figure 6). Do this on the side of easiest access. Some older fans have the motor pulley facing the fan blades.
6. Make sure the yardstick has two points of contact for each pulley and tensioner. The yardstick in figure 6 shows two points of contact for the motor pulley (orange arrows) and two points of contact for the fan pulley (yellow arrows). These pulleys are in alignment.
7. This method works when the motor pulley and fan pulley are the same thickness.
Make sure the yardstick is not resting on any raised edges at the center of the pulleys.
8. If you only have two points of contact, this indicates a potential misalignment. Because the yardstick is rigid, it will not bend like the string for three points of contact. The yardstick shows that the fan pulley in figure 7 is out of alignment by 5/8 inch.
9. The fan motor in figure 7 can only be moved away from the fan pulley to tighten the fan belt. Loosen the set screw holding the fan pulley on
the fan shaft. Adjust the fan pulley out away from the fan blades until the yardstick makes the correct four points of contact (figure 8). Moving the pulley may require application of spray lubricant, a jaws gear puller, and a hammer to move the pulley on the fan shaft.
10. Tighten the fan pulley set screw, replace the fan belt, remove the fan blade chock if used, check the fan for any tools or loose parts, reinstall the shutter, and restore power to the fan to check it for proper operation.
11. Use a fan pulley alignment worksheet, like the example at the end of this document, to annually record the fan number, house number, date of evaluation, and the person evaluating pulley alignment. Keep these worksheets as a record to track alignment issues over time.
-

- Figure 6. Hold the yardstick across the face of both the motor and fan pulleys. We have removed the fan belt during this check. You want to have four points of contact (shown by the orange arrows for the motor pulley and yellow arrows for the fan pulley). Make sure not to lap over the raised area near the shaft; this will give a false reading.
-
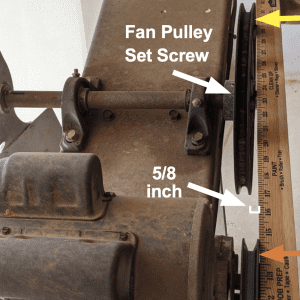
- Figure 7. Yardstick method used on a fan where the pulleys are out of alignment (approximately 5/8 inch).
-
- Figure 8. Yardstick method showing four points of contact and the pulleys in correct alignment after adjustment.
Laser Alignment Method
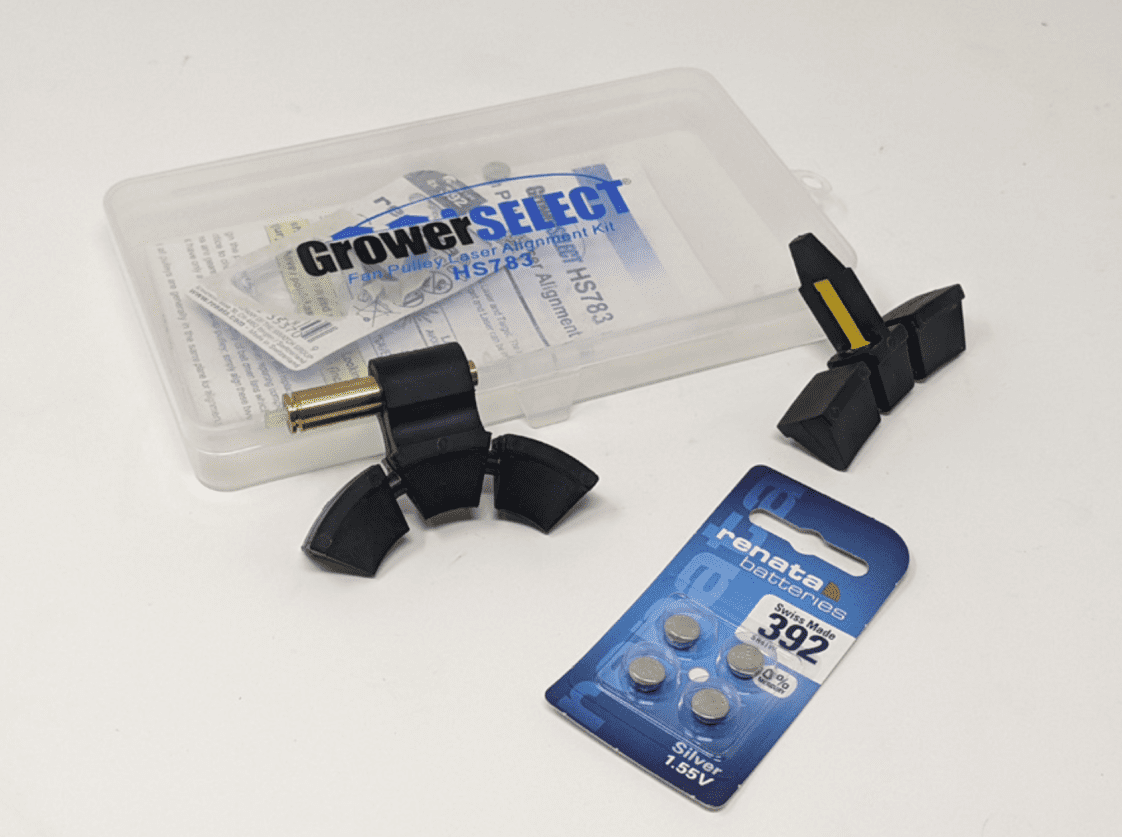
Not all fans are designed so that a yardstick can be used, and sometimes the simple string method is difficult to implement due to motor, frame, and other obstructions. Other tools are available that use a laser to align the pulleys. One of these tools is a laser alignment kit (Grower Select model HS783), which can be purchased for about $20. Equivalent kits vary in price. This unit comes with simple instructions to check the pulleys for alignment.
1. Disconnect the power to the fan by unplugging and turning off the circuit breaker.
2. Remove the fan shutter or wire screen on butterfly fans.
3. You must remove the fan belt from the motor and fan pulleys for this method. It may be necessary to use a towel, leather glove, or other soft chock to keep the fan blade from spinning after the fan belt is removed. This is especially true if other fans are on inside the house. Do not bend the fan blades during this process.
4. Insert three number 392 batteries into the brass laser body of the Grower Select laser alignment kit (figure 9).
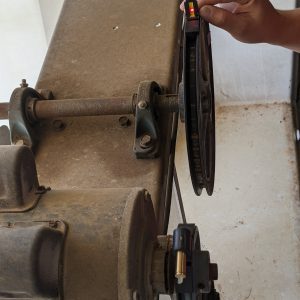
5. Turn on the laser and place the brass laser body on the motor pulley and the target body on the fan pulley (figure 10).
6. Make sure the laser hits within the acceptable yellow band on the target (figure 10). For this fan you can see the laser hitting our thumb approximately 5/8 inch off target.
7. The fan motor in figure 10 can only be moved away from the fan pulley to tighten the fan belt. Loosen the set screw holding the fan pulley on the fan shaft. Adjust the fan pulley out away from the fan blades until the laser hits within the yellow band on the target (figure 11). Moving the pulley may require application of spray lubricant, a jaws gear puller, and a hammer to move the pulley on the fan shaft.
8. Tighten the fan pulley set screw, replace the fan belt, remove the fan blade chock if used, check the fan for any tools or loose parts, reinstall the shutter, and restore power to the fan to check it for proper operation.
9. Use a fan pulley alignment worksheet, like the example at the end of this document, to annually record the fan number, house number, date of evaluation, and the person evaluating pulley alignment. Keep these worksheets as a record to track alignment issues over time.
-

- Figure 9. Laser alignment kit (Grower Select model HS783) including a laser assembly (left), number 392 batteries, and a target assembly (right). Each assembly fits into the v-groove of each pulley.
-
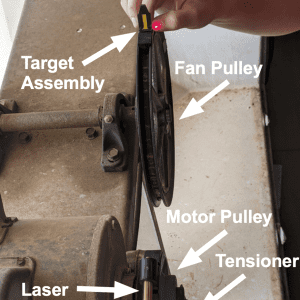
- Figure 10. A laser alignment kit is placed on a tunnel fan to evaluate alignment. The laser body is on the motor pulley and the target body is on the fan pulley.
-
- Figure 11. The laser hitting inside the yellow acceptable strip shows that the pulleys are in correct alignment.
Safety Warnings
- Always wear personal protective equipment (PPE).
- Always disconnect equipment prior to inspection and service. This test requires direct contact with potentially moving fan parts that may be energized without notice unless totally disconnected.
- Always read the manual and follow technical and safety instructions when performing maintenance activities on any fan and its components.


![]()
 Jesse Campbell, Extension Specialist, Assistant Extension Professor, Jeremiah Davis, Extension Specialist, Associate Professor, Director, Kelly Griggs, Research Engineer, Cody Smith, Research Engineer, Martha Sabine Rueda Lastres, Graduate Research Assistant, and Carson Edge, Graduate Research Assistant, all NPTC.
New December 2021, NPTC Tools of the Trade: Fan Pulley Alignment, ANR-2834