Aquaculture

“Aquaculture (and aquaponics) has, perhaps more than any other agriculture or academic content area, the potential for interdisciplinary and collaborative instruction” (Conroy, 1980).
This powerful quote is from an evaluation report following the development of a national aquaculture curriculum. Many teachers would like to incorporate aquaponics or aquaculture into their curricula. Aquaponics incorporates both aquaculture, growing aquatic organisms under controlled conditions, and hydroponics, growing plants without soil, to create a symbiotic environmental system where fish and plants are grown together. These programs add a hands-on element that provides real world application of the principles taught in biology, math, science and several other disciplines (see table 1). For example: students may learn enterprise budgeting, finance, marketing and sales when studying aquaponics as a business. Aquaculture’s relevance in history and its potential to help feed the earth’s ever-growing population link it to various social studies. Teachers who use aquaponic systems in their classrooms find them highly effective in translating academic principles to practical applications. One of the simplest ways to initiate a program of this nature is to bring a small aquaponics system into the classroom.
Table 1. Aquaponics can be utilized to teach these and other subjects.
| Art | Home Economics |
| Biology | Hydraulics |
| Carpentry | Hydroponics |
| Chemistry | Language Arts |
| Computer Technology | Marketing |
| Economics | Masonry |
| Environmental Science | Mechanical Systems |
| Fish Health | Morphology |
| Fish Production | Nutrition |
| Finance | Physics |
| Genetics | Plumbing |
| History | Public Relations |
An aquaponics system may be as simple as a single small aquarium and plant tank or as complex as a multi-unit production system. An aquaponics system suitable for a classroom is simple and inexpensive to build. While the greatest value of the aquaponics system is as a teaching tool, the experience of working with aquaponics can also motivate students to participate and develop new life skills. Aquaponics projects can encourage cooperative learning, bring students of diverse backgrounds together, and link seemingly disparate skills. Some schools sell fish and plants to generate revenue for their programs. Others incorporate the fish and vegetables into their culinary programs. This helps students learn sales, marketing and other entrepreneurial skills. Teachers often report that students become so engrossed in working with the systems they forget they are studying science and math. The students take a great deal of pride in raising fish and they learn responsibility by working with live plants and animals. This publication focuses on the construction of a tabletop aquaponic system. Future publications will detail operation, maintenance, and specific approaches to utilize the system for teaching.
System Components
A simple aquaponics system can be constructed from items available at nearly any home improvement store. Step-by-step instructions for building a system are described and illustrated below. There are many options and variations available, but the system shown here has been classroom tested. Every aquaponics system must include components to hold the fish and plants, remove the solid wastes (mechanical filter), remove the dissolved nitrogenous wastes (biological filter), circulate the water (pump), maintain the temperature and aerate the water if necessary.
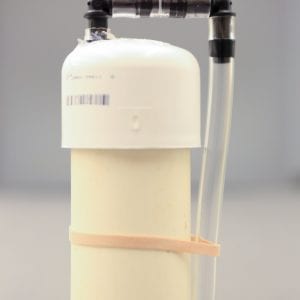
The first component is the fish tank or aquarium where the fish live (1). A small pump lifts water from the bottom of the fish tank to a 1-gallon bucket supported by plywood on the top of a 5-gallon bucket (2). In the 1-gallon bucket, which is the mechanical filter, the water must pass down through several layers of filter material that capture the uneaten feed and solid waste. Once through the filter pads, the water flows through holes in the bottom of a piece of 4-inch pipe and up and over a smaller standpipe in the center of the bucket that leads to the larger 5-gallon bucket. The water is directed to the bottom of the 5-gallon bucket and then overflows (3) into the plant container. Pea gravel or clay balls in the plant tank (4) provide surface area for bacteria to grow that converts the dissolved fish waste (ammonia) first to nitrite, then to nitrate. The nitrate is like fertilizer for the plants. The plants remove the nitrate which cleans the water and acts as a biological filter for the fish. Once the plant tank fills with water it overflows back into the fish tank via the bell siphon (5,6). As you build the system your understanding of the path and process will grow.
Building the Tabletop Aquaponics System
Tools and Supplies
- PVC pipe cutter or hacksaw
- Extension cord
- Goggles or safety glasses
- Electric drill with drill bits
- Hole saw to cut 1 1/4 and 1 3/4 –inch
- Saber saw or jigsaw
- Hand saw
- Ruler or tape measure
- Marker
- Sandpaper
- Gloves
- Silicone adhesive
- Silicone lubricant or soap
Parts List
Pump to 1-gallon bucket assembly
- A small, 40- to 60-gallon per hour fountain pump
- 1 (one) 3- to 6-inch piece of 3/8-inch ID vinyl tubing (to connect pump to barbed fitting)
- 1 (one) 1⁄2-inch threaded male to 3/8-inch barb connector (to connect pump)
- 1 (one) 1⁄2-inch threaded to slip connector
- 1 (one) 18- to 22-inch piece of 1⁄2-inch pipe (length will vary based on base and bucket used)
- 1 (one) 4-inch piece of 1⁄2-inch pipe
- 1 (one) 2-inch piece of 1⁄2-inch pipe
- 2 (two) 1⁄2-inch 90-degree elbows
Filter bucket components
- 1 (one) 15-inch piece of 4-inch pipe (eventually cut into two sections (7 inches + 8 inches), but having a longer length makes it easier to handle during cutting operation)
- 1 (one) 1-gallon bucket
- 2 (two) 1-inch Uniseals
- 1 (one) 5-gallon bucket
- 2 (two) 12-inch pieces of 1-inch pipe
- 1 (one) 90-degree 1-inch elbow
- 1 (one) 14 × 14 inch square of plywood (3/8 inch or 1⁄2 inch)
- Filter media cut to fit (14 inch × 7 inch rectangle)
- 1 (one) rubber band
Plant tank components
- 1 (one) 14 inch × 11.5 inch × 6.5 inch plastic plant grow tray (size will vary depending on aquarium)
- 1 (one) 8-inch piece of 4-inch pipe (second half of the filter bucket piece)
- 1 (one) flat 4-inch pipe cap
- 2 (two) 7-inch pieces of 3⁄4-inch pipe
- 1 (one) 3⁄4-inch Uniseal
- 1 (one) 90-degree 3⁄4-inch elbow
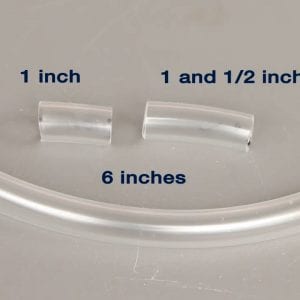
Bell siphon components
- 1 (one) 5-inch piece of 2-inch pipe
- 1 (one) 2-inch pipe cap
- 2 (two) 3/8-inch barb × barb 90-degree elbow
- 1 (one) 6-inch piece of 3/8-inch hose
- 1 (one) 1-inch piece of 3/8-inch hose
- 1 (one) 11⁄2-inch piece of 3/8-inch hose
- 1 (one) rubber band
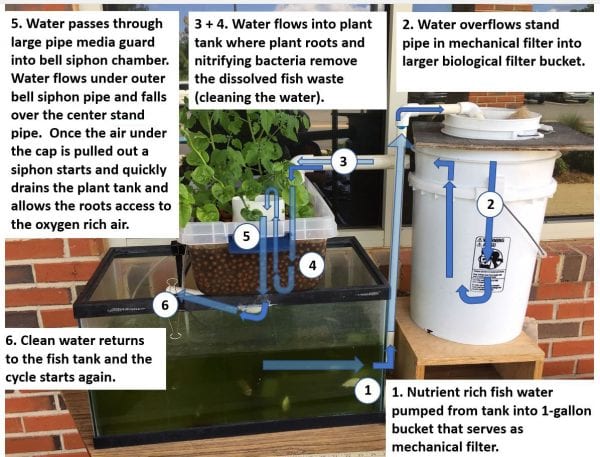
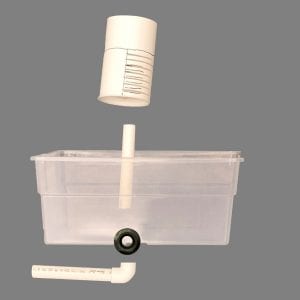
Figure 1. An aquaponics system illustrating the components and showing the path the water follows as it travels through the system.
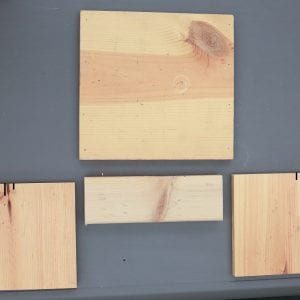
Filter bucket stand**
** This is to place under the 5-gallon bucket. See figure 1. The height of this stand will be determined by the type of 5-gallon bucket used and where the overflow is located on the side of the bucket. These measurements are for use with a standard 5-gallon bucket that is 14 1/2 inches tall.
- 1 (one) 12-inch piece of 1-inch × 12-inch board
- 2 (two) 8-inch pieces of 1-inch × 12-inch board
- 1 (one) 101⁄2-inch piece of 2-inch × 4-inch board
- 10 (ten) 8D finishing nails 11⁄2 inches long
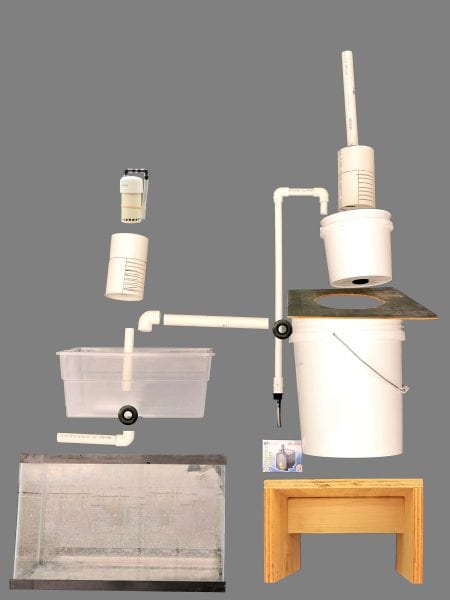
Figure 2. View of the complete system with all of the components.
Putting the System Together
1. Instructions
- Gather and organize necessary tools.
- Gather necessary parts and plumbing supplies (see Parts List).
- Cut the pipes to the specified length using PVC-pipe cutters or hacksaw. Exact lengths are determined by your placement of the tank, filter buckets and grow tray.
2. Getting the water to the filter-fish tank pump and piping (photo 1)
- Choose an aquarium that fits your available space (15 to 20 gallons is suggested).
- Open pump box and insert the 3/8-inch tube over the outlet hole of the pump*. Connect the pump to the 3/8-inch barb x 1⁄2-inch male connector using the 3/8-inch vinyl tubing. (*Pump outlet size may vary, and adjustments may be required to tubing and connector size.)
- Screw the barb fitting into the 1⁄2-inch threaded × slip PVC connector.
- Attach connector to 22 inch piece of 1⁄2-pipe (final length may vary, 16-22 inches, depending on the height of the 5-gallon bucket).
- Connect the vertical pipe and horizontal pipe with the two remaining 1⁄2-inch elbows. The lengths of these pipes will vary depending on the placement of your culture tank and filter assembly.
- Attach the short 2-inch piece of pipe downward to help secure the contact with the 1-gallon bucket filter.
-
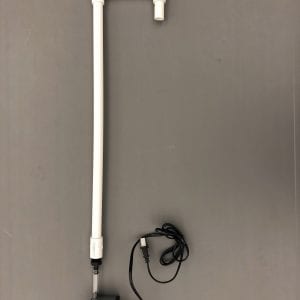
- Photo 1. Culture tank, pump, and 1⁄2-inch PVC water delivery pipe. Your system may vary slightly depending on the pump used.
-
- Photo 2. Components of the filter bucket system. Your components may vary slightly from this system.
3. Preparing filter buckets (photo 2)
- Obtain buckets, preferably new or from a food/ drink processor and rinse them thoroughly. Do not use chemical buckets as there may be residue that could be toxic to the fish and/or humans.
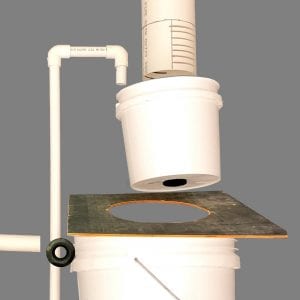
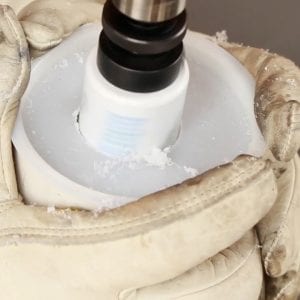
- Solids Filter Support Board. Turn the 1-gallon bucket upside down in the center of the 14 x 14 inch plywood square. Trace a line around the outside edge of the bucket. Using your traced circle as a guide, cut 1⁄4 inch inside the line using your saber saw. Gently remove burrs and smooth lightly with sandpaper. This will ensure that the lower part of your 1-gallon bucket fits snugly inside the hole while allowing it to be supported by the structural ring on the bucket. You can always make the hole larger, but it is difficult to make it smaller. You can paint the plywood later with a nontoxic paint to help preserve the wood.
- Solids Filter. Using a 13⁄4-inch hole saw, cut a hole in the center of the bottom of the 1-gallon bucket. Smooth rough edges with sandpaper to remove burrs and install a 1-inch Uniseal from the inside of the bucket. A Uniseal is similar to a bulkhead fitting but simpler, it allows a pipe to be plumed through a tank wall, or in our case a bucket. They are available online. Lubricate the Uniseal with soap or silicone lubricant and push a 12 inch piece of 1-inch PVC pipe through the Uniseal until the top of the pipe is two inches below the top of the bucket. This piece can be adjusted to control the water level in the 1-gallon bucket.
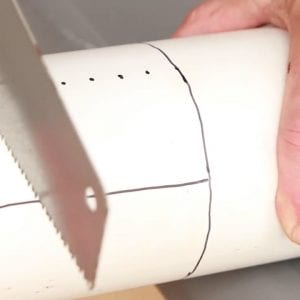
- Solids Filter Standpipe Guard. (photo 3) Start with the 15-inch piece of 4-inch pipe. This pipe is the sleeve that protects and separates the internal standpipe from the filter media. The final length of this sleeve will be 7 inches, but we suggest that you start with a 15-inch-long section so it will be easier to hold when cutting slits in the side. The slits will allow water to pass through the protective sleeve so it can get to the overflow pipe. You will complete this procedure on both ends of the pipe and cut it into two pieces, one 7-inch piece and one 8-inch piece.
-
- Measure 4 inches up from one end of the pipe and draw a line around the pipe.
- Place a straight edge across the widest diameter of the pipe and make a mark on either side.
- Measure 2 inches on either side of the marks in step 2 and draw a line from the bottom of the pipe up to the 4-inch marker. The distance between these two longer marks will help guide the cutting of the slits.
- Starting 1⁄2 inch from the end of the pipe at the initial mark (step 2), place dots every 1⁄2 inch up to the 4-inch line. Repeat this process on the opposite side.
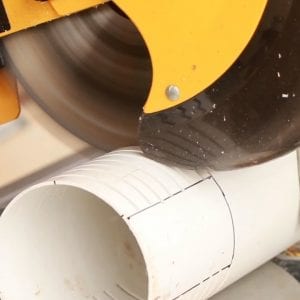
- Place the handsaw on the dot at 1⁄2 inch and start cutting through the pipe. The goal is to cut a slit in the pipe until it reaches the lines that were placed 2 inches from the initial marks (step 3). This creates a slit that travels one-third the way around the pipe (photo 3). A chop saw makes this process much easier (photo 3a).
- Move to the next dot up the pipe and continue this process until you have 8 slits on either side of the pipe.
- After cutting all the slits, repeat steps 1-6 on the other end of the pipe and cut it into two pieces (8 inches and 7 inches). The other end of the pipe will be used in the plant grow bed.
- Cut the filter material into a rectangle 7 inches by 18 inches. Wrap the filter material around the stand pipe guard and secure it with a rubber band (photo 4).
-
- Photo 3. Cutting slits in the stand pipe guard
-
- Photo 3a. Cutting slits with chop saw
-
- Photo 4. Filter material wrapped around stand pipe guard
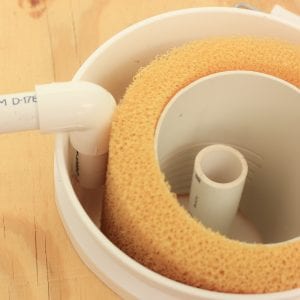
- 5-Gallon Filter Bucket. Using a 1 3/4-inch hole saw, cut one hole in the side of the 5-gallon bucket. Center the hole two and a half inches from the top rim of the bucket. Gently remove burrs and smooth very lightly with sandpaper. Install a 1-inch Uniseal from the inside of the bucket. Installing the Uniseal from the inside of the bucket keeps the support rings on the outside of the bucket from interfering with the seal. Lubricate the inside of the Uniseal and outside of the 12-inch piece of 1-inch pipe and push it through the Uniseal from the inside until there are 1 or 2 inches of pipe inside the bucket. This pipe is the drain from the filter buckets to the grow tray. The length of the pipe will be determined by the distance of the grow tray from the 5-gallon bucket (12 inches is suggested.).
- Once you have determined the length of the drainpipe, install a 1 inch 90-degree elbow on the grow tray end of the pipe to help direct your water flow.
4. Assembling the grow tray (photo 5)
- Find a flat section near the center of the grow tray bottom for the overflow drain. Using a 1 1/4– inch hole saw, cut a hole in the chosen location in the bottom of the tray. Smooth rough edges with sandpaper to remove burrs and install a 3⁄4-inch Uniseal. Lubricate the inside of the Uniseal and one end of the 7-inch long, 3⁄4-inch pipe and insert it about 2 inches through the Uniseal. Support the bottom of the grow tray with your hand to avoid cracking the plastic. This piece can be adjusted to control the water level in the grow tray.
- Retrieve the second half of the standpipe guard created in step 3d and the flat 4-inch pipe cap.
- Carefully hold the 4-inch flat cap and drill a 1 1⁄4 hole in the middle using a hole saw. Attach the cap to the 4-inch pipe on the end with the slits using silicone.
- Slide the standpipe in the grow tray through the hole in the 4-inch pipe cap until it rests on the bottom of the grow tray. Having a cap on the bottom of the guard prevents the plant grow media from getting inside the guard and interfering with the operation of the siphon
-
- Photo 5. Plant tray components
-
- Photo 6. Drilling hole in media guard end cap
-
- Photo 7. Bell siphon component hoses
5. Constructing the bell siphon for the grow tray (photo 7 and photo 7a)
- Cut a 5-inch long piece of 2-inch PVC pipe and smooth the rough edges on both ends. Draw a line 1⁄2 inch from one end of the pipe, then drill a line of 1⁄4-inch holes below the line around the edge of the pipe and smooth the rough edges. Place the holes close together so there will be about 20 holes.
- Halfway between the center and one edge of the 2-inch cap, drill a 1/2-inch hole and insert the 1-inch piece of 3/8-inch clear tubing. Push the 90-degree 3/8-inch barb into the tubing to seal the edges around the hole. Place the 2-inch PVC cap on the opposite end from the holes. You can test the seal by putting your finger over the outlet of the barb connector and placing it in water with air under the cap. If you find that air can escape around the hole, you may need to seal with silicone. Attach the 1 1/2-inch piece of clear tubing to the 90-degree barb. Orient the barb so that it points across the 2-inch cap and place the second 90-degree barb so that it points downward along the side of the cap. Attached the 6 inch piece of clear tubing to the downward facing barb and lay the tubing along the length of the 2-inch PVC pipe. The opening of the tube should be close to the holes in the bottom end of the 2-inch pipe. Use the rubber band to hold the tubing in place. Do not constrict the tubing with the rubber band. This tubing will break the siphon during the draining process. Its placement will control how low the water drains in the plant tray. To see additional details on building the siphon, see this short video at https://youtu.be/5jWv4ajDH_w. Note: the length of the standpipe is 1-inch longer in the video.
-
- Photo 7a. Bell siphon complete
-
- Photo 8. Filter bucket stand components
-
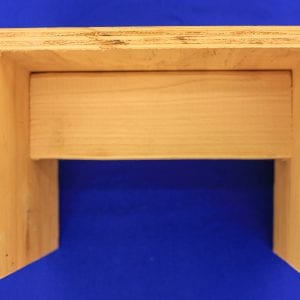
- Photo 8a. Filter bucket stand complete
6. Assembling the Filter Bucket Stand (photos 8 and 8a)
- On a flat surface, lay the 101⁄2-inch 2×4 on edge.
- Place a mark at 4 inches along one cut side of each of the two 8-inch-long side boards and then draw another mark 3⁄4 of an inch on either side of this center mark. This will help align where to place the 2×4 board in the middle of the sides.
- Stand the 8-inch long 1×12-inch side boards on the cut edge and center the 2×4 between the lines. Carefully hammer 2, 8D finishing nails through the side board and into the end of the 2×4. Complete the same process on the other end of the 2×4.
- Stand the side board plus 2×4 combo up with the 2×4 facing the top. Place the 12-inch square piece of 1×12-inch board on top of the stand and square up the edges. Carefully hammer 3, 8D finishing nails through the top into each leg and 2 into the top of the 2×4. The complete filter bucket stand should look like photo 8a.
7. Assembling the components to complete the system (figure 1)
- Arrange the components of the system so that your pump supplies water to the 1-gallon filter bucket, outside of the 4-inch pipe (photo 4). This ensures that the water must pass through the filter material before entering the standpipe to the 5-gallon bucket. Once the water fills the 5-gallon bucket, it will overflow via gravity drain into the grow tray. Place the 5-gallon bucket overflow pipe so that is outside of the 4-inch pipe in the grow tray. The grow tray fills with water and begins to overflow back into the aquarium. Once the air is pulled out of the dome of the 2-inch cap, it will start the siphon and quickly drain the plant grow bed. When the water level reaches the open end of the 3/8-inch hose on the side of the bell siphon, air will flow back into the top of the dome and break the siphon and the process begins anew.
If you would like to see a more thorough description of the assembly, go to the Tabletop Aquaponics video on the Alabama Extension YouTube channel at https://www.youtube.com/user/alcoopextensionvideo.
David Cline, Associate Extension Professor, Aquaculture, Auburn University
Revised September 2021, Building a Tabletop Aquaponics System as a Platform for STEM Education, ANR-2711